


官方公众号企业安全新浪微博

FreeBuf.COM网络安全行业门户,每日发布专业的安全资讯、技术剖析。

FreeBuf+小程序

 ichi9o
- 关注
0
1
2
3
4
5
6
7
8
9
0
1
2
3
4
5
6
7
8
9
0
1
2
3
4
5
6
7
8
9
0
1
2
3
4
5
6
7
8
9
0
1
2
3
4
5
6
7
8
9
0
1
2
3
4
5
6
7
8
9
0x00 准备阶段
Part 1 redis
下载安装好 redis 用于保存 ip
这是 Windows 5.0.14安装版的链接
链接:https://pan.baidu.com/s/1eUTTQ_XIeGjWdvXsZ__Bpg
提取码:ce6d
再附上 Windows 下 redis 的图形化工具
链接:https://pan.baidu.com/s/11f-F_Sw4hqx_5wQ4HgsfJw
提取码:5ufr
最后附上官方下载链接
https://download.redis.io/releases/
redis 的安装很简单,就不多多啰嗦了。
Part 2 proxy_pool
前往GitHub下载 jhao104 师傅的工具 proxy_pool,按照大佬的 README.md 文档做。
安装好 python3 的第三方库
pip install -r requirements.txt
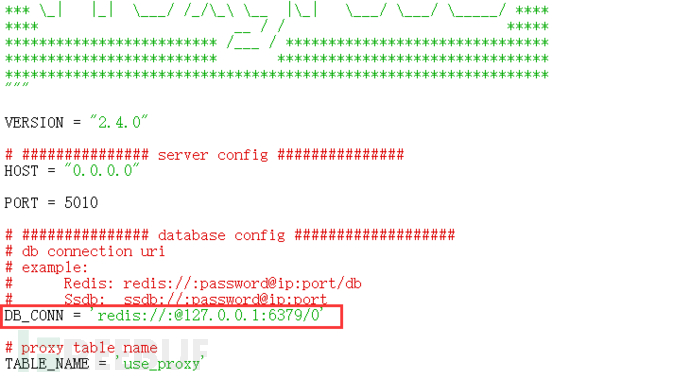
配置 setting.py 文件,主要是 redis 的密码、地址和端口。
Part 3 Proxifier
下载安装 Proxifier 4.01,附上下载地址
链接:https://pan.baidu.com/s/1Yk5rDKvbrR0g_0eI0ta2DA
提取码:z2s7
安装也是很简单,也不多多啰嗦了。
大家也可以下载汉化版的,经过试探 4 版本似乎没有汉化的,这里也附上汉化版的链接。
链接:https://pan.baidu.com/s/16xkS3GNmz0SjBhTaY2W2hg
提取码:5cyx
需要注意的是,如果使用免安装版会报错,原因在于没有安装 Proxifier 的网络模块,当时也在网上查了很多资料,也没解决,最后用安装版的,安装完就能直接用了。
0x01 收集IP
开启 redis 服务,一般来说需要到 redis 安装目录下使用命令行来运行。
redis-server redis.windows-service.conf
运行收集IP的 proxy_Pool 脚本:
python proxyPool.py schedule
等待线程暂停,如下图:

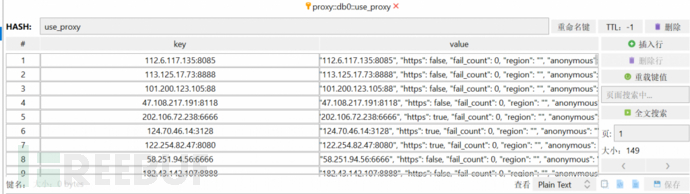
这时就可以看到很多 IP 被保存在 redis 数据库中了,有 http 的,也有 https 的。
0x02 生成 Proxifier 配置文件
版本 4 和版本 3 的文件是有区别的,版本 4 的配置文件能在版本 3 使用,但版本 3 的配置文件就不能在版本 4 使用了。
以下为生成版本 4 配置文件的 Python 3 代码,直接运行即可。
#!/usr/bin/python3
# -*- coding:utf8 -*-

import redis
import json
from xml.etree import ElementTree
import fileinput

def RedisProxyGet():
ConnectString = []
pool = redis.ConnectionPool(host='127.0.0.1', port='6379', db=0, decode_responses=True)
use_proxy = redis.Redis(connection_pool=pool)
key = use_proxy.hkeys('use_proxy')
for temp in key:
try:
ConnectString.append(json.loads(use_proxy.hget('use_proxy',temp)))
except json.JSONDecodeError:
pass
return ConnectString

def xmlOutputs(data):
i = 102
ProxyIDList = []
ProxifierProfile = ElementTree.Element("ProxifierProfile")
ProxifierProfile.set("version", str(i))
ProxifierProfile.set("platform", "Windows")
ProxifierProfile.set("product_id", "0")
ProxifierProfile.set("product_minver", "400")

Options = ElementTree.SubElement(ProxifierProfile, "Options")

Resolve = ElementTree.SubElement(Options, "Resolve")
AutoModeDetection = ElementTree.SubElement(Resolve, "AutoModeDetection")
AutoModeDetection.set("enabled", "true")
ViaProxy = ElementTree.SubElement(Resolve, "ViaProxy")
ViaProxy.set("enabled", "false")
ExclusionList = ElementTree.SubElement(Resolve, "ExclusionList")
ExclusionList.set("OnlyFromListMode", "false")
ExclusionList.text = "%ComputerName%; localhost; *.local"
DnsUdpMode = ElementTree.SubElement(Resolve, "DnsUdpMode")
DnsUdpMode.text = "0"

Encryption = ElementTree.SubElement(Options, "Encryption")
Encryption.set("mode", 'basic')
Encryption = ElementTree.SubElement(Options, "ConnectionLoopDetection")
Encryption.set("enabled", 'true')
Encryption.set("resolve", 'true')
Encryption = ElementTree.SubElement(Options, "ProcessOtherUsers")
Encryption.set("enabled", 'false')
Encryption = ElementTree.SubElement(Options, "ProcessServices")
Encryption.set("enabled", 'false')
Encryption = ElementTree.SubElement(Options, "HandleDirectConnections")
Encryption.set("enabled", 'false')
Encryption = ElementTree.SubElement(Options, "HttpProxiesSupport")
Encryption.set("enabled", 'false')

ProxyList = ElementTree.SubElement(ProxifierProfile, "ProxyList")
i = 99
for temp in data:
if temp['https']:
i += 1
Proxy = ElementTree.SubElement(ProxyList, "Proxy")
Proxy.set("id", str(i))
Proxy.set("type", "HTTPS")
ProxyIDList.append(i)
else:
continue

Options = ElementTree.SubElement(Proxy, "Options")
Options.text = "48"

Port = ElementTree.SubElement(Proxy, "Port")
Port.text = temp['proxy'].split(":", 1)[1]

Address = ElementTree.SubElement(Proxy, "Address")
Address.text = temp['proxy'].split(":", 1)[0]

ChainList = ElementTree.SubElement(ProxifierProfile, "ChainList")

Chain = ElementTree.SubElement(ChainList, "Chain")
Chain.set("id", str(i))
Chain.set("type", "simple")

RedundancyRecheckTime = ElementTree.SubElement(Chain, "RedundancyRecheckTime")
RedundancyRecheckTime.text = "60"
RedundancyRecheck = ElementTree.SubElement(Chain, "RedundancyRecheck")
RedundancyRecheck.text = "true"
RedundancyTryDirect = ElementTree.SubElement(Chain, "RedundancyTryDirect")
RedundancyTryDirect.text = "false"
RedundancyTimeout = ElementTree.SubElement(Chain, "RedundancyTimeout")
RedundancyTimeout.text = "5"

for temp_id in ProxyIDList:
Proxy = ElementTree.SubElement(Chain, "Proxy")
Proxy.set("enabled", "true")
Proxy.text=str(temp_id)

Name = ElementTree.SubElement(Chain, "Name")
Name.text="AgentPool"

RuleList = ElementTree.SubElement(ProxifierProfile, "RuleList")

Rule = ElementTree.SubElement(RuleList, "Rule")
Rule.set("enabled", "true")
Action = ElementTree.SubElement(Rule,"Action")
Targets = ElementTree.SubElement(Rule,"Targets")
Name = ElementTree.SubElement(Rule,"Name")

Action.set("type", "Direct")
Targets.text="127.0.0.1; 192.168.1.*"
Name.text="Proxy"

Rule = ElementTree.SubElement(RuleList, "Rule")
Rule.set("enabled", "true")
Action = ElementTree.SubElement(Rule, "Action")
Name = ElementTree.SubElement(Rule, "Name")

Action.set("type", "Direct")
Name.text = "Default"

tree = ElementTree.ElementTree(ProxifierProfile)
tree.write("ProxifierConf.ppx", encoding="UTF-8")
with open("ProxifierConf.ppx", "r+") as file:
content = file.read()
file.seek(0, 0)
file.write('<?xml version="1.0" encoding="UTF-8" standalone="yes"?>\n' + content)

if __name__ == '__main__':
proxy_data = RedisProxyGet()
xmlOutputs(proxy_data)

print("ProxifierConf.ppx配置文件创建完成....")
由于 http 的代理有时访问不到 https ,因此直接全部使用 https 的
0x03 Proxifier
双击生成的配置文件以打开代理,这里的配置文件默认的代理规则为 “Direct”。
代理服务器配置界面,双击 AgentPool。
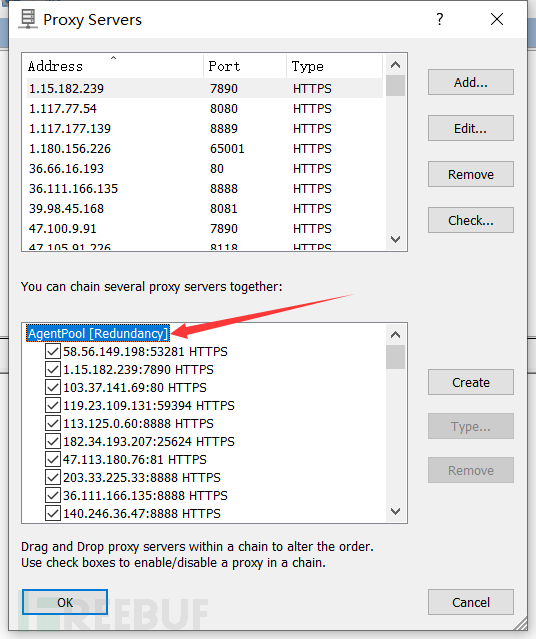
配置自动切换代理;
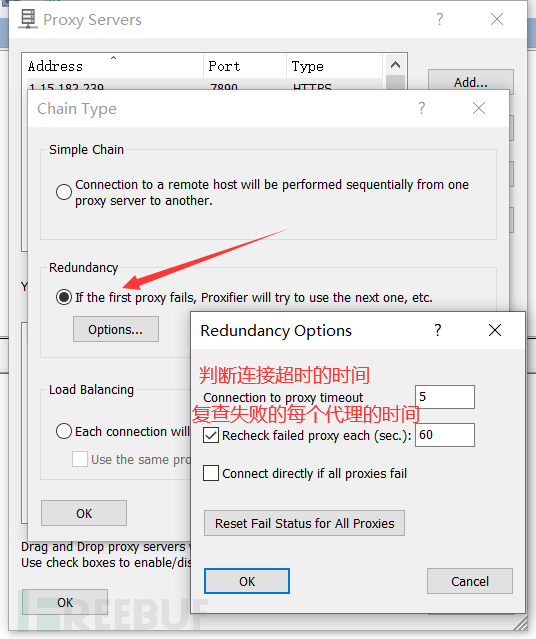
代理规则,Action 选择 Chain AgentPool ,这样就可以自动切换代理了。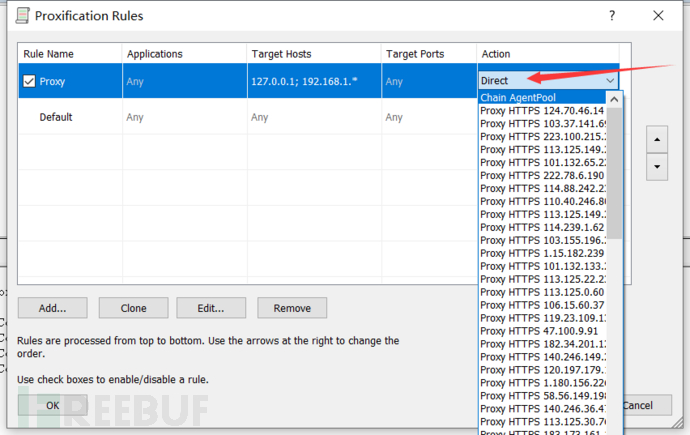
如需授权、对文章有疑问或需删除稿件,请联系 FreeBuf 客服小蜜蜂(微信:freebee1024)
 渗透实战优质工具


- 3 文章数
- 5 关注者