


官方公众号企业安全新浪微博

FreeBuf.COM网络安全行业门户,每日发布专业的安全资讯、技术剖析。

FreeBuf+小程序

 软件安全爱好者
- 关注
0
1
2
3
4
5
6
7
8
9
0
1
2
3
4
5
6
7
8
9
0
1
2
3
4
5
6
7
8
9
0
1
2
3
4
5
6
7
8
9
0
1
2
3
4
5
6
7
8
9
0
1
2
3
4
5
6
7
8
9
0
1
2
3
4
5
6
7
8
9
0
1
2
3
4
5
6
7
8
9
0
1
2
3
4
5
6
7
8
9
 本文由
软件安全爱好者 创作,已纳入「FreeBuf原创奖励计划」,未授权禁止转载
本文由
软件安全爱好者 创作,已纳入「FreeBuf原创奖励计划」,未授权禁止转载
DynamoRIO是一个动态二进制插桩/翻译平台。通过DynamoRIO,可以操控一个程序的运行代码,并可对运行代码的任何地方进行变形和控制。
DynamoRIO用于对程序进行动态分析、优化和翻译。DynamoRIO可运行在Windows和Linux操作系统上,并且支持IA-32和AMD64平台。
著名的模糊测试神器WinAFL使用DynamoRIO进行动态插桩。大家在使用WinAFL进行模糊测试时,通常使用DynamoRIO中提供的工具Dr.run来查看代码覆盖率。
1、实验环境
Windows 7 X64
WinAFL 1.16
DynamoRIO-Windows-6.2.0-2
IDA Pro 6.8(Lighthouse插件v0.6)
Visual C++6.0
注意:关闭360等杀毒软件,部分杀毒软件会误报。
2、验证模糊测试时的偏移量offset
为了测试dr.run,编写如下测试代码,编译环境为Visual C++6.0。
#include <stdio.h>
#include <string.h>
#include <stdlib.h>

#define PASSWORD "1234567"  // 默认密码
int g_execute_count = 0;    // 全局变量,为了记录执行次数

int verify_password (char *password)
{
    printf("input password = %s\n", password);  // for debug
    int authenticated;
    char buffer[8];
    authenticated=strcmp(password,PASSWORD);
    strcpy(buffer,password);                    //over flowed here!
    return authenticated;
}

int main(int argc, char* argv[])
{
    printf("g_execute_count = %d\n", g_execute_count);
    g_execute_count = g_execute_count + 1;
    int valid_flag=0;
    char password[1024];
    FILE * fp;

    if (argc != 2)
    {
        printf("Usage: %s input_file\n", argv[0]);
        return 1;
    }
    // argv[1]为文件名
    if(!(fp=fopen(argv[1],"rw+")))
    {
        printf("open %s fail!\n\n", argv[1]);
        exit(0);
    }
    fscanf(fp,"%s",password);
    valid_flag = verify_password(password);
    if(valid_flag)
    {
        printf("incorrect password!\n\n");
    }
    else
    {
        printf("Congratulation! You have passed the verification!\n\n");
    }
    fclose(fp);
    return 0;
}
然后将上述代码编译为Release模式32位的可执行文件readFile.exe。
在本机实验环境中
WinAFL路径:D:\winAFL\;DynamoRIO的路径:D:\DynamoRIO-Windows-6.2.0-2\。
步骤如下:
(1)首先将编译出的readFile.exe文件和要读取的文件input.txt,复制到D:\winAFL\bin32\下。input.txt中可以输入字符串“ABCDEF”。
(2)使用IDA Pro查看readFile.exe函数的地址,如图1所示,可以看到main函数地址为0x00401080。
 图1 main函数地址
使用IDA Pro查看基址,依次打开菜单Edit->Segment->Rebase program,如图2所示,可以看到基址为0x400000。则main函数偏移量offset = 0x00401080 - 0x400000 = 0x1080。
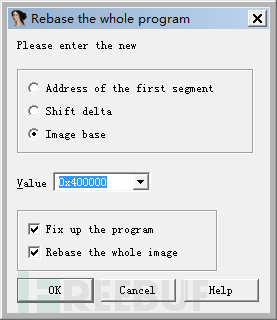 图2 查看基址
(3)然后构造如下所示命令行,其中target_offset为偏移量,fuzz_iterations为执行次数。
注意:target_offset为文件中的偏移量。因为readFile.exe为32位程序,故使用bin32文件夹下的drrun.exe,而不是bin64文件夹下的drrun.exe。
| D:\DynamoRIO-Windows-6.2.0-2\bin32\drrun.exe -c winafl.dll -debug -target_module readFile.exe -target_offset 0x1080 -fuzz_iterations 5-nargs 2-- readFile.exe input.txt |
然后切换到D:\winAFL\bin32\目录下,执行上述命令,执行结果如图3所示。
可以看到readFile.exe被执行了5次。(因为g_execute_count为全局变量,可以记录执行次数)如图可知我们设置的偏移量0x1080是正确的。
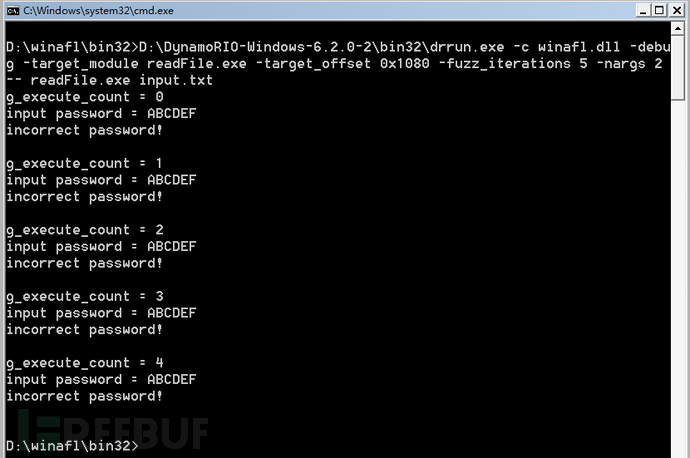 图3 drrun执行截图
(4)D:\winAFL\bin32目录下生成afl.readFile.exe.01016.0000.proc.log类似的log文件。log文件如下所示。
| Module loaded, readFile.exe Module loaded, drx.dll Module loaded, drreg.dll Module loaded, drwrap.dll Module loaded, winafl.dll Module loaded, drmgr.dll Module loaded, dynamorio.dll Module loaded, KERNELBASE.dll Module loaded, KERNEL32.dll Module loaded, ntdll.dll In pre_fuzz_handler In OpenFileA, reading input.txt In OpenFileW, reading input.txt In post_fuzz_handler In pre_fuzz_handler In OpenFileA, reading input.txt In OpenFileW, reading input.txt In post_fuzz_handler In pre_fuzz_handler In OpenFileA, reading input.txt In OpenFileW, reading input.txt In post_fuzz_handler In pre_fuzz_handler In OpenFileA, reading input.txt In OpenFileW, reading input.txt In post_fuzz_handler In pre_fuzz_handler In OpenFileA, reading input.txt In OpenFileW, reading input.txt In post_fuzz_handler Everything appears to be running normally. Coverage map follows: ... |
可以看到很多行开始都是Module loaded,也就是说参数coverage_module和target_module指定的模块必须出现在这里。
如果-target_offset设置不正确,查看log文件中,警告提示如下。
| ... In OpenFileA, reading input.txt In OpenFileW, reading input.txt WARNING: Target function was never called. Incorrect target_offset? Coverage map follows: ... |
3、生成Code coverage文件
切换到D:\DynamoRIO-Windows-6.2.0-2\bin32目录下,执行如下命令。
| D:\DynamoRIO-Windows-6.2.0-2\bin32>drrun.exe -t drcov -- ..\..\winafl\bin32\readFile.exe ..\..\winafl\bin32\input.txt |
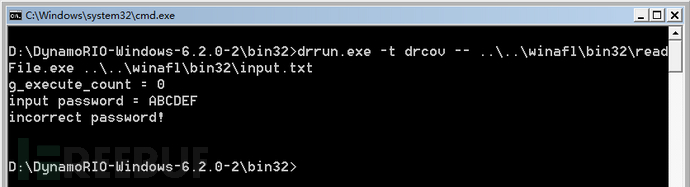 图4 drrun执行截图
在D:\DynamoRIO-Windows-6.2.0-2\bin32目录下,生成drcov.readFile.exe.12800.0000.proc.log类似文件。
使用IDA Pro加载上述代码生成的readFile.exe文件(IDA Pro已经安装Lighthouse插件v0.6),待文件加载完成后。打开IDA Pro菜单File -> Load File -> Code coverage file...加载drcov.readFile.exe.12800.0000.proc.log文件。如图5所示,Lighthouse插件将不同覆盖率的函数着色不同。
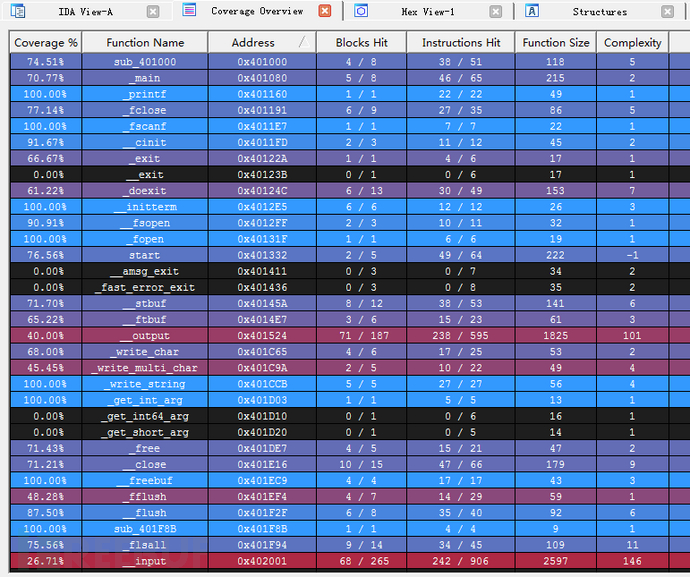 图5 函数视角的代码覆盖率
如图6所示,可以看到某个函数中的基本块是否覆盖到。
 图6 某个函数的基本块覆盖
在模糊测试中,如果要测试的函数覆盖率较高,则可进行下一步操作,既精简输入数据集。
已在FreeBuf发表 5 篇文章
如需授权、对文章有疑问或需删除稿件,请联系 FreeBuf 客服小蜜蜂(微信:freebee1024)
 模糊测试
模糊测试


- 5 文章数
- 3 关注者