 Fstark
- 关注
0
1
2
3
4
5
6
7
8
9
0
1
2
3
4
5
6
7
8
9
0
1
2
3
4
5
6
7
8
9
0
1
2
3
4
5
6
7
8
9
0
1
2
3
4
5
6
7
8
9
0
1
2
3
4
5
6
7
8
9
0
1
2
3
4
5
6
7
8
9
0
1
2
3
4
5
6
7
8
9
0
1
2
3
4
5
6
7
8
9
模糊测试(将可能无效的数据、异常数据或随机数据作为输入内容提供给程序)是在大型软件系统中查找错误的一种非常有效的方式,也是软件开发生命周期的重要组成部分。LibFuzzer 与被测库相关联,并处理在模糊测试会话期间出现的所有输入选择、变更和崩溃报告。LLVM 的排错程序用于协助内存损坏检测以及提供代码覆盖率指标。
本篇文章简述libFuzzer原理,配合各个实例介绍参数功能意义,为最终进一步的完全利用奠定基础
理论篇
libFuzzer是什么?
LibFuzzer在概念上与American Fuzzy Lop(AFL)类似,但它是在单个进程中执行了所有模糊测试。进程内的模糊测试可能更具针对性,由于没有进程反复启动的开销,因此与AFL相比可能更快。
按照官方定义,libFuzzer是一个in-process(进程内的),coverage-guided(以覆盖率为引导的),evolutionary(进化的)的fuzz引擎,是LLVM项目的一部分。据Google官方技术博客的表述,这三个特性可分别解释为如下意义:
**in-process(进程内的)**:*we mean that we don’t launch a new process for every test case, and that we mutate inputs directly in memory.*我们并没有为每一个测试用例都开启一个新进程,而是在一个进程内直接将数据投放在内存中。**coverage-guided(以覆盖率为引导的)**:*we mean that we measure code coverage for every input, and accumulate test cases that increase overall coverage.*我们对每一个输入都进行代码覆盖率的计算,并且不断积累这些测试用例以使代码覆盖率最大化。**evolutionary(进化的)**:fuzz按照类型分为3类,这是最后一种。
第一类是基于生成的
Generation Based通过对目标协议或文件格式建模的方法,从零开始产生测试用例,没有先前的状态;第二类为基于突变的
Evolutionary基于一些规则,从已有的数据样本或存在的状态变异而来;最后一种就是基于进化的
Evolutionary包含了上述两种,同时会根据代码覆盖率的回馈进行变异。
LibFuzzer和要被测试的库链接在一起,通过一个特殊的模糊测试进入点(目标函数),用测试用例feed(喂)要被测试的库。fuzzer会跟踪哪些代码区域已经测试过,然后在输入数据的语料库上产生变异,来最大化代码覆盖。其中代码覆盖的信息由LLVM的SanitizerCoverage插桩提供。
libFuzzer与传统Fuzz相比的特点
传统fuzz面临问题
搜索空间过于广泛
无法fuzz特定的函数
难以fuzz网络协议
常规fuzz速度太慢
传统的fuzz大多通过对已有的样本 按照预先设置好的规则进行变异产生测试用例,然后喂给 目标程序同时监控目标程序的运行状态,这类fuzz有很多,比如:peach,FileFuzz等。找寻漏洞的过程形如下图:

libFuzzer的优势
In-process, in-memory
会主动引导fuzz过程
针对函数/协议级别的fuzz非常有效率
1000x的快
编写基于libfuzzer的fuzzer很容易
可以单独跟随一个单元进行检测
libFuzzer所有的程序的主要功能都是对一些 字节序列进行操作,基于这一个事实(libfuzzer生成 随机的 字节序列 ,扔给 待fuzz的程序,然后检测是否有异常出现) 所以在libfuzzer看来,fuzz的目标 其实就是一个 以 字节序列为输入的 函数。其过程形如下图:

libFuzzer的理论过程
简单理解libfuzzer就是,如果我们要fuzz一个程序,找到一个入口函数,然后利用
extern "C" int LLVMFuzzerTestOneInput(const uint8_t *data, size_t size) {
    .......
    .......
}
接口(hardness),我们可以拿到libfuzzer生成的 测试数据以及测试数据的长度,我们的任务就是把这些生成的测试数据 传入到目标程序中 让程序来处理 测试数据, 同时要尽可能的触发更多的代码逻辑。
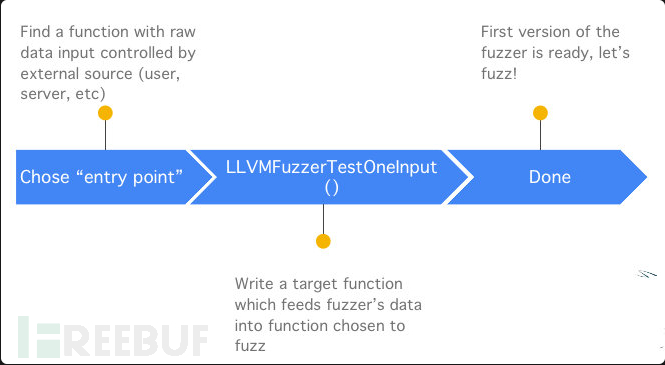
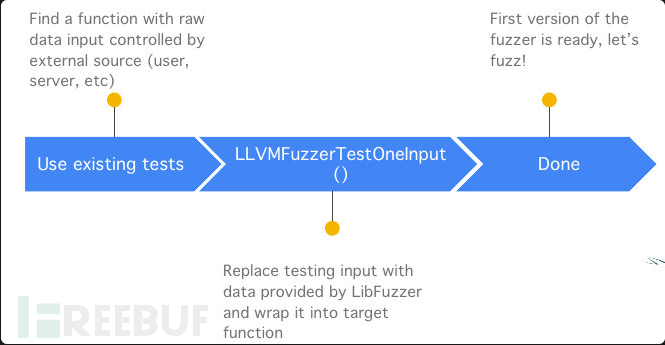
libfuzzer已经把 一个fuzzer的核心(样本生成引擎和异常检测系统) 给做好了, 我们需要做的是根据目标程序的逻辑,把libfuzzer生成的数据,交给目标程序处理,然后在编译时采取合适的Sanitizer用于检测运行时出现的内存错误。
实践篇
实践部分建议学习查阅Google的**libFuzzerTutorial**,内容比较完善跟随不同的案例逐个验证libFuzzer的具体功能,但是因为介绍每个功能采用的案例不同,可能对于新手来说割裂感比较严重,我把共用的部分摘取总结出来把这部分变成一个工具书,理想的是在一个具体案例中能够运用一遍所有的常用功能,这样更加连贯,具体实践放在最后的案例篇。
安装
官方推荐使用Ubuntu16.04 x64安装,其本身是llvm项目的一部分,和clang是亲兄弟,二者项目源码分别可见于https://github.com/llvm/llvm-project/tree/master/compiler-rt/lib/fuzzer和https://github.com/llvm/llvm-project/tree/master/clang,就在同一个仓库里面,现在稍微新的版本的clang都已经内置libFuzzer了,也可以使用llvm官方提供的脚本进行安装。
#!/bin/bash -eux
# Copyright 2016 Google Inc.
#
# Licensed under the Apache License, Version 2.0 (the "License");
# you may not use this file except in compliance with the License.
# You may obtain a copy of the License at
#
#      http://www.apache.org/licenses/LICENSE-2.0
#
# Unless required by applicable law or agreed to in writing, software
# distributed under the License is distributed on an "AS IS" BASIS,
# WITHOUT WARRANTIES OR CONDITIONS OF ANY KIND, either express or implied.
# See the License for the specific language governing permissions and
# limitations under the License.
#
################################################################################

sudo apt-get update
sudo apt-get upgrade -y
sudo apt-get autoremove -y

sudo apt-get install -y libc6-dev binutils libgcc-5-dev

LLVM_DEP_PACKAGES="build-essential make cmake ninja-build git python2.7"
sudo apt-get install -y $LLVM_DEP_PACKAGES

WORK_DIR=$PWD
mkdir -p $WORK_DIR/src

# Checkout
cd $WORK_DIR/src && git clone --depth 1 http://llvm.org/git/llvm.git
cd $WORK_DIR/src/llvm/tools && git clone --depth 1 http://llvm.org/git/clang.git
cd $WORK_DIR/src/llvm/projects && git clone --depth 1 http://llvm.org/git/compiler-rt.git
cd $WORK_DIR/src/llvm/projects && git clone --depth 1 http://llvm.org/git/libcxx.git
cd $WORK_DIR/src/llvm/projects && git clone --depth 1 http://llvm.org/git/libcxxabi.git

# Uncomment if you want *fresh* libFuzzer from checkouted repository.
#rm -r $WORK_DIR/libFuzzer/Fuzzer
#cp -r $WORK_DIR/src/llvm/projects/compiler-rt/lib/fuzzer/ $WORK_DIR/libFuzzer/Fuzzer

# Build & Install
mkdir -p $WORK_DIR/work/llvm
cd $WORK_DIR/work/llvm

# Consider adding of -DCMAKE_INSTALL_PREFIX=%PATH% flag, if you do not want to
# install fresh llvm binaries into standard system paths.
cmake -G "Ninja" \
      -DLIBCXX_ENABLE_SHARED=OFF -DLIBCXX_ENABLE_STATIC_ABI_LIBRARY=ON \
      -DCMAKE_BUILD_TYPE=Release -DLLVM_TARGETS_TO_BUILD="X86" \
      $WORK_DIR/src/llvm
ninja -j$(nproc)
sudo ninja install
rm -rf $WORK_DIR/work/llvm
编写Fussing Target(hardness)
libFuzzer要求实现一个fuzz target作为被测对象的接口,这个入口点用来接收 libFuzzer 生成的 测试用例(比特序列)
官方文档中的代码示例如下:
// fuzz_target.cc
extern "C" int LLVMFuzzerTestOneInput(const uint8_t *Data, size_t Size) {
  DoSomethingInterestingWithMyAPI(Data, Size);
  return 0;  // Non-zero return values are reserved for future use.
}
名称参数返回值类型都不能动,并且注意参数中传来的字节数组Data是通过底层const修饰了的,也就是不允许修改其中数据。
data是libFuzzer生成的 测试数据,size是数据的长度fuzz引擎会在一个进程中进行多次fuzz, 所以其效率非常高要能处理各种各样的输入 (空数据, 大量的 或者 畸形的数据...)
内部不会调用
exit()如果使用多线程的话,在函数末尾要把 线程
join
fuzzer target(即LLVMFuzzerTestOneInput函数)目的是作为被测对象与libFuzzer库之间的一个中转接口,其作用在于接受libFuzzer提供的输入数据Data字节串,(可能还需要进行数据格式转换,)然后传递给实际的被测函数(如上述示例中的DoSomethingInterestingWithMyAPI)。
官方文档中对其有如下要求:
The fuzzing engine will execute the fuzz target many times with different inputs in the same process.
函数会在同一进程中多次执行,即被循环调用。It must tolerate any kind of input (empty, huge, malformed, etc).
必须接受所有格式的输入。It must not exit() on any input.
不允许主动退出,前面说了是循环调用,退出了就没法循环了。It may use threads but ideally all threads should be joined at the end of the function.
可以开线程,但返回之前必须结束它,原因还是那个——循环调用,自己的线程自己关。It must be as deterministic as possible. Non-determinism (e.g. random decisions not based on the input bytes) will make fuzzing inefficient.
其执行必须结果必须是具有确定性的,两次的Data如果一致,则两次执行的结果也必须一致。It must be fast. Try avoiding cubic or greater complexity, logging, or excessive memory consumption.
速度,速度!毕竟模糊测试需要进行大量数据的测试。Ideally, it should not modify any global state (although that’s not strict).
不允许修改全局变量,因为在同一个进程里,修改全局变量会导致下一次运行时读取的是修改后的结果,可能会违反前面说的确定性原则。Usually, the narrower the target the better. E.g. if your target can parse several data formats, split it into several targets, one per format.
尽量窄范围测试,如果测试处理多种数据格式的目标,还是分割成多个子目标为好。这既是处于速度考量,也是出于模糊测试数据变异的效果考量。
编译连接
文档中给出的编译链接命令大致可归纳为:
clang++ -g -O1 -fsanitize=fuzzer,address -fsanitize-coverage=trace-pc-guard \
fuzz_target.cc ../../libFuzzer/Fuzzer/libFuzzer.a \
-o mytarget_fuzzer
-g和-O1是gcc/clang的通用选项,前者保留调试信息,使错误消息更易于阅读;后者指定优化等级为1(保守地少量优化),但这两个选项不是必须的。-fsanitize=fuzzer才是关键,通过这个选项启用libFuzzer,向libFuzzer提供进程中的覆盖率信息,并与libFuzzer运行时链接。除了
fuzzer外,还可以附加其他sanitize(漂白剂)选项也可以加进来,如-fsanitize=fuzzer,address同时启用了地址检查。关于地址漂白剂详细作用可以查看llvm的官方文档AddressSanitizer
常用内存错误检测工具
AddressSanitizer: 检测uaf, 缓冲区溢出,stack-use-after-return,container-overflow等内存访问错误,使用-fsanitize = address
MemorySanitizer(MSAN): 检测未初始化内存的访问,使用-fsanitize = memory。MSAN不能与其他消毒剂结合使用,应单独使用。
UndefinedBehaviorSanitizer(UBSAN): 检测一些其他的漏洞,整数溢出,类型混淆等,检测到C / C ++的各种功能的使用,这些功能已明确列出来导致未定义的行为。使用-fsanitize = undefined,也可以将ASAN和UBSAN合并到一个版本中。
-fsanitize-coverage=trace-pc-guard: 为libfuzzer提供代码覆盖率信息libFuzzer.a: 为libfuzzer项目中执行build.sh编译好生成的libFuzzer.a-o fuzzer:一个 生成 测试用例, 交给目标程序测试,然后检测程序是否出现异常的程序
这一步骤整体过程就是通过clang的-fsanitize=fuzzer选项可以启用libFuzzer,这个选项在编译和链接过程中生效,实现了条件判断语句和分支执行的记录,并且辅以libFuzzer中的库函数,通过生成不同的测试样例然后能够获得代码的覆盖率情况,最终实现所谓的fuzz testing。
对这一过程感兴趣的可以阅读libFuzzer编译链接,博主对比了正常clang编译和使用libFuzzer编译从准备—预处理—编译—汇编—链接全过程的对比,展示了libFuzzer在具体编译过程中的作用。
这一步最终生成的就是这个fuzzer。
开始测试
被测程序在启用libFuzzer并编译链接后,即成为了一个可接受用户参数的命令行程序,直接执行程序便是启动测试。
一般格式:
./your-fuzzer -flag1=val1 -flag2=val2 ... dir1 dir2 ...
flags代表各个控制测试过程的选项参数,可以提供零到任意个,但必须是严格的-flag=value形式
选项前导用单横线,即使选项是一个词而非单个字符
选项必须要提供对应的值,即使只是一个开关选项如
-help,必须要写作-help=1,且选项与值中间只能用等号,不能用空格。
dirs表示语料库目录,它们的内容都会被读取作为初始语料库,但测试过程中生成的新输入只会被保存到第一个目录下。
常用有以下部分参数,全文我将附在博客的最后附件1中.
对于开关选项(如help),效用一列表示当参数启用时(-help=1)的效果
| 选项 | 默认 | 效用 |
|---|---|---|
| verbosity | 1 | 运行时输出详细日志 |
| seed | 0 | 随机种子。如果为0,则自动生成 |
| runs | -1 | 单个测试运行的次数(-1表示无限) |
| max_len | 0 | 测试输入的最大长度。若为0,libFuzzer会自行猜测 |
| minimize_crash | 0 | 如果为1,则最小化提供的崩溃输入。与-runs = N或-max_total_time = N一起使用以限制尝试次数。 |
| reduce_inputs | 1 | 尝试减小输入的大小,同时保留其全部功能集 |
| fork | 0 | 在子过程中发生fuzzing的实验模式 |
| ignore_timeouts | 1 | 在fork模式下忽略超时 |
| ignore_crashes | 0 | 在fork模式下忽略崩溃 |
| ignore_ooms | 1 | 在fork模式下忽略OOM |
| cross_over | 1 | 交叉输入 |
| rss_limit_mb | 2048 | 内存使用限制,以Mb为单位。使用0则禁用限制。 |
| mutate_depth | 5 | 每个输入连续突变的数量 |
| shuffle | 1 | 启动时打乱初始语料库 |
| prefer_small | 1 | 打乱语料库时将小输入置于优先位置 |
| timeout | 1200 | 若为正,表示单元运行最大秒数。超时会被提前中止 |
| error_exitcode | 77 | libFuzzer本身出错时的退出码 |
| timeout_exitcode | 77 | libFuzzer超时退出码 |
| max_total_time | 0 | 若为正,表示整个模糊测试运行最大秒数 |
| dict | 0 | 提供输入关键字的字典 |
| use_counters | 1 | 使用覆盖率计数器生成命中代码块的频率的近似计数;默认为1。 |
| help | 0 | 打印帮助并退出 |
| merge | 0 | 不损失覆盖率前提下,将第2/3/4/…个语料库合并到第一个中去 |
| merge_control_file | 0 | 指定合并进程的控制文件,用于恢复合并状态 |
| jobs | 0 | 运行的作业数量。所有作业的输出会被重定向到fuzz-JOB.log。 |
| workers | 0 | 运行作业的并发进程数。若为0,实验CPU核心数一半 |
| reload | 1 | 每N秒载主语料库,以知悉其他进程发现的单元 |
| only_ascii | 0 | 仅生成ASCII(isprint + isspace)输入 |
| artifact_prefix | 0 | 提供将模糊处理工件(崩溃,超时或缓慢的输入)另存为$(artifact_prefix)file时要使用的前缀。默认为空。 |
| exact_artifact_path | 0 | 如果为空则忽略(默认)。如果为非空,则将失败(崩溃,超时)时的单个工件写为$(exact_artifact_path)。这将覆盖-artifact_prefix,并且不会在文件名中使用校验和。请勿将相同的路径用于多个并行进程。 |
| detect_leaks | 1 | 如果为1(默认值)并且启用了LeakSanitizer,则尝试在模糊测试期间检测内存泄漏(即,不仅在关闭时)。 |
| print_final_stats | 0 | 退出时打印统计信息 |
| print_corpus_stats | 0 | 退出时打印语料库元素统计信息 |
| print_coverage | 0 | 退出时打印覆盖率信息 |
| close_fd_mask | 0 | 为1则在关闭stdout,为2则关闭stderr,为3则关闭二者 |
重运行模式:
./your-fuzzer -flag1=val1 -flag2=val2 ... file1 file2 ...
与上面一样,但是选项后面接的是文件列表而非文件夹列表,这些输入样例将会重新读取并输入运行,不会产生新样例,在回归测试时十分有用。
这里有几个选项功能是值得单独说一下的
(1)Seed corpus 种子语料库
corpus语料库就是给目标程序的各种各样的输入
mkdir MY_CORPUS
./your-fuzzer MY_CORPUS/ seeds/
当基于libFuzzer的模糊器以另一个目录作为参数执行时,它将首先递归地从每个目录中读取文件(在本例中MY_CORPUS/和seeds/都读),并对所有目录执行目标函数。然后,任何触发感兴趣的代码路径的输入将被写回到第一个语料库目录(在本例中为MY_CORPUS)。一般情况下我们将相关文件放在seeds的位置下,MY_CORPUS/目录为空,这样运行后生成的样本就存在MY_CORPUS/中了。
(2)精简语料库样本集
在模糊测试期间,测试语料库可能会增长到很大容量。如果希望最小化语料库,即创建具有相同覆盖率的语料库子集但容量却小很多,这就是一件性价比十分高的事情了。
mkdir corpus1_min
./your-fuzzer -merge=1 corpus1_min corpus1
corpus1_min: 精简后的样本集存放的位置corpus1: 原始样本集存放的位置
(3)并行运行
提高模糊测试效率的另一种方法是使用更多的CPU。如果您使用-jobs=N它运行模糊器,它将产生N个独立的作业,但最多不超过拥有的内核数的一半。用于-workers=M设置允许的并行作业数。
当指定了多个任务时,程序启动时会先产生一个master进程,同时并发启动相应数量个worker进程,master会把jobs分配到workers上去执行,当某个任务结束后,相应进程终止,同时master会启动一个新的任务进程分配到对应的worker上,平均每个worker上会分配jobs/workers个任务。
./your-fuzzer MY_CORPUS/ seeds/ -jobs=8
在8核计算机上,这将产生4个并行工作器。如果其中一个被退出,将自动创建另一个,最多8个。
fuzzer -jobs=8
  ├─sh -c ./fuzzer >fuzz-0.log 2>&1
  │   └─fuzzer
  │       └─{fuzzer}
  ├─sh -c ./fuzzer >fuzz-1.log 2>&1
  │   └─fuzzer
  │       └─{fuzzer}
  ├─sh -c ./fuzzer >fuzz-2.log 2>&1
  │   └─fuzzer
  │       └─{fuzzer}
  ├─sh -c ./fuzzer >fuzz-3.log 2>&1
  │   └─fuzzer
  │       └─{fuzzer}
(4)Dictionaries 字典
字典最早是afl在2015年一篇博客上提出的afl-fuzz: making up grammar with a dictionary in hand,
基本思路就是应用程序都是都是处理具有一定格式的数据,比如xml文档,png图片等等。 这些数据中会有一些特殊字符序列 (或者说关键字), 比如 在xml文档中 就有CDATA, 等,png图片就有 png 图片头。
如果我们事先就把这些 字符序列列举出来,fuzz直接使用这些关键字去 组合,就会就可以减少很多没有意义的 尝试,同时还有可能会走到更深的程序分支中去。
Dictionary就是实现了这种思路。libfuzzer和afl使用的dictionary文件的语法是一样的, 所以可以直接拿 afl 里面的dictionary文件来给libfuzzer使用。
如下是libFuzzer官方文档中的字典示例
# Lines starting with '#' and empty lines are ignored.

# Adds "blah" (w/o quotes) to the dictionary.
kw1="blah"
# Use \\ for backslash and \" for quotes.
kw2="\"ac\\dc\""
# Use \xAB for hex values
kw3="\xF7\xF8"
# the name of the keyword followed by '=' may be omitted:
"foo\x0Abar"
#开头的行 和 空行会被忽略kw1=这些就类似于注释, 没有意义真正有用的是由
"包裹的字串,这些 字串就会作为一个个的关键字,libfuzzer会用它们进行组合来生成样本。
libfuzzer使用-dict指定dict文件,下面使用xml.dict为dictionary文件,进行fuzz。
./your-fuzzer -dict=DICTIONARY_FILE
(5)输出
当fuzzer成功运行之后,信息会输出在屏幕上。输出行具有事件代码和统计信息的形式。常见的事件代码是:
READfuzzer已从语料库目录中读取了所有提供的输入样本。INITEDfuzzer已完成初始化,其中包括通过被测代码运行每个初始输入样本。NEWfuzzer创建了一个测试输入,该输入涵盖了被测代码的新区域。此输入将保存到主要语料库目录。pulsefuzzer已生成 2的n次方个输入(定期生成以使用户确信fuzzer仍在工作)。DONEfuzzer已完成操作,因为它已达到指定的迭代限制(-runs)或时间限制(-max_total_time)。RELOADfuzzer在定期从语料库目录中重新加载输入;这使它能够发现其他fuzzer进程发现的任何输入(请参阅并行模糊化)。
每条输出行还报告以下统计信息(非零时):
cov:执行当前语料库所覆盖的代码块或边的总数。ft:libFuzzer使用不同的信号来评估代码覆盖率:边缘覆盖率,边缘计数器,值配置文件,间接调用方/被调用方对等。这些组合的信号称为功能(ft:)。corp:当前内存中测试语料库中的条目数及其大小(以字节为单位)。exec/s:每秒模糊器迭代的次数。rss:当前的内存消耗。
对于NEW事件,输出行还包含有关产生新输入的变异操作的信息:
L:新输入的大小(以字节为单位)。MS: <n> <operations>用于生成输入的变异操作的计数和列表。
我们以如下样例作解释:
INFO: Seed: 1608565063
INFO: Loaded 1 modules (37 guards): [0x788ec0, 0x788f54),
INFO: -max_len is not provided, using 64
INFO: A corpus is not provided, starting from an empty corpus
#0  READ units: 1
#1  INITED cov: 3 ft: 3 corp: 1/1b exec/s: 0 rss: 11Mb
#3  NEW    cov: 4 ft: 4 corp: 2/4b exec/s: 0 rss: 12Mb L: 3 MS: 2 InsertByte-InsertByte-
#3348   NEW    cov: 5 ft: 5 corp: 3/65b exec/s: 0 rss: 12Mb L: 61 MS: 2 ChangeByte-InsertRepeatedBytes-
#468765 NEW    cov: 6 ft: 6 corp: 4/78b exec/s: 0 rss: 49Mb L: 13 MS: 4 CrossOver-ChangeBit-EraseBytes-ChangeByte-
#564131 NEW    cov: 7 ft: 7 corp: 5/97b exec/s: 0 rss: 56Mb L: 19 MS: 5 InsertRepeatedBytes-InsertByte-ChangeByte-InsertByte-InsertByte-
=================================================================
==32049==ERROR: AddressSanitizer: heap-buffer-overflow on address 0x60200072bb93 at pc 0x000000528540 bp 0x7ffdb3439100 sp 0x7ffdb34390f8
READ of size 1 at 0x60200072bb93 thread T0
    ......................................................
    ......................................................
    ......................................................

0x60200072bb93 is located 0 bytes to the right of 3-byte region [0x60200072bb90,0x60200072bb93)
allocated by thread T0 here:
   ......................................................
   ......................................................
   ......................................................

SUMMARY: AddressSanitizer: heap-buffer-overflow /home/haclh/vmdk_kernel/libfuzzer-workshop-master/lessons/04/./vulnerable_functions.h:22:14 in VulnerableFunction1(unsigned char const*, unsigned long)
Shadow bytes around the buggy address:
  0x0c04800dd720: fa fa fd fd fa fa fd fa fa fa fd fa fa fa fd fa
  0x0c04800dd730: fa fa fd fd fa fa fd fd fa fa fd fd fa fa fd fd
  0x0c04800dd740: fa fa fd fa fa fa fd fa fa fa fd fa fa fa fd fa
  0x0c04800dd750: fa fa fd fa fa fa fd fa fa fa fd fa fa fa fd fa
  0x0c04800dd760: fa fa fd fa fa fa fd fa fa fa fd fd fa fa fd fd
=>0x0c04800dd770: fa fa[03]fa fa fa fa fa fa fa fa fa fa fa fa fa
  0x0c04800dd780: fa fa fa fa fa fa fa fa fa fa fa fa fa fa fa fa
  0x0c04800dd790: fa fa fa fa fa fa fa fa fa fa fa fa fa fa fa fa
  0x0c04800dd7a0: fa fa fa fa fa fa fa fa fa fa fa fa fa fa fa fa
  0x0c04800dd7b0: fa fa fa fa fa fa fa fa fa fa fa fa fa fa fa fa
  0x0c04800dd7c0: fa fa fa fa fa fa fa fa fa fa fa fa fa fa fa fa
......................................................
......................................................
==32049==ABORTING
MS: 1 CrossOver-; base unit: 38a223b0988bd9576fb17f5947af80b80203f0ef
0x46,0x55,0x5a,
FUZ
artifact_prefix='./'; Test unit written to ./crash-0eb8e4ed029b774d80f2b66408203801cb982a60
Base64: RlVa
首先我们可以看出来Seed: 1608565063说明这次的种子数据,如果我们想重现重新运行-seed=1608565063以得到相同的结果。其次-max_len is not provided, using 64,-max_len用于设置最大的数据长度,因为没有设置fuzzer会自己猜测,这里设置的数据不大于64KB。
接下来#开头的行是fuzz过程中找到的路径信息
# 564131 NEW cov: 7 ft: 7 corp: 5/97b exec/s: 0 rss: 56Mb L: 19 MS: 5 InsertRepeatedBytes-InsertByte-ChangeByte-InsertByte-InsertByte-
我们可以看出来libFuzzer尝试了至少564131个输入(#564131),发现了5个输入,总共97个字节(corp: 5/97b),它们总共覆盖了7个覆盖点(cov: 7)。我们可以将覆盖点视为代码中的 基本块。
==32049==ERROR: AddressSanitizer: heap-buffer-overflow on address 0x60200072bb93 at pc 0x000000528540 bp 0x7ffdb3439100 sp 0x7ffdb34390f8
READ of size 1 at 0x60200072bb93 thread T0
这个信息说明在其中一个输入上,AddressSanitizer已检测到heap-buffer-overflow错误并中止了执行。
artifact_prefix='./'; Test unit written to ./crash-0eb8e4ed029b774d80f2b66408203801cb982a60
倒数第二行是触发漏洞的测试用例,在退出进程之前,libFuzzer已创建了一个文件,其中包含触发崩溃的字节和所有信息,要重现崩溃而无模糊运行可以使用
ASAN_OPTIONS=symbolize=1 ./first_fuzzer ./crash-0eb8e4ed029b774d80f2b66408203801
# ASAN_OPTIONS=symbolize=1 用于显示栈的符号信息
来重现crash
如果我们在fuzzer运行的选项里有使用字典-dictionary和-print_final_stats执行完打印统计信息,最后的输出可能还会多出两块,形如下面
###### Recommended dictionary. ######
"X\x00\x00\x00\x00\x00\x00\x00" # Uses: 1228
"prin" # Uses: 1353
...........................
...........................
...........................
"U</UTrri\x09</UTD" # Uses: 61
###### End of recommended dictionary. ######
Done 1464491 runs in 301 second(s)
stat::number_of_executed_units: 1464491
stat::average_exec_per_sec:     4865
stat::new_units_added:          1407
stat::slowest_unit_time_sec:    0
stat::peak_rss_mb:              407
开始由####夹着的是libfuzzer在fuzz过程中挑选出来的dictionary, 同时还给出了使用的次数,这些dictionary可以在以后fuzz同类型程序时 节省fuzz的时间。
然后以stat:开头的是一些 fuzz 的统计信息, 主要看stat::new_units_added表示整个fuzz过程中触发了多少个代码单元。
可以看到直接fuzz,5分钟 触发了1407个代码单元
实例篇
以Freeimage为例进行测试
我们首先把最新版本的Freeimage给拉到本地,然后解压
wget https://downloads.sourceforge.net/freeimage/FreeImage3180.zip
unzip FreeImage3180.zip

对这个源包先进行一下编译
pushd FreeImage

# b44ExpLogTable.cpp only contains a definition of main().
sed -i 's/Source\/OpenEXR\/IlmImf\/b44ExpLogTable.cpp//' Makefile.srcs
make LIBRARIES=-lc++ -j$(nproc)

popd
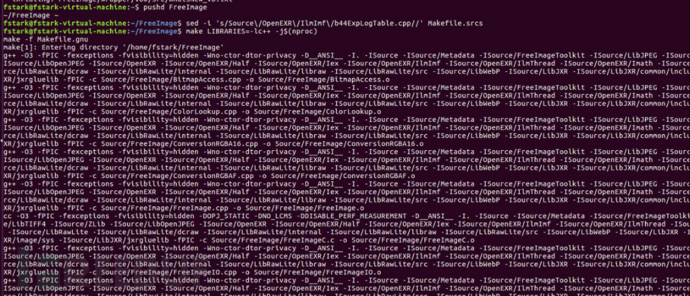
编译成功后在Freeimage/Dist里应该就生成了libfreeimage.a,.h和.o文件
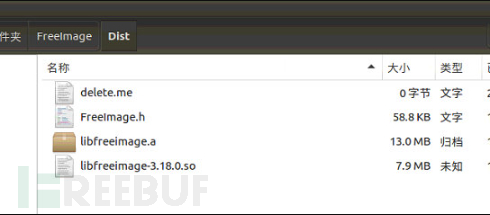
随后根据Freeimage的功能特性写对应的hardness,也就是fuzzing target,这里直接使用OSS-fuzz的project中给出的Freeimage的hardness,在根目录保存为load_from_memory_fuzzer.cc文件
#include <cstddef>
#include <cstdint>
#include <cstdlib>
#include <vector>
#include <FreeImage.h>

namespace {

// Returns true if the format should be attempted to loaded from memory.
bool SafeToLoadFromMemory(FREE_IMAGE_FORMAT fif) {
  // For now, just load if it is a BMP. Future heuristics may need to be based
  // on the expected size in different formats for memory regions to avoid OOMs.
  return fif == FIF_BMP;
}

}  // namespace

extern "C" int LLVMFuzzerTestOneInput(const uint8_t* data, size_t size) {
  static bool initialized = false;
  if (!initialized) {
    FreeImage_Initialise();
  }

  if (size > 100 * 1000) {
    return 0;
  }

  std::vector<uint8_t> fuzzer_data_vector(data, data + size);
  FIMEMORY* fiMem = FreeImage_OpenMemory(
      reinterpret_cast<unsigned char*>(fuzzer_data_vector.data()),
      fuzzer_data_vector.size());

  FREE_IMAGE_FORMAT fif = FreeImage_GetFileTypeFromMemory(fiMem, 0);
  if (SafeToLoadFromMemory(fif)) {
    FIBITMAP* fiBitmap = FreeImage_LoadFromMemory(fif, fiMem);
    FreeImage_Unload(fiBitmap);
  }
  FreeImage_CloseMemory(fiMem);

  return 0;
}
接下来的步骤就是开始编译fuzzer,把对应参数输入在后面,使用clang++开始编译
clang++ -g -fsanitize=fuzzer,address \
load_from_memory_fuzzer.cc ./FreeImage/Dist/libfreeimage.a \
-o load_from_memory_fuzzer

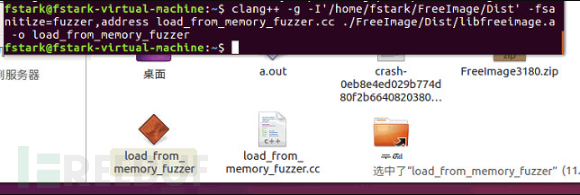
出现了一点错误,看来是Freeimage.h文件没有找到,需要用-I 指定一下文件的路径让他可以找到
clang++ -g -fsanitize=fuzzer,address -I'/home/fstark/FreeImage/Dist' \
load_from_memory_fuzzer.cc ./FreeImage/Dist/libfreeimage.a \
-o load_from_memory_fuzzer
这次成功了,发现已经成功生成了load_from_memory_fuzzer
不加任何附加命令直接运行一下试试,发现可以跑了,就是速度不怎么快
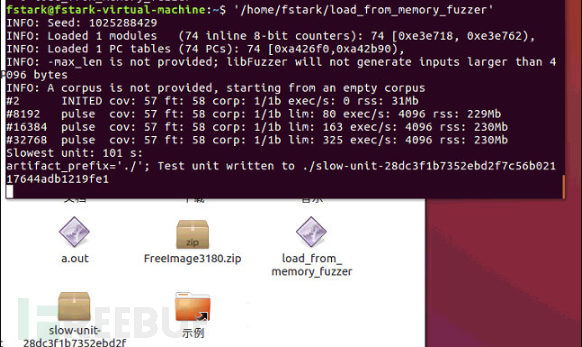
当我做到这一步时,学长点拨前面的编译是有问题的,运行时结果仅覆盖57是肯定有问题的。通过在开会时看学长的讲解分析,确实在编译的时候直接拉freeimage的包,里面的makefile需要修改。这里把编译选项更改一下,其实我又回顾了一下之前clusterfuzz踩的坑,其中心脏滴血在编译的时候就要求加上-fsanitize=address,fuzzer-no-link,但之前没有细心注意。
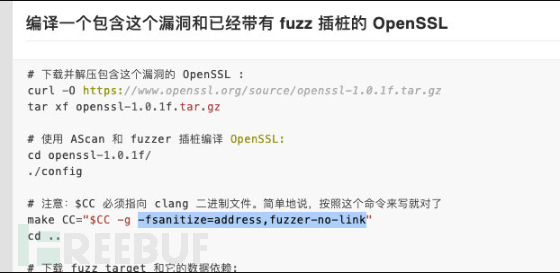
我们在makefile.gnu里把默认的03改成01,再加上这几条推荐的编译选项,不得不说自己对于常见的编译过程真是陌生,要不是靠学长又是进坑几个小时,真要抽个时间好好补补这部分的内容了,做个编译过程大梳理和常见编译器对比什么的

这样再编译一遍,不放样本,速度也好了很多
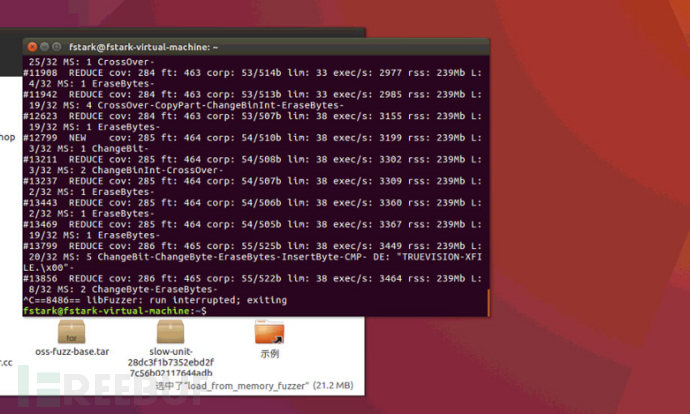
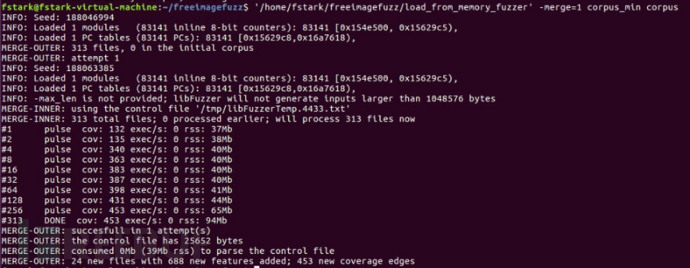
简单准备个样本集,再精简一下
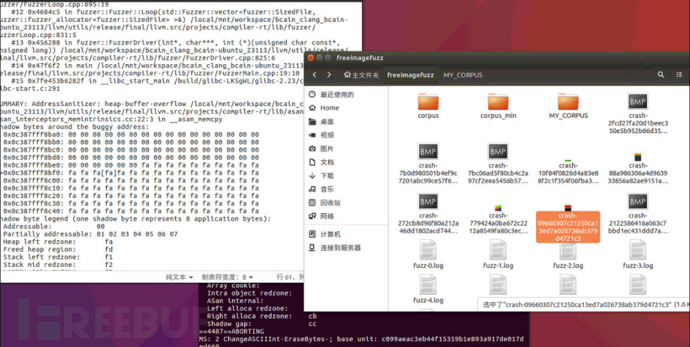
简单跑一下,这次就可以跑出crash了,但是很多是重复的在跑的时候附加的选项还是要多多限制,逐渐摸索,但整体流程就是这样了
附件一
| Flags: | value | strictly in form -flag=value |
|---|---|---|
| verbosity | 1 | Verbosity level. |
| seed | 0 | Random seed. If 0, seed is generated. |
| runs | -1 | Number of individual test runs (-1 for infinite runs). |
| max_len | 0 | Maximum length of the test input. If 0, libFuzzer tries to guess a good value based on the corpus and reports it. |
| lea_control | 100 | Try generating small inputs first, then try larger inputs over time. Specifies the rate at which the length limit is increased (smaller == faster). If 0, immediately try inputs with size up to max_len. Default value is 0, if LLVMFuzzerCustomMutator is used. |
| seed_inputs | 0 | A comma-separated list of input files to use as an additional seed corpus. Alternatively, an "@" followed by the name of a file containing the comma-seperated list. |
| cross_over | 1 | If 1, cross over inputs. |
| mutate_depth | 5 | Apply this number of consecutive mutations to each input. |
| reduce_depth | 0 | Experimental/internal. Reduce depth if mutations lose unique features |
| shuffle | 1 | Shuffle inputs at startup |
| prefer_small | 1 | If 1, always prefer smaller inputs during the corpus shuffle. |
| timeout | 1200 | Timeout in seconds (if positive). If one unit runs more than this number of seconds the process will abort. |
| error_exitcode | 77 | When libFuzzer itself reports a bug this exit code will be used. |
| timeout_exitcode | 70 | When libFuzzer reports a timeout this exit code will be used. |
| max_total_time | 0 | If positive, indicates the maximal total time in seconds to run the fuzzer. |
| help | 0 | Print help. |
| fork | 0 | Experimental mode where fuzzing happens in a subprocess |
| ignore_timeouts | 1 | Ignore timeouts in fork mode |
| ignore_ooms | 1 | Ignore OOMs in fork mode |
| ignore_crashes | 0 | Ignore crashes in fork mode |
| merge | 0 | If 1, the 2-nd, 3-rd, etc corpora will be merged into the 1-st corpus. Only interesting units will be taken. This flag can be used to minimize a corpus. |
| stop_file | 0 | Stop fuzzing ASAP if this file exists |
| merge_control_file | 0 | Specify a control file used for the merge process. If a merge process gets killed it tries to leave this file in a state suitable for resuming the merge. By default a temporary file will be used. |
| minimize_crash | 0 | If 1, minimizes the provided crash input. Use with -runs=N or -max_total_time=N to limit the number attempts. Use with -exact_artifact_path to specify the output. Combine with ASAN_OPTIONS=dedup_token_length=3 (or similar) to ensure that the minimized input triggers the same crash. |
| cleanse_crash | 0 | If 1, tries to cleanse the provided crash input to make it contain fewer original bytes. Use with -exact_artifact_path to specify the output. |
| use_counters | 1 | Use coverage counters |
| use_memmem | 1 | Use hints from intercepting memmem, strstr, etc |
| use_value_profile | 0 | Experimental. Use value profile to guide fuzzing. |
| use_cmp | 1 | Use CMP traces to guide mutations |
| shrink | 0 | Experimental. Try to shrink corpus inputs. |
| reduce_inputs | 1 | Try to reduce the size of inputs while preserving their full feature sets |
| jobs | 0 | Number of jobs to run. If jobs >= 1 we spawn this number of jobs in separate worker processes with stdout/stderr redirected to fuzz-JOB.log. |
| workers | 0 | Number of simultaneous worker processes to run the jobs. If zero, "min(jobs,NumberOfCpuCores()/2)" is used. |
| reload | 1 | Reload the main corpus every seconds to get new units discovered by other processes. If 0, disabled |
| report_slow_units | 10 | Report slowest units if they run for more than this number of seconds. |
| only_ascii | 0 | If 1, generate only ASCII (isprint+isspace) inputs. |
| dict | 0 | Experimental. Use the dictionary file. |
| artifact_prefix | 0 | Write fuzzing artifacts (crash, timeout, or slow inputs) as $(artifact_prefix)file |
| exact_artifact_path | 0 | Write the single artifact on failure (crash, timeout) as $(exact_artifact_path). This overrides -artifact_prefix and will not use checksum in the file name. Do not use the same path for several parallel processes. |
| print_pcs | 0 | If 1, print out newly covered PCs. |
| print_funcs | 2 | If >=1, print out at most this number of newly covered functions. |
| print_final_stats | 0 | If 1, print statistics at exit. |
| print_corpus_stats | 0 | If 1, print statistics on corpus elements at exit. |
| print_coverage | 0 | If 1, print coverage information as text at exit. |
| dump_coverage | 0 | Deprecated. |
| handle_segv | 1 | If 1, try to intercept SIGSEGV. |
| handle_bus | 1 | If 1, try to intercept SIGBUS. |
| handle_abrt | 1 | If 1, try to intercept SIGABRT. |
| handle_ill | 1 | If 1, try to intercept SIGILL. |
| handle_fpe | 1 | If 1, try to intercept SIGFPE. |
| handle_int | 1 | If 1, try to intercept SIGINT. |
| handle_term | 1 | If 1, try to intercept SIGTERM. |
| handle_xfsz | 1 | If 1, try to intercept SIGXFSZ. |
| handle_usr1 | 1 | If 1, try to intercept SIGUSR1. |
| handle_usr2 | 1 | If 1, try to intercept SIGUSR2. |
| lazy_counters | 0 | If 1, a performance optimization isenabled for the 8bit inline counters. Requires that libFuzzer successfully installs its SEGV handler |
| close_fd_mask | 0 | If 1, close stdout at startup; if 2, close stderr; if 3, close both. Be careful, this will also close e.g. stderr of asan. |
| detect_leaks | 1 | If 1, and if LeakSanitizer is enabled try to detect memory leaks during fuzzing (i.e. not only at shut down). |
| purge_allocator_interval | 1 | Purge allocator caches and quarantines every seconds. When rss_limit_mb is specified (>0), purging starts when RSS exceeds 50% of rss_limit_mb. Pass purge_allocator_interval=-1 to disable this functionality. |
| trace_malloc | 0 | If >= 1 will print all mallocs/frees. If >= 2 will also print stack traces. |
| rss_limit_mb | 2048 | If non-zero, the fuzzer will exit uponreaching this limit of RSS memory usage. |
| malloc_limit_mb | 0 | If non-zero, the fuzzer will exit if the target tries to allocate this number of Mb with one malloc call. If zero (default) same limit as rss_limit_mb is applied. |
| exit_on_src_pos | 0 | Exit if a newly found PC originates from the given source location. Example: -exit_on_src_pos=foo.cc:123. Used primarily for testing libFuzzer itself. |
| exit_on_item | 0 | Exit if an item with a given sha1 sum was added to the corpus. Used primarily for testing libFuzzer itself. |
| ignore_remaining_args | 0 | If 1, ignore all arguments passed after this one. Useful for fuzzers that need to do their own argument parsing. |
| focus_function | 0 | Experimental. Fuzzing will focus on inputs that trigger calls to this function. If -focus_function=auto and -data_flow_trace is used, libFuzzer will choose the focus functions automatically. |
| analyze_dict | 0 | Experimental |
| use_clang_coverage | 0 | Deprecated; don't use |
| data_flow_trace | 0 | Experimental: use the data flow trace |
| collect_data_flow | 0 | Experimental: collect the data flow trace |
参考文献
用libFuzzer搞事情 http://pwn4.fun/2017/07/15/%E7%94%A8libFuzzer%E6%90%9E%E4%BA%8B%E6%83%85/
libFuzzer——编译链接
https://i-m.dev/posts/20190831-143715.html
libFuzzer –用于覆盖率指导的模糊测试的库
https://releases.llvm.org/4.0.0/docs/LibFuzzer.html#startup-initialization
libFuzzerTutorial
https://github.com/google/fuzzing/blob/master/tutorial/libFuzzerTutorial.md
fuzz实战之libfuzzer
https://www.secpulse.com/archives/71898.html
fuzzer-test-suite
https://github.com/google/fuzzer-test-suite
如需授权、对文章有疑问或需删除稿件,请联系 FreeBuf 客服小蜜蜂(微信:freebee1024)


