介绍
AMSI为终端安全供应商提供了丰富的接口以帮助他们更好地对目标组件进行内存缓冲区安全扫描,或选择需要扫描的内容。根据微软提供的信息,AMSI支持的组件有如下几种:
1、用户账户控制(UAC)
2、PowerShell(脚本、交互使用和动态代码计算)
3、Windows脚本主机(wscript.exe和cscript.exe)
4、JavaScript和VBScript
5、Office VBA宏
针对从事安全防御检测的工程师和防御者,以及对成熟规避技术感兴趣的攻击端研究人员,我给大家提出了以下几个问题:
1、AMSI所支持的这些组件跟哪些实际的PE文件有关联?
2、微软提供的信息是否准确,或者说上面的列表缺少了哪些组件?
3、是否可以在不需要注册AMSI程序作为终端安全提供商的情况下,使用AMSI呢?
AMSI组件枚举
为了解决前两个问题,我们需要想办法自动识别和发现AMSI组件。整个过程需要涉及到一系列包含了ASCII或Unicode字符串“amsi.dll”的EXE或DLL文件。那么我们为什么要搜索“amsi.dll”字符串呢?
1、amsi.dll可以提供扫描缓冲区所需的函数,即AmsiScanBuffer、AmsiScanString和AmsiUacScan。
2、这个字符串意味着EXE或DLL会通过静态导入(比如说,它能够以ASCII字符串的形式存储在PE文件中)或在运行时动态加载(比如说,它能够以Unicode字符串的形式存储在PE文件中)amsi.dll。
下面这段PowerShell代码也许可以回答我们的疑问:
$UserPEs = Get-CimInstance -ClassName CIM_DataFile -Filter 'Drive = "C:" and (Extension = "exe" or Extension = "dll")' -Property 'Name' | Select -ExpandProperty Name
$AMSIReferences1 = $UserPEs | % { Select-String -Encoding ascii -LiteralPath $_ -Pattern 'amsi\.dll' }
$AMSIReferences2 = $UserPEs | % { Select-String -Encoding unicode -LiteralPath $_ -Pattern 'amsi\.dll' }
$AMSIReferences1.Path
$AMSIReferences2.Path
上面这段PowerShell代码段使用了WMI来枚举所有的EXE和DLL。之所以选择这种方法,而不选择Get-ChildItem,是因为它在尝试访问其无权访问的文件时,有可能引发异常。
接下来,它会使用Select-String(相当于PowerShell中的grep)来扫描每个文件,并查找文件中的ASCII和Unicode文本字符串-“amsi.dll”。
对结果进行过滤后,找到了下列AMSI组件:
1、%windir%\System32\consent.exe
2、%windir%\System32\jscript.dll
3、%windir%\System32\vbscript.dll
4、%windir%\System32\wbem\fastprox.dll
5、%windir%\Microsoft.NET\assembly\GAC_MSIL\System.Management.Automation\v4.0_3.0.0.0__31bf3856ad364e35\System.Management.Automation.dll
6、%windir%\Microsoft.NET\Framework64\v4.0.30319\clr.dll
7、%ProgramFiles%\WindowsApps\Microsoft.Office.Desktop_16051.11929.20300.0_x86__8wekyb3d8bbwe\VFS\ProgramFilesCommonX86\Microsoft Shared\VBA\VBA7.1\VBE7.DLL
通过研究之后,我们按照微软提供的文档对上述的AMSI组件进行分类:
1、用户账户控制:consent.exe
2、PowerShell:System.Management.Automation.dll
3、JavaScript和VBScript:jscript.dll, vbscript.dll
4、Office VBA宏:VBE7.dll
5、未分类:clr.dll, fastprox.dll
那这些未分类的AMSI组件是什么呢?clr.dll,即常见语言运行时,微软在.NET 4.8提到过这个组件,它的作用是扫描内存中的编译加载。目前,已经有研究人员在研究相关的绕过机制了,参考资料见本文末尾。接下来我们会对fastprox.dll进行分析,大家莫急。
WMI与AMSI
fastprox.dll位于System32\wbem目录内,并且fastprox.dll的描述为“WMI自定义Marshaller”,不言而喻,它很明显与WMI有关。为了进一步验证,我们可以使用PowerShell来识别fastprox.dll的加载跟哪一个进程有关:
> Get-Process | Where-Object { $_.Modules.ModuleName -contains 'fastprox.dll' }
Handles NPM(K) PM(K) WS(K) CPU(s) Id SI ProcessName
------- ------ ----- ----- ------ -- -- -----------
2196 274 219988 232044 14,573.92 1192 5 chrome
1162 47 85544 38524 803.86 14580 5 mmc
692 42 129920 55564 1,081.20 2408 5 powershell
874 47 77144 87852 73.48 4040 5 powershell
686 39 71132 42608 42.78 12620 5 powershell
229 13 2596 10072 0.13 2956 0 svchost
480 20 3840 6728 69.66 3376 0 svchost
613 34 26776 17356 4,370.64 3648 0 svchost
217 43 2572 4148 18.64 6728 0 svchost
564 33 11276 16544 4.34 11520 0 svchost
129 7 1496 2196 0.77 5232 0 unsecapp
1650 67 318004 256536 99.28 16576 5 vmconnect
898 29 62664 23660 1,267.36 4776 0 vmms
386 16 8492 13408 21.77 14220 0 WmiPrvSE
176 10 2684 8592 1.36 15772 0 WmiPrvSE
我们可以使用下列PowerShell命令来解析svchost.exe进程对应的服务:
> Get-Process | Where-Object { $_.Modules.ModuleName -contains 'fastprox.dll' -and $_.ProcessName -eq 'svchost' } | ForEach-Object { Get-CimInstance -ClassName Win32_Service -Filter "ProcessId = $($_.Id)" } | Format-Table -AutoSize
ProcessId Name StartMode State Status ExitCode
--------- ---- --------- ----- ------ --------
2956 Netman Manual Running OK 0
3376 iphlpsvc Auto Running OK 0
3648 Winmgmt Auto Running OK 0
6728 SharedAccess Manual Running OK 0
11520 BITS Auto Running OK 0
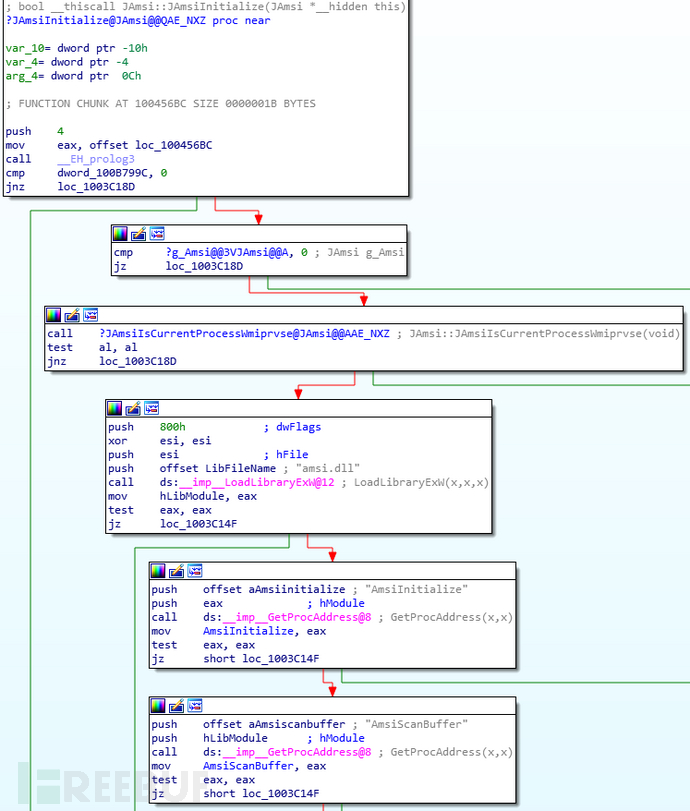
由此看来,似乎任何希望与WMI交互的进程都需要用到这个DLL。现在,我们直接查看代码来确定fastprox.dll如何与amsi.dll交互。目前,唯一的“amsi.dll”引用出现在JAmsi::JAmsiInitialize函数中,下面是相关代码:

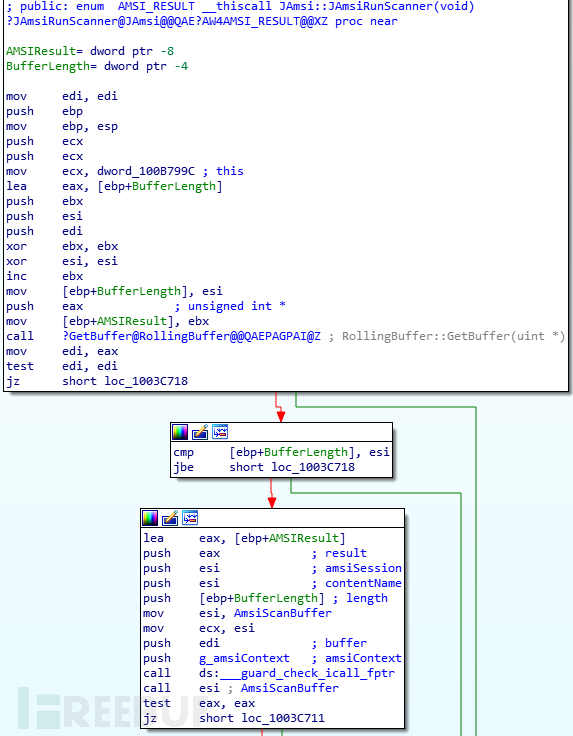
首先,只有在当前进程不是%windir%\System32\wbem\wmiprvse.exe时,该函数才会初始化AMSI。通过对amsi.dll中loadlibrary的调用以及所需的相关导出函数(如amsiscanbuffer)进行解析后,我们发现amsiscanbuffer的唯一交叉引用是JAmsi::JAmsiRunScanner函数:

JAmsiRunScanner由JAmsi::JAmsiProcessor调用,而这个函数会有下列函数进行调用:
1、CWbemSvcWrapper::XWbemServices::ExecNotificationQueryAsync
2、CWbemSvcWrapper::XWbemServices::CreateInstanceEnum
3、CWbemSvcWrapper::XWbemServices::ExecQueryAsync
4、CWbemSvcWrapper::XWbemServices::ExecQuery
5、CWbemSvcWrapper::XWbemServices::CreateInstanceEnumAsync
6、CWbemSvcWrapper::XWbemServices::GetObjectW
7、CWbemSvcWrapper::XWbemServices::ExecMethod
8、CWbemSvcWrapper::XWbemServices::ExecMethodAsync
9、CWbemSvcWrapper::XWbemServices::ExecNotificationQuery
10、CWbemSvcWrapper::XWbemServices::GetObjectAsync
11、JAmsi::JAmsiProcessor (called by CWbemInstance::SetPropValue)
除了最后一个函数,其他的函数都对对应了IWbemServices接口所实现的方法,而最后一个函数很可能对应的是IWbemClassObject::Put方法。
接下来,我们需要运行logman来捕捉所有的AMSI事件,并尝试捕获相关的WMI事件:
logman start trace AMSITrace -p Microsoft-Antimalware-Scan-Interface (Event1) -o amsi.etl -ets接下来,运行下列代码进行事件触发测试:
$CimSession = New-CimSession -ComputerName .
Invoke-CimMethod -ClassName Win32_Process -MethodName Create -Arguments @{CommandLine = 'notepad.exe'} -CimSession $CIMSession
$CIMSession | Remove-CimSession
上述命令可以创建一个本地CIM会话来枚举远程WMI连接,完成WMI交互之后,停止事件捕捉:
logman stop AMSITrace -ets接下来,使用PowerShell来识别任意WMI事件:
> $AMSIEvents = Get-WinEvent -Path .\amsi.etl -Oldest
> $AMSIEvents[5] | Format-List *
Message : AmsiScanBuffer
Id : 1101
Version : 0
Qualifiers :
Level : 4
Task : 0
Opcode : 0
Keywords : -9223372036854775807
RecordId : 5
ProviderName : Microsoft-Antimalware-Scan-Interface
ProviderId : 2a576b87-09a7-520e-c21a-4942f0271d67
LogName :
ProcessId : 7184
ThreadId : 8708
MachineName : COMPY486
UserId :
TimeCreated : 10/3/2019 12:14:51 PM
ActivityId : 95823c06-72e6-0000-a133-8395e672d501
RelatedActivityId :
ContainerLog : c:\users\testuser\desktop\amsi.etl
MatchedQueryIds : {}
Bookmark : System.Diagnostics.Eventing.Reader.EventBookmark
LevelDisplayName : Information
OpcodeDisplayName : Info
TaskDisplayName :
KeywordsDisplayNames : {}
Properties : {System.Diagnostics.Eventing.Reader.EventProperty, System.Diagnostics.Eventing.Reader.EventProperty...}
> $AMSIEvents[5].Properties
Value
-----
0
1
1
WMI
300
300
{67, 0, 73, 0...}
{131, 136, 119, 209...}
False
> [Text.Encoding]::Unicode.GetString($AMSIEvents[5].Properties[7].Value)
CIM_RegisteredSpecification.CreateInstanceEnum();
Win32_Process.GetObjectAsync();
Win32_Process.GetObject();
SetPropValue.CommandLine("notepad.exe");
> Get-CimInstance -ClassName Win32_Service -Filter "ProcessId = $($AMSIEvents[5].ProcessId)"
ProcessId Name StartMode State Status ExitCode
--------- ---- --------- ----- ------ --------
7184 WinRM Auto Running OK 0
首先,第六个事件(索引5)是唯一的第四个属性值中包含“wmi”的事件。另外,第八个属性值包含了看起来像由Unicode字符串组成的二进制数据。解码后,它反映了上面示例中win32_process create的执行。值得注意的是,记录的进程ID-7184是AMSI事件的来源,它是一个svchost.exe进程。
WMI非常的“混乱”,操作系统会定期使用WMI进行合法操作,而可疑的操作同样会涉及到WMI,而且很多WMI操作都不会被记录。背后的原因很明显,就是因为只有当JAmsi::JAmsiIsScannerNeeded返回TRUE时,JAmsi::JAmsiRunScanner才会执行。

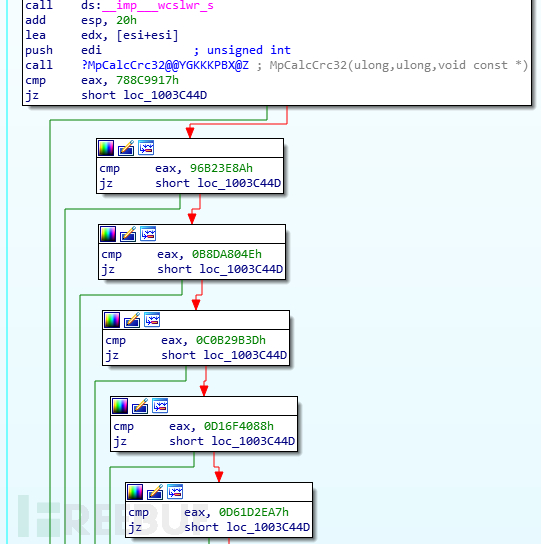
WMI的操作上下文字符串有一个专门计算的CRC校验和,只有它们的校验和与白名单中的值匹配时才会记录WMI事件:

研究过程中,我们发现白名单中包含下列CRC校验和:
0x788c9917、0x96b23e8a、0xb8da804e、0xc0b29b3d、0xd16f4088、0xd61d2ea7、0xef726924、0x46b9d093、0xf837efc3很明显,只要攻击者能够恢复出白名单中的校验和,他们就可以绕过操作系统针对WMI操作的记录,接下来的结果,想必大家心知肚明了吧!
总结
本文介绍的方法可以用来识别AMSI组件,研究它们的实现(使用WMI作为用例),并根据AMSI ETW事件来推断上下文,这种方法对于试图躲避AMSI检测的攻击者来说是非常有效的。
参考资料
1、https://twitter.com/mattifestation/status/1071034781020971009
2、https://modexp.wordpress.com/2019/06/03/disable-amsi-wldp-dotnet/
* 参考来源:specterops,FB小编Alpha_h4ck编译,转载请注明来自FreeBuf.COM
如需授权、对文章有疑问或需删除稿件,请联系 FreeBuf 客服小蜜蜂(微信:freebee1024)


