


官方公众号企业安全新浪微博

FreeBuf.COM网络安全行业门户,每日发布专业的安全资讯、技术剖析。

FreeBuf+小程序

0
1
2
3
4
5
6
7
8
9
0
1
2
3
4
5
6
7
8
9
0
1
2
3
4
5
6
7
8
9
 本文由
FreeBuf_398767 创作,已纳入「FreeBuf原创奖励计划」,未授权禁止转载
本文由
FreeBuf_398767 创作,已纳入「FreeBuf原创奖励计划」,未授权禁止转载
环境搭建
以下软件都可以使用apt直接安装,虽然apt中的版本相比源码安装来说会低一些,不过不会影响实验过程。环境依赖中,binwalk负责固件提取,qemu负责模拟,gdb-multiarch负责调试
sudo apt install binwalk qemu-user-static gdb-multiarch
sasquatch
squashfs是一个只读压缩文件系统,可以将整个文件系统或者某个单一的目录压缩在一起, 存放在某个设备, 某个分区或者普通的文件中,而有部分嵌入式设备会使用此格式存放其文件系统。
binwalk内置了对squashfs格式的识别,但在文件系统解压过程中还需要sasquatch才能完成解压。binwalk仓库中的原devttys0/sasquatch仓库年久失修,现在已经无法编译。我从threadexio/sasquatch处fork了一份修复后的代码,加入了CI保证可以编译成功。以下是编译的代码:
sudo apt-get install zlib1g-dev liblzma-dev liblzo2-dev
git clone https://github.com/syheliel/sasquatch.git
(cd ./sasquatch && ./build.sh)
基本分析
首先下载靶场
git clone https://github.com/praetorian-inc/DVRF.git
cd DVRF
使用binwalk提取固件,其中e参数表示提取,M参数表示采用递归提取算法
cd ./Firmware
binwalk -Me ./DVRF_v03.bin
提取后会生成_DVRF_v03.bin.extracted文件夹,其中的内容为
192728.squashfs:squashfs文件系统
piggy:内核镜像
squashfs-root:
192728.squashfs解压后的结果
❯ tree -L 2
├── 192728.squashfs
├── piggy
└── squashfs-root
    ├── bin
    ├── dev
    ├── etc
    ├── lib
    ├── media -> tmp/media
    ├── mnt
    ├── proc
    ├── pwnable
    ├── sbin
    ├── sys
    ├── tmp
    ├── usr
    ├── var -> tmp/var
    └── www
接着进入实验对象所在的目录,文件格式为MIPS32
> cd ./squashfs-root/pwnable/Intro/
> file ./stack_bof_01
./stack_bof_01: ELF 32-bit LSB executable, MIPS, MIPS32 version 1 (SYSV), dynamically linked, interpreter /lib/ld-uClibc.so.0, not stripped
qemu模拟
运行
返回squashfs-root目录后:
拷贝qemu-mipsel-static到当前目录下,
$(which qemu-mipsel-static)负责获取qemu-mipsel-static的绝对路径执行
qemu-mipsel-static,同时使用chroot让该程序使用当前文件目录下的配套指令
> cd ../../
> cp $(which qemu-mipsel-static) ./
> sudo chroot . ./qemu-mipsel-static ./pwnable/Intro/stack_bof_01 test123
Welcome to the first BoF exercise!
You entered test123
Try Again
调试
接着讲解如何使用gdb进行调试,你需要开两个窗口,第一个窗口负责运行程序,并暴露1234作为调试端口:
sudo chroot . ./qemu-mipsel-static -g 1234 ./pwnable/Intro/stack_bof_01 AAAA
第二个窗口首先使用gdb-multiarch加载文件
gdb-multiarch ./pwnable/Intro/stack_bof_01 -q
打开后在gdb内设置架构并连接target
set architecture mips
target remote 127.0.0.1:1234
gdb成功连接后如图所示,上方是第一个窗口,下方是第二个·窗口,停在了_start函数中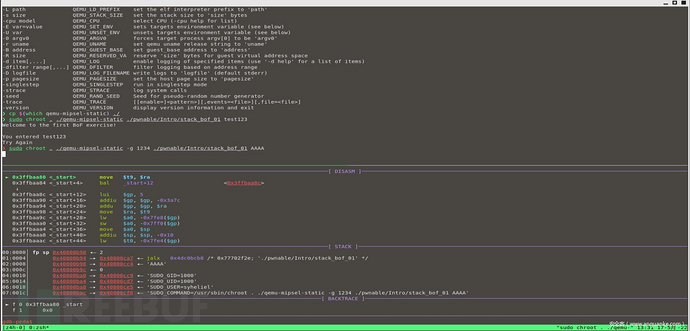 至此,已完成初始环境设置,能够模拟IOT固件运行特定的二进制文件。
 已在FreeBuf发表 1 篇文章
如需授权、对文章有疑问或需删除稿件,请联系 FreeBuf 客服小蜜蜂(微信:freebee1024)


- 1 文章数
- 1 关注者