


官方公众号企业安全新浪微博

FreeBuf.COM网络安全行业门户,每日发布专业的安全资讯、技术剖析。

FreeBuf+小程序

- 关注
作者:谢泽华
背景
众所周知单个机房在出现不可抗拒的问题(如断电、断网等因素)时,会导致无法正常提供服务,会对业务造成潜在的损失。所以在协同办公领域,一种可以基于同城或异地多活机制的高可用设计,在保障数据一致性的同时,能够最大程度降低由于机房的仅单点可用所导致的潜在高可用问题,最大程度上保障业务的用户体验,降低单点问题对业务造成的潜在损失显得尤为重要。
同城双活,对于生产的高可用保障,重大的意义和价值是不可言喻的。表面上同城双活只是简单的部署了一套生产环境而已,但是在架构上,这个改变的影响是巨大的,无状态应用的高可用管理、请求流量的管理、版本发布的管理、网络架构的管理等,其提升的架构复杂度巨大。
结合真实的协同办公产品:京办(为北京市政府提供协同办公服务的综合性平台)生产环境面对的复杂的政务网络以及京办同城双活架构演进的案例,给大家介绍下京办持续改进、分阶段演进过程中的一些思考和实践经验的总结。本文仅针对ES集群在跨机房同步过程中的方案和经验进行介绍和总结。
架构
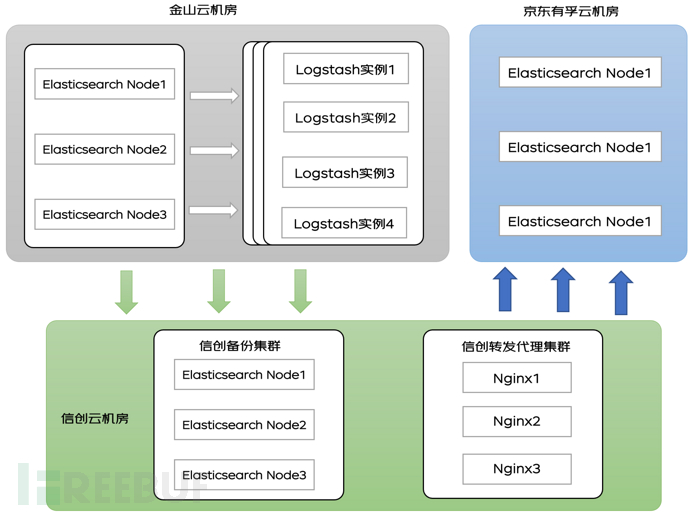
1.部署Logstash在金山云机房上,Logstash启动多个实例(按不同的类型分类,提高同步效率),并且和金山云机房的ES集群在相同的VPC
2.Logstash需要配置大网访问权限,保证Logstash和ES原集群和目标集群互通。
3.数据迁移可以全量迁移和增量迁移,首次迁移都是全量迁移后续的增加数据选择增量迁移。
4.增量迁移需要改造增加识别的增量数据的标识,具体方法后续进行介绍。
原理
Logstash工作原理
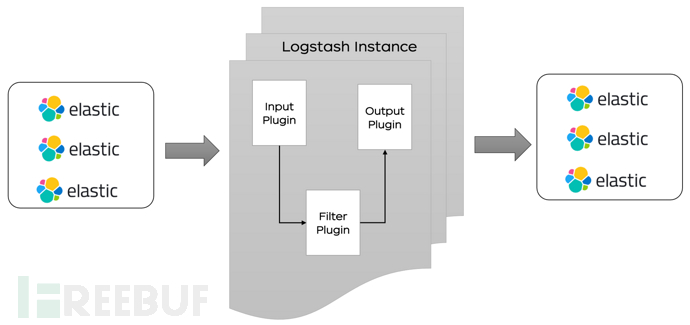
Logstash分为三个部分input 、filter、ouput:
1.input处理接收数据,数据可以来源ES,日志文件,kafka等通道.
2.filter对数据进行过滤,清洗。
3.ouput输出数据到目标设备,可以输出到ES,kafka,文件等。
增量同步原理
1. 对于T时刻的数据,先使用Logstash将T以前的所有数据迁移到有孚机房京东云ES,假设用时∆T
2. 对于T到T+∆T的增量数据,再次使用logstash将数据导入到有孚机房京东云的ES集群
3. 重复上述步骤2,直到∆T足够小,此时将业务切换到华为云,最后完成新增数据的迁移
适用范围:ES的数据中带有时间戳或者其他能够区分新旧数据的标签
流程
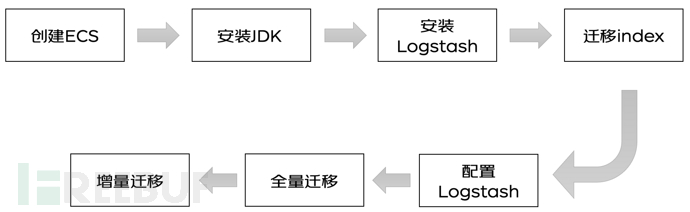
准备工作
1.创建ECS和安装JDK忽略,自行安装即可
2.下载对应版本的Logstash,尽量选择与Elasticsearch版本一致,或接近的版本安装即可
https://www.elastic.co/cn/downloads/logstash
1) 源码下载直接解压安装包,开箱即用
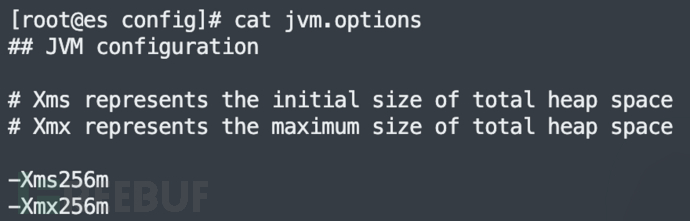
2)修改对内存使用,logstash默认的堆内存是1G,根据ECS集群选择合适的内存,可以加快集群数据的迁移效率。
3. 迁移索引
Logstash会帮助用户自动创建索引,但是自动创建的索引和用户本身的索引会有些许差异,导致最终数据的搜索格式不一致,一般索引需要手动创建,保证索引的数据完全一致。
以下提供创建索引的python脚本,用户可以使用该脚本创建需要的索引。
create_mapping.py文件是同步索引的python脚本,config.yaml是集群地址配置文件。
注:使用该脚本需要安装相关依赖
yum install -y PyYAML
yum install -y python-requests
拷贝以下代码保存为 create_mapping.py:
importyaml
importrequests
importjson
importgetopt
importsys

defhelp():print"""
    usage:
    -h/--help print this help.
    -c/--config config file path, default is config.yaml

    example:
    python create_mapping.py -c config.yaml
    """defprocess_mapping(index_mapping,dest_index):print(index_mapping)# remove unnecessary keysdelindex_mapping["settings"]["index"]["provided_name"]delindex_mapping["settings"]["index"]["uuid"]delindex_mapping["settings"]["index"]["creation_date"]delindex_mapping["settings"]["index"]["version"]# check aliasaliases =index_mapping["aliases"]foralias inlist(aliases.keys()):ifalias ==dest_index:print("source index "+dest_index +" alias "+alias +" is the same as dest_index name, will remove this alias.")delindex_mapping["aliases"][alias]ifindex_mapping["settings"]["index"].has_key("lifecycle"):lifecycle =index_mapping["settings"]["index"]["lifecycle"]opendistro ={"opendistro":{"index_state_management":{"policy_id":lifecycle["name"],"rollover_alias":lifecycle["rollover_alias"]}}}index_mapping["settings"].update(opendistro)# index_mapping["settings"]["opendistro"]["index_state_management"]["rollover_alias"] = lifecycle["rollover_alias"]delindex_mapping["settings"]["index"]["lifecycle"]print(index_mapping)returnindex_mapping
defput_mapping_to_target(url,mapping,source_index,dest_auth=None):headers ={'Content-Type':'application/json'}create_resp =requests.put(url,headers=headers,data=json.dumps(mapping),auth=dest_auth)ifcreate_resp.status_code !=200:print("create index "+url +" failed with response: "+str(create_resp)+", source index is "+source_index)print(create_resp.text)withopen(source_index +".json","w")asf:json.dump(mapping,f)defmain():config_yaml ="config.yaml"opts,args =getopt.getopt(sys.argv[1:],'-h-c:',['help','config='])foropt_name,opt_value inopts:ifopt_name in('-h','--help'):help()exit()ifopt_name in('-c','--config'):config_yaml =opt_value

    config_file =open(config_yaml)config =yaml.load(config_file)source =config["source"]source_user =config["source_user"]source_passwd =config["source_passwd"]source_auth =Noneifsource_user !="":source_auth =(source_user,source_passwd)dest =config["destination"]dest_user =config["destination_user"]dest_passwd =config["destination_passwd"]dest_auth =Noneifdest_user !="":dest_auth =(dest_user,dest_passwd)print(source_auth)print(dest_auth)# only deal with mapping listifconfig["only_mapping"]:forsource_index,dest_index inconfig["mapping"].iteritems():print("start to process source index"+source_index +", target index: "+dest_index)source_url =source +"/"+source_index
            response =requests.get(source_url,auth=source_auth)ifresponse.status_code !=200:print("*** get ElasticSearch message failed. resp statusCode:"+str(response.status_code)+" response is "+response.text)continuemapping =response.json()index_mapping =process_mapping(mapping[source_index],dest_index)dest_url =dest +"/"+dest_index
            put_mapping_to_target(dest_url,index_mapping,source_index,dest_auth)print("process source index "+source_index +" to target index "+dest_index +" successed.")else:# get all indicesresponse =requests.get(source +"/_alias",auth=source_auth)ifresponse.status_code !=200:print("*** get all index failed. resp statusCode:"+str(response.status_code)+" response is "+response.text)exit()all_index =response.json()forindex inlist(all_index.keys()):if"."inindex:continueprint("start to process source index"+index)source_url =source +"/"+index
            index_response =requests.get(source_url,auth=source_auth)ifindex_response.status_code !=200:print("*** get ElasticSearch message failed. resp statusCode:"+str(index_response.status_code)+" response is "+index_response.text)continuemapping =index_response.json()dest_index =index
            ifindex inconfig["mapping"].keys():dest_index =config["mapping"][index]index_mapping =process_mapping(mapping[index],dest_index)dest_url =dest +"/"+dest_index
            put_mapping_to_target(dest_url,index_mapping,index,dest_auth)print("process source index "+index +" to target index "+dest_index +" successed.")if__name__ =='__main__':main()
配置文件保存为config.yaml:
# 源端ES集群地址,加上http://
source: http://ip:port
source_user: "username"
source_passwd: "password"
# 目的端ES集群地址,加上http://
destination: http://ip:port
destination_user: "username"
destination_passwd: "password"

# 是否只处理这个文件中mapping地址的索引
# 如果设置成true,则只会将下面的mapping中的索引获取到并在目的端创建
# 如果设置成false,则会取源端集群的所有索引,除去(.kibana)
# 并且将索引名称与下面的mapping匹配,如果匹配到使用mapping的value作为目的端的索引名称
# 如果匹配不到,则使用源端原始的索引名称
only_mapping: true

# 要迁移的索引,key为源端的索引名字,value为目的端的索引名字
mapping:
    source_index: dest_index
以上代码和配置文件准备完成,直接执行 python create_mapping.py 即可完成索引同步。
索引同步完成可以取目标集群的kibana上查看或者执行curl查看索引迁移情况:
GET _cat/indices?v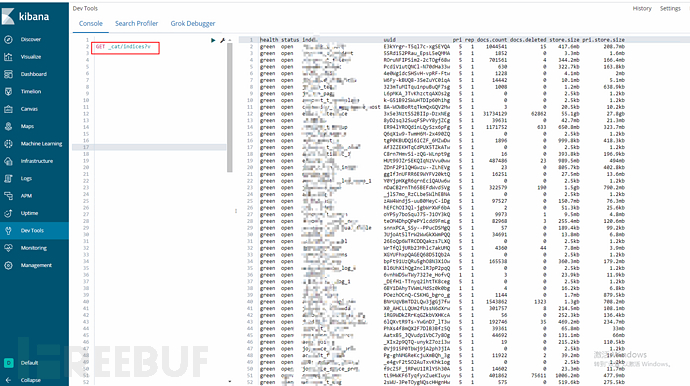
全量迁移
Logstash配置位于config目录下。
用户可以参考配置修改Logstash配置文件,为了保证迁移数据的准确性,一般建议建立多组Logstash,分批次迁移数据,每个Logstash迁移部分数据。
配置集群间迁移配置参考:

input{
    elasticsearch{
        # 源端地址
        hosts =>  ["ip1:port1","ip2:port2"]
        # 安全集群配置登录用户名密码
        user => "username"
        password => "password"
        # 需要迁移的索引列表,以逗号分隔,支持通配符
        index => "a_*,b_*"
        # 以下三项保持默认即可,包含线程数和迁移数据大小和logstash jvm配置相关
        docinfo=>true
        slices => 10
        size => 2000
        scroll => "60m"
    }
}

filter {
  # 去掉一些logstash自己加的字段
  mutate {
    remove_field => ["@timestamp", "@version"]
  }
}

output{
    elasticsearch{
        # 目的端es地址
        hosts => ["http://ip:port"]
        # 安全集群配置登录用户名密码
        user => "username"
        password => "password"
 # 目的端索引名称,以下配置为和源端保持一致
        index => "%{[@metadata][_index]}"
        # 目的端索引type,以下配置为和源端保持一致
        document_type => "%{[@metadata][_type]}"
        # 目标端数据的_id,如果不需要保留原_id,可以删除以下这行,删除后性能会更好
        document_id => "%{[@metadata][_id]}"
        ilm_enabled => false
        manage_template => false
    }

    # 调试信息,正式迁移去掉
    stdout { codec => rubydebug { metadata => true }}
}
增量迁移
预处理:
1. @timestamp 在elasticsearch2.0.0beta版本后弃用
https://www.elastic.co/guide/en/elasticsearch/reference/2.4/mapping-timestamp-field.html
2. 本次对于京办从金山云机房迁移到京东有孚机房,所涉及到的业务领域多,各个业务线中所代表新增记录的时间戳字段不统一,所涉及到的兼容工作量大,于是考虑通过elasticsearch中预处理功能pipeline进行预处理添加统一增量标记字段:gmt_created_at,以减少迁移工作的复杂度(各自业务线可自行评估是否需要此步骤)。
PUT _ingest/pipeline/gmt_created_at
{"description":"Adds gmt_created_at timestamp to documents",
  "processors":[{"set":{"field":"_source.gmt_created_at",
        "value":"{{_ingest.timestamp}}"}}]}
3. 检查pipeline是否生效
GET _ingest/pipeline/*4. 各个index设置对应settings增加pipeline为默认预处理
PUT index_xxxx/_settings
{
  "settings": {
    "index.default_pipeline": "gmt_created_at"
  }
}
5. 检查新增settings是否生效
GET index_xxxx/_settings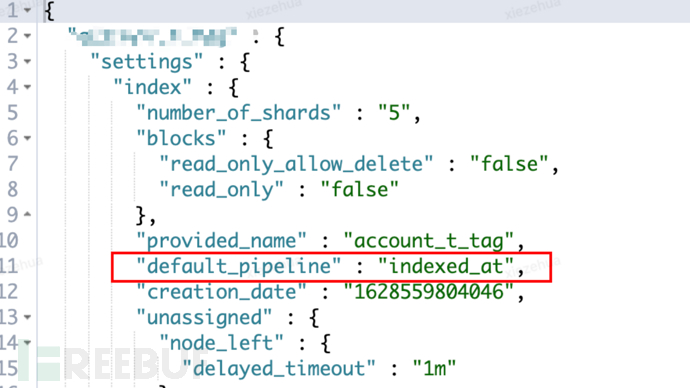
增量迁移脚本
schedule-migrate.conf
index:可以使用通配符的方式
query: 增量同步的DSL,统一gmt_create_at为增量同步的特殊标记
schedule: 每分钟同步一把,"* * * * *"
input {elasticsearch {hosts =>["ip:port"]# 安全集群配置登录用户名密码user =>"username"password =>"password"index =>"index_*"query =>'{"query":{"range":{"gmt_create_at":{"gte":"now-1m","lte":"now/m"}}}}'size =>5000scroll =>"5m"docinfo =>trueschedule =>"* * * * *"}}filter {mutate {remove_field =>["source", "@version"]}}output {elasticsearch {# 目的端es地址hosts =>["http://ip:port"]# 安全集群配置登录用户名密码user =>"username"password =>"password"index =>"%{[@metadata][_index]}"document_type =>"%{[@metadata][_type]}"document_id =>"%{[@metadata][_id]}"ilm_enabled =>falsemanage_template =>false}# 调试信息,正式迁移去掉stdout {codec =>rubydebug {metadata =>true}}}问题:
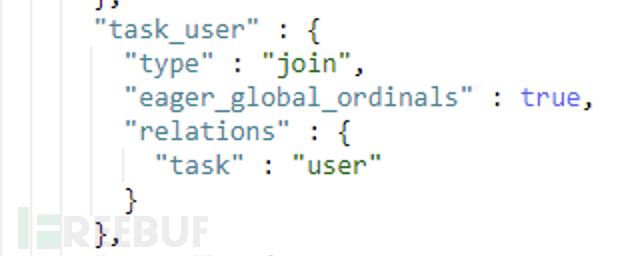
mapping中存在join父子类型的字段,直接迁移报400异常
[2022-09-20T20:02:16,404][WARN ][logstash.outputs.elasticsearch] Could not index event to Elasticsearch. {:status=>400,
:action=>["index", {:_id=>"xxx", :_index=>"xxx", :_type=>"joywork_t_work", :routing=>nil}, #<LogStash::Event:0x3b3df773>],
:response=>{"index"=>{"_index"=>"xxx", "_type"=>"xxx", "_id"=>"xxx", "status"=>400,
"error"=>{"type"=>"mapper_parsing_exception", "reason"=>"failed to parse",
"caused_by"=>{"type"=>"illegal_argument_exception", "reason"=>"[routing] is missing for join field [task_user]"}}}}}
解决方法:
https://discuss.elastic.co/t/an-routing-missing-exception-is-obtained-when-reindex-sets-the-routing-value/155140https://github.com/elastic/elasticsearch/issues/26183
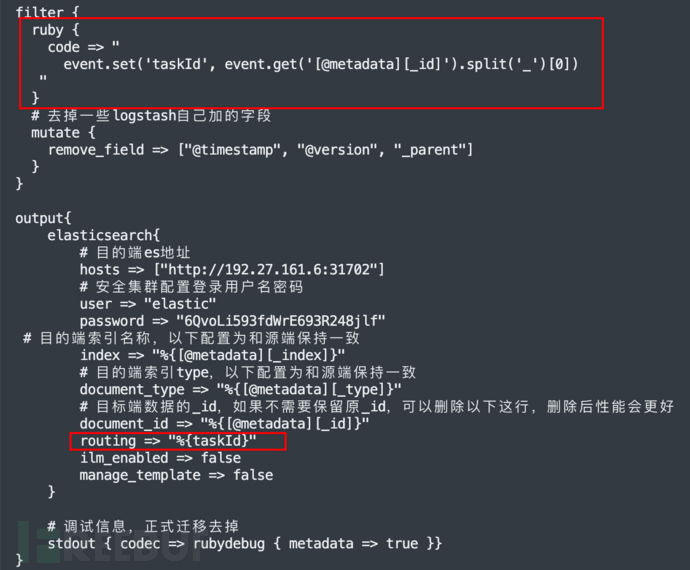
结合业务特征,通过在filter中加入小量的ruby代码,将_routing的值取出来,放回logstah event中,由此问题得以解决。
示例:
如需授权、对文章有疑问或需删除稿件,请联系 FreeBuf 客服小蜜蜂(微信:freebee1024)
- 0 文章数
- 0 关注者