关于Tarian
Tarian是一款针对Kubernetes云端应用程序的安全保护工具,该工具可以通过预注册可信进程和可信文件签名,保护在Kubernetes上运行的应用程序免受恶意攻击。Tarian能够检测未知进程和注册文件的更改,然后发送警报并采取自动操作,从而保护我们的K8s环境免受恶意攻击或勒索软件的侵扰。
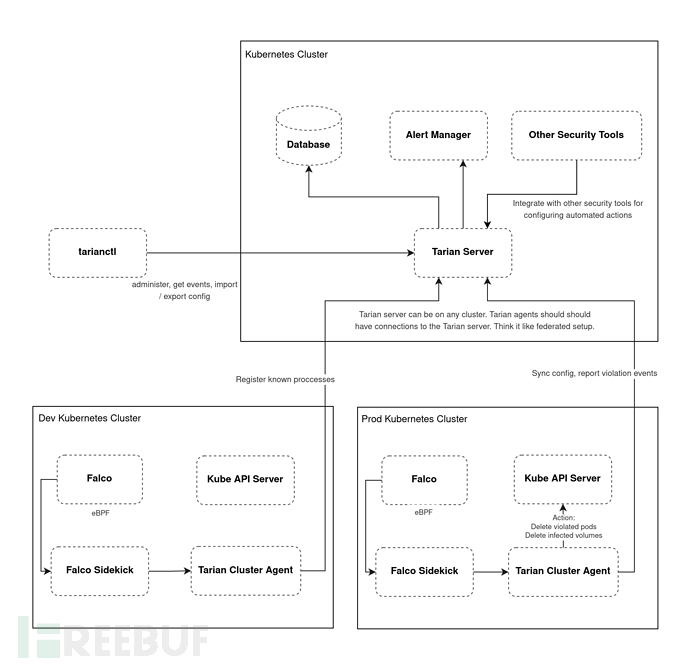
工具架构

工具要求
一个支持运行Falco的Kubernetes集群。
准备命名空间
kubectl create namespace tarian-system

kubectl create namespace falco
通过Tarian和自定义规则安装Falco
首先,将下列代码拷贝至falco-values.yaml中:
falcosidekick:

  enabled: true

  config:

    webhook:

      address: http://tarian-cluster-agent.tarian-system.svc:8088
接下来,使用Helm来安装Falco:
helm repo add falcosecurity https://falcosecurity.github.io/charts

helm repo update


helm upgrade -i falco falcosecurity/falco -n falco -f falco-values.yaml \

  --set-file customRules."tarian_rules\.yaml"=https://raw.githubusercontent.com/kube-tarian/tarian/main/dev/falco/tarian_rules.yaml
在GKE中,Falco将使用ebpf,因此我们还需要设置下列参数:
--set ebpf.enabled=true
设置一个Postgresql数据库
你可以将一个数据库以云端服务的形式使用,或者直接在集群中使用。比如说,我们可以通过下列命令在集群中安装数据库:
helm repo add bitnami https://charts.bitnami.com/bitnami


helm install tarian-postgresql bitnami/postgresql -n tarian-system \

  --set postgresqlUsername=postgres \

  --set postgresqlPassword=tarian \

  --set postgresqlDatabase=tarian
安装Tarian
首先,我们需要使用Helm来安装Tarian:
helm repo add tarian https://kube-tarian.github.io/tarian

helm repo update


helm upgrade -i tarian-server tarian/tarian-server --devel -n tarian-system

helm upgrade -i tarian-cluster-agent tarian/tarian-cluster-agent --devel -n tarian-system
接下来,等待所有的Pods就绪:
kubectl wait --for=condition=ready pod --all -n tarian-system
执行数据库初始化,并创建所有需要的数据库表:
kubectl exec -ti deploy/tarian-server -n tarian-system -- ./tarian-server db migrate
至此,工具安装就算完成了。
工具使用
使用tarianctl控制tarian-server
1、从该项目的【Release页面】下载Tarian;
2、提取文件并将tarianctl拷贝至本地目录中;
3、在设备上通过Ingress或port-forward功能开放tarian-server:
kubectl port-forward svc/tarian-server -n tarian-system 41051:80
4、使用env环境变量配置服务器地址:
export TARIAN_SERVER_ADDRESS=localhost:41051
查看违规事件
tarianctl get events
添加进程限制
tarianctl add constraint --name nginx --namespace default \

  --match-labels run=nginx \

  --allowed-processes=pause,tarian-pod-agent,nginx
tarianctl get constraints
添加文件限制
tarianctl add constraint --name nginx-files --namespace default \

  --match-labels run=nginx \

  --allowed-file-sha256sums=/usr/share/nginx/html/index.html=38ffd4972ae513a0c79a8be4573403edcd709f0f572105362b08ff50cf6de521
tarianctl get constraints
在一个pod中运行Tarian代理
metadata:

  annotations:

pod-agent.k8s.tarian.dev/threat-scan: "true"
kubectl apply -f https://raw.githubusercontent.com/kube-tarian/tarian/main/dev/config/monitored-pod/configmap.yaml

kubectl apply -f https://raw.githubusercontent.com/kube-tarian/tarian/main/dev/config/monitored-pod/pod.yaml


# wait for it to become ready

kubectl wait --for=condition=ready pod nginx


# simulate unknown process runs
kubectl exec -ti nginx -c nginx -- sleep 15
# you should see it reported in tarian
tarianctl get events
通知警报管理器整合
Tarian自带了Prometheus警报管理工具,如果你想使用其他的警报管理实例的话,可以使用下列命令:
helm install tarian-server tarian/tarian-server --devel \

  --set server.alert.alertManagerAddress=http://alertmanager.monitoring.svc:9093 \

  --set alertManager.install=false \

  -n tarian-system
项目地址
Tarian:【GitHub传送门】
参考资料
https://falco.org/docs/getting-started/
https://falco.org/docs/getting-started/third-party/production/
https://cloud.google.com/kubernetes-engine/docs/how-to/private-clusters#add_firewall_rules
https://join.slack.com/t/kube-tarian/shared_invite/zt-118iqu4g6-wopEIyjqD_uy5uXRDChaLA


